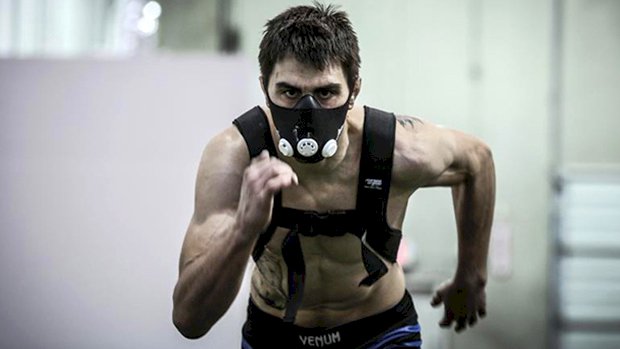
 When you’re seriously pushing the limits of your training, isn’t the simple act of breathing already hard enough without strapping a mask to your face that makes you breathe through a half-clogged garden hose? The oxygen deprivation or “altitude simulator” mask makes you look like the skinny-fat version of a Batman villain, but it can also do damage the cardiovascular system and breathing mechanics. It’s actually difficult to correlate studies that evaluated the efficacy of various forms of hypoxic training such as high elevation and closed chamber, oxygen-deprived rooms. The research is spotty on specifically using an oxygen deprivation mask itself, and it wouldn’t do any good to make ballpark comparisons with this style of training. The mask truly stands alone in its stupidity. With all the oxygen deprivation mask’s shortcomings, there was actually one meta-analysis that showed that training in an oxygen-deprived environment may have the ability to reduce waist circumference and effectively reduce arterial stiffness. I’m sure that’s exactly why so many Average Joes are strapping this thing to their faces while repping out supersets or running around the track. For their arterial health. Bad Posture and Deep Breathing Something I often see in my clinical practice is an alarmingly-high rate of dysfunctional, and sometimes even painful, breathing patterns directly attributed to posture or a lack of it. Posture with increased kyphotic spine positions, internally rotated and protracted shoulders, and a forward head position predispose our respiratory muscles to overexertion on a frequent basis. And this debilitating postural cycle is just when we’re sitting still. Think about what happens as we include training volume, intensity, and exercise choice into the equation. Posture obviously has a major carryover into training and performance, and it can actually predispose certain regions of the body, such as the lumbar spine and shoulder region, to increased rates of injuries. Using an oxygen deprivation mask with an individual who already has dysfunctional posture and poor mechanical breathing patterns is a recipe for disaster. Take Off the Mask In a society that “likes” social media pictures of NFL pros and MMA stars hitting the treadmill wearing this dysfunctional gimmick, I challenge you to break away from the crowd. Master your posture, enhance your breathing strategies and techniques, and only then might you even begin to think about taking the next step to train in a legitimate hypoxic
Origin: Tip: Ditch the Oxygen Deprivation Mask
3 Ways to Control Insulin and Get Jacked
 Here’s what you need to know… Insulin is an anabolic hormone. Some people think that it only causes fat storage, but it also increases muscle growth. Insulin sensitivity in muscle is key. It will allow you to build more muscle and get lean. Exercise, diet, and certain supplements can improve insulin sensitivity. Two weeks is all it takes to start seeing benefits. Insulin gets a bad rap, but it’s simply a hormone the body makes in response to the food we eat. It can either help us store the energy we get from food in muscle cells (good) or in fat cells (not good). The more muscle you have –and the more insulin sensitive that muscle is –the greater capacity you’ll have to store muscle glycogen. Ideally, you’ll store more of what you eat as muscle while also getting leaner, i.e. reducing the amount of fat you’re storing. Impossible? Nope, you can change your body composition by changing your insulin sensitivity. And you can change your insulin sensitivity with these three tools. 1 – How to Control Insulin with Food Insulin regulates our metabolism and is released in greatest amounts when we eat. This is to our benefit depending on when, what, and how we’re eating. Some think that avoiding carbs is the key to leanness, but cutting them altogether makes muscle glycogen synthesis more difficult. And if you play sports or care about your lifting performance, then it’ll keep you from maximizing your potential. Carbs are a fast acting bioenergetic fuel source. Sure, an unnecessarily high carb intake throughout the day isn’t without consequence. It may even make you more insulin resistant depending on how excessive it is. Instead, consume the majority of your carbs around the time of your workout when you’ll need and use them most. Get Adequate Fiber, But Not Around Workouts: Increased fiber intake has been shown to have blood glucose lowering effects and may increase total body insulin sensitivity. The only caveat? Don’t have your high fiber meal around workout time. That’s when you’d want to have a greater insulin spike so that your workout nutrition can be directed to your muscle cells. Eat Slower: Multiple studies have shown that faster eaters are also more insulin resistant. These studies even accounted for factors like genetic predisposition, BMI, caloric intake, waist circumference, and triglyceride levels. Fast eating has been linked with obesity and it’s believed that speed eating makes it more difficult for your appetite suppressing hormones to take effect, which ultimately affects insulin’s ability to do its job. 2 – How to Control Insulin with Exercise Exercise is the antidote for raising insulin sensitivity in muscle cells. Studies show that a single workout can increase your insulin sensitivity for at least 16 hours post training. Both strength training and conditioning have been shown to make significant improvements to our insulin sensitivity in a short amount of time. Strength Training: Researchers have found that both insulin sensitivity and glucose uptake capacity in muscles increases with resistance training. Storing glycogen in the muscle cells is a gift that keeps on giving. As you train, you use your muscles, they use up the glycogen, you burn more total calories, and then when you eat you replace that depleted glycogen with more energy for later use. Add some glycogen-depleting finishers to your normal strength training: Timed kettlebell swings, snatches, clean and jerks CrossFit WODs Supersets Circuit training AMRAP (as many reps as possible) bodyweight exercises Conditioning: Both long, slow cardio and fast, intense cardio have their place in improving insulin sensitivity. And the improvements come quickly. One study showed that just two weeks of high intensity exercise (4-6 sets of 30 second sprints) made subjects significantly improve their insulin sensitivity. Researchers have found that aerobic exercise (in the zone-2 cardio range, 65-75 percent of VO2 Max) has been shown to improve insulin sensitivity. Their studies show that this happened through the activation of AMPK (AMP activated protein kinase), an enzyme involved in glucose and lipid metabolism. Likewise, high intensity exercise (greater than 80 percent of VO2 max) has been shown to improve insulin sensitivity and lower blood glucose for up to 1-3 days post exercise. Try intervals with these for a high intensity insulin sensitivity boosting workout. Incorporate 5 sets of 30 second intervals a few times a week into your program. Hill sprints Prowler pushes Jump rope Rowing ergometer Battling ropes 3 – How to Control Insulin with Supplementation You can also improve insulin sensitivity with proper supplementation. Although these substances can be found in food sources, it’s easier to get a potent and condensed source from supplementing. In fact, you may not even get the benefits without using a concentrated supplement. Cyanide 3-Glucoside: C3G comes from a powerful chemical from nature called anthocyanin. It’s
Origin: 3 Ways to Control Insulin and Get Jacked
How to Keep Muscle During a Layoff
 Here’s what you need to know… Don’t panic. You won’t lose muscle if you take a week off from training. After a three-week break, you might lose 5-10% of your strength mostly due to lost neural adaptations. After three weeks, it’s possible to lose muscle mass, but there are ways to mitigate the loss. You don’t gain strength by deloading. You reveal the strength you gained during your hard training cycle. Fatigue masks fitness. Deloads reveal it. People notice overtraining when they start to lose strength and body weight, so their normal reaction is to train more, making things worse. Time Off: Planned and Unplanned There are three situations where a serious lifter would take time off from training: A planned deload to help reach peak performance or to recover from overtraining. A short planned break (vacation or trip). An unplanned layoff (sickness or injury). Deloading and hiatuses from training are part of everybody’s life. While it’s my job to help people get the most out of their training, it’s also part of my job to help them retain most of their gains when they’re forced out of the gym. Here’s my take on all three: 1 – A Planned Deload Deloading prior to a competition or before trying to hit a new PR It’s a common approach to include a deloading period prior to a competition or “gym test.” The theory is that you impose a large stress on your body with 2-3 weeks of hard training, then you include 4-10 days of reduced training or active rest. This is called a taper. During the taper, several markers of performance go up: Testosterone peaks (it’s normal for it to get low during high-stress training). The nervous system gets back to optimal function (as evidenced by a marked increase in grip strength tests 3-4 days into the taper). Super-compensation of glycogen stores occur and the body stores more water inside muscles and less subcutaneously (possibly indicative of lower cortisol). You’re left with a body that’s primed to function at its best. You don’t gain extra strength by tapering/deloading for a peak. You’re simply revealing the strength you gained during your hard training cycle. Fatigue masks fitness. When you accumulate a certain degree of systemic fatigue, you might only be able to function at 90 or even 80% of what you’re capable of. The thing is, once you’re past the beginner stage, you must train at a level that will cause some accumulated fatigue to stimulate further gains in strength and size, and the harder you train to make gains, the more fatigue you build up. So, during a hard cycle you might be able to gradually add some weight to the bar (making you believe that you aren’t plagued by fatigue), but the results you see in the gym and in your body are inferior to the real gains you’re making, because fatigue masks your true level of fitness. So, why not avoid accumulated fatigue altogether? If you’re training hard enough to get optimal gains it will lead to a certain level of accumulated fatigue. If you aren’t building up a certain level of fatigue, then you aren’t imposing a stimulus strong enough to force the body to adapt. Important: Don’t stop lifting during a taper. Sure, not training at all will help you recover faster, but it would be at the expense of timing and neural activation. When I competed in Olympic lifting, I performed the most poorly when my coach had me do a taper where I wouldn’t train at all 4-5 days prior to the competition. I lacked timing and felt out of the groove and not fully focused. Don’t spend more than one day without touching a bar when trying to maximize performance, even if it’s only light training to stay in the groove. Application: During the taper we do the following: Drop all assistance work, only doing the 3 main lifts. Drop training frequency to 3 times during the week: Monday, Tuesday, Thursday, and test on Saturday. Perform the 3 lifts at each session, using submaximal weights. Monday: 70% for 3 sets of 3 Tuesday: 90% for 3 sets of 1 Thursday: 80% for 3 sets of 2 Saturday: Test Increase Plazma™ intake during the taper to promote a maximum anabolic rebound, despite a lower volume of training: 2 servings pre-training, 1 serving during training, 1 serving 30 minutes post-training, and 1 serving 60 minutes post-training. One serving of Mag-10® 15 minutes before every meal. Increase caloric intake by about 25%. Most people make the mistake of decreasing calories when they taper. They think that since they’re training less, they need less fuel. They’re also afraid of gaining some fat if they eat more while training less. This is the best way to miss your peak! The goal of the taper is to get rid of any fatigue you might have that could mask your fitness. By eating less you risk slowing down your recovery. Deloading to recover from overtraining A certain amount of accumulated fatigue is normal when training hard toward a goal, but we don’t want this to turn into an overtraining situation. When it happens you need to get out of that
Origin: How to Keep Muscle During a Layoff
Tip: Your Fitness Tracker Sucks
![]() Since fitness trackers and smart watches have become popular, several bloggers have attempted to test their accuracy. Most have noticed the same thing: these suckers just aren’t very accurate. When the bloggers wore several of the gadgets at once, the devices all gave them different readings when it came to heart rate, steps taken, calories burned and other metrics. Not good. These were just regular folks doing the testing, but now science has stepped up to really put these devices through their paces when it comes to two important metrics: heart rate and energy expenditure (calories burned.) The Study In a Stanford University Medical Center study, researchers recruited 60 volunteers to test out several devices in a lab setting. The subjects wore up to four devices at the same time and did various activities such as walking, running, cycling and even just sitting. They were also hooked up to “gold standard” lab instruments that measure heart rate and energy expenditure. The idea was to compare the mass market gadgets to the super-accurate lab instruments. The Results For heart rate, most of the fitness trackers did okay. The Apple Watch had the lowest error rate (2%) while the Samsung Gear S2 had the highest error rate (6.8%). But that’s close enough for non-medical purposes. The problem was in the “calories burned” or energy expenditure readings. They all sucked: No device achieved an error rate in energy expenditure below 20%. The most “accurate” device was off by an average of 27%. The least accurate was off by 93%. The error rate was worse for males and those with darker skin tones. The Apple Watch had the most favorable overall error profile while the PulseOn had the least favorable overall error profile. Here’s an overview: Apple Watch: Not as shitty Basis Peak: Still kinda shitty Fitbit Surge: Pretty darn shitty Microsoft Band: Super shitty PulseOn: The shittiest How to Use This Info Whatever you do, don’t adjust your training or diet based solely on what a wearable fitness gadget is telling you. When it comes to “calories burned” measurements, they’re grossly inaccurate. The algorithms stink and what you’re basically getting is a broad, educated guess. But if you’re absolutely determined to buy one, the Apple Watch looks like the best bet based on this study. Or you could use that inexpensive, highly-accurate fitness assessment tool you already own: a
Since fitness trackers and smart watches have become popular, several bloggers have attempted to test their accuracy. Most have noticed the same thing: these suckers just aren’t very accurate. When the bloggers wore several of the gadgets at once, the devices all gave them different readings when it came to heart rate, steps taken, calories burned and other metrics. Not good. These were just regular folks doing the testing, but now science has stepped up to really put these devices through their paces when it comes to two important metrics: heart rate and energy expenditure (calories burned.) The Study In a Stanford University Medical Center study, researchers recruited 60 volunteers to test out several devices in a lab setting. The subjects wore up to four devices at the same time and did various activities such as walking, running, cycling and even just sitting. They were also hooked up to “gold standard” lab instruments that measure heart rate and energy expenditure. The idea was to compare the mass market gadgets to the super-accurate lab instruments. The Results For heart rate, most of the fitness trackers did okay. The Apple Watch had the lowest error rate (2%) while the Samsung Gear S2 had the highest error rate (6.8%). But that’s close enough for non-medical purposes. The problem was in the “calories burned” or energy expenditure readings. They all sucked: No device achieved an error rate in energy expenditure below 20%. The most “accurate” device was off by an average of 27%. The least accurate was off by 93%. The error rate was worse for males and those with darker skin tones. The Apple Watch had the most favorable overall error profile while the PulseOn had the least favorable overall error profile. Here’s an overview: Apple Watch: Not as shitty Basis Peak: Still kinda shitty Fitbit Surge: Pretty darn shitty Microsoft Band: Super shitty PulseOn: The shittiest How to Use This Info Whatever you do, don’t adjust your training or diet based solely on what a wearable fitness gadget is telling you. When it comes to “calories burned” measurements, they’re grossly inaccurate. The algorithms stink and what you’re basically getting is a broad, educated guess. But if you’re absolutely determined to buy one, the Apple Watch looks like the best bet based on this study. Or you could use that inexpensive, highly-accurate fitness assessment tool you already own: a
Origin: Tip: Your Fitness Tracker Sucks
The Hormone Cycle and Female Lifters
 Here’s what you need to know… The menstrual cycle has a huge influence on a female’s metabolic state and training results. The follicular phase is when women should focus on progress. It’s characterized by a higher tolerance for pain and increasing levels of endurance. Insulin sensitivity is higher during the follicular phase. Her body will be more prone to using carbs to fuel muscle gains. During ovulation, high estrogen levels can make women more prone to injury. During the luteal phase, the female body will rely more on fat as a fuel source. Your Hormones Control You You work hard each and every time you hit the gym. You give 100% effort and make sure that you eat right. You think you’re doing everything right, but could there be something you aren’t even aware of diminishing your results? Each and every day, your hormones control you. You’re well aware that testosterone, the male predominant sex hormone, is responsible for making men more muscular, strong, and aggressive. But what about your hormones? As a woman, each month your body goes through a series of events known as the female menstrual cycle. What most women don’t realize, however, is the influence this cycle can have on your metabolic state and training results. Let’s look more closely at this issue and explain what’s going on. The good news is once you understand the ramifications of these hormones, you can cater your program to overcome them and even take advantage of them to further your training results. Your Cycle: A Refresher First, keep in mind we’re talking about premenopausal women who aren’t using oral birth control. Now, the start of your cycle begins immediately after you finish menstruating with the follicular phase, lasting from day zero to 14. This phase is characterized by increasing estrogen, normal progesterone, and an average body temperature. From there, you move into ovulation, which takes place around day 14. When this occurs, your estrogen level peaks and progesterone starts to increase. You’ll also notice you start to feel warmer. From day 15 to 28 of your cycle, you’ll enter the luteal phase where estrogen is declining, progesterone is increasing, and your body temperature remains higher than baseline. Menstruation then follows to start things off all over again. Now let’s talk about what you go through during each phase. The Follicular Phase: Eat Carbs and Train Harder When it comes to your workout sessions, the follicular phase – including the ovulation period – is when you should focus on progress. This phase is characterized by a higher tolerance for pain, the highest maximum voluntary force generation capacity, as well as increasing levels of endurance. Your body will also be more prone to utilizing muscle glycogen to fuel exercise during this stage, making high-carb workout nutrition critical. To add to this, your insulin sensitivity levels will be higher during this phase, so focus on higher carb phases or refeeds during intense, carb-depleting workouts. Your body will be more prone to using those carbs to fuel muscle gains. These intense workouts, coupled with metabolism-enhancing refeeds, will also help to counteract the decline in your resting metabolic rate that takes place during this time. One study published in the American Journal of Clinical Nutrition noted that basal metabolic rate decreased during menstruation and then proceeded to decline to its lowest point one week before ovulation took place. The Ovulation Phase: Go for a PR! During ovulation, your strength levels will still be high and you may notice the highest sheer force generation capacity during this phase. If you want to set a PR, now is the time to try. One study published in the Journal of Physiology noted that ovulating women showed an 11% increase in both quadriceps as well as handgrip strength. Take note, though, that you may also be at a higher risk of injury. As estrogen skyrockets to its highest point during this phase, it can impact collagen metabolism and also influence your neuromuscular control. It was noted in the American Journal of Sports Medicine that anterior cruciate ligament injury rates are four to eight times higher during this point in the cycle than in all other phases. So train hard at this time, but be especially careful about using good form and being mindful of fatigue build-up. Your metabolism will also be starting to climb at this point, so if you’re feeling a little extra hungry, understand that this may very well be why. Consider adding a few more calories to your diet to fuel this increase, but get those calories from a balanced mix of proteins, carbs, and fats as your insulin sensitivity is starting to decline. The Luteal Phase: Back Off on Lifting Intensity and Lose Fat Ever have workouts where it seems your body is just fighting you every step of the way? If so, chances are good it’s happening during your luteal phase. During the luteal phase, with your body temperature higher than
Origin: The Hormone Cycle and Female Lifters
21 Days to a Bigger Back
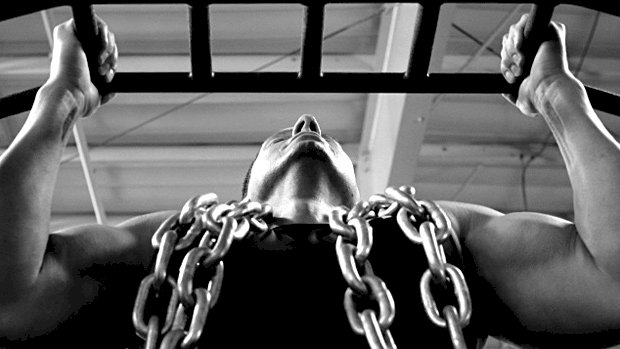 Here’s what you need to know… At a certain point you need specialization. The big basics are the foundation of physique development, but if your back is a weak point, you’ll need more than that. Hit it every training day. All you need is a couple of key exercises and a little patience. Use intensity techniques. Just don’t use the same ones all the time. No More Wimpy Backs To beef up a wimpy back, the first thing you have to do is get serious about fixing it. A machine-based routine won’t do, nor will any of the standard “chin-ups and rows once a week” programs. What you need is a plan that builds strength in both rowing and pull-up variations while gradually increasing the total volume through multiple training exposures per week. Start with a 3-week specialization block. It will deliver marked improvements in size and strength, provided you back off in week 4 and allow supercompensation to occur. The 3 Principles of Back Specialization 1 – Focus on big and basic. This isn’t the time to work on corrective drills to restore function – that should’ve already been taken care of. Instead, focus on big compound movements and weight-bearing rows. 2 – Share the load. Instead of having one day devoted to doing every row variation under the sun, try rotating horizontal and vertical pulls and rows throughout the week. Use a heavy weight for every variation rather than going balls-out for the first two exercises and then having to settle for less load during the subsequent exercises. So if you lift four times a week with two upper-body emphasis days and two lower-body, you could divide the variations over all four days to ensure that heavier loads can be used. Here’s an example: Workout Back Emphasis Exercise Suggestions Workout Back Emphasis Exercise Suggestions Day 1 Lower-Body Horizontal Weighted Inverted Horizontal Row Day 2 Upper-Body Vertical Horizontal Pull Down Heavy Face-Pull Day 3 Lower-Body Horizontal Bent-Over Dumbbell Row Day 4 Upper-Body Vertical Weighted Chin-Up Note: While the weight should always be challenging, the overall difficulty of the exercise for both vertical and horizontal movements can be rotated in a given week to prevent burn out. 3 – Don’t go through the motions. Get stronger. Get stronger in rowing and pull-up movements. Too many lifters use the same weight and rep/set scheme every week for their assistance exercises just to get a pump in their muscles without ever trying to get stronger. Then they wonder why they’re not building muscle. It’s a good idea when specializing to record the weights you’re using on all your back exercises to ensure you’re actually getting stronger. Back-Building Methods Weighted and Inverted Row with Back-Off Sets Inverted rows are a great horizontal pull variation for building a thicker back. Work up to a really heavy set of 5 reps and then take 85-90% of that weight and do 3-5 more sets of 5 reps. For example, say you hit 5 reps with 110 pounds of additional weight – two 45-pound plates and one 20-pound chain – for your heaviest set. For the next set, drop the weight down to 90-95 pounds and continue doing sets of 5 reps. If that gets too hard too soon, take 85% of that and get in more volume. This ensures that you don’t take off too much weight and cheat yourself of getting the most tension. The 5-Rep Max Chin-Up Workout First do 5 reps with bodyweight and then progressively add weight every set until you reach the heaviest load you can do for 5 reps. The goal is to get 5 or more quality sets in, so don’t load too much weight too soon. Rest 45-60 seconds between each set and try not to cheat much on your heaviest set, but still really challenge yourself. Max weight pull-up workouts are usually reserved for testing scenarios, but they’re also a great workout on their own that can be repeated for at least 3 weeks, usually resulting in phenomenal gains in both back strength and size. 6 Minutes of Rowing These are great to use on heavy squat day because they’re a little more low-back friendly than conventional bent-over barbell rows. Better still, if done correctly, there’s no need to perform any other row variation on the day they’re used. Pick two dumbbells that you feel like you could do 7 reps with and do a set of 5 reps. Then rest 30 seconds and do another set. Keep doing a set every 30 seconds for 6 straight minutes. As you go through the sets, you’ll inevitably have to drop the reps down to maintain the pace without dropping weight. By the end, you may only be doing 1 or 2 reps per set. The load and total volume is your priority, not the number of reps per set. A little cheating is permissible by the end but don’t get carried away. Your 3-Week Back Specialization Plan Day 1 – Lower Body: Strength Emphasis Exercise Sets Reps Load A Front Squat 6 3 85-90% 1RM B Reverse Lunge 3 6-8 C Split-Stance Romanian Deadlift 3 6-10 D1 Weighted Inverted Row 1 5 Max D2 Weighted Inverted Row (back-off sets) 3-5
Origin: 21 Days to a Bigger Back
Tip: Metabolic Brownies – The Best Recipe Ever
 Pumpkin is a great way to add a ton of moisture to your desserts without a ton of calories, and the flavor can be masked fairly easily. It doesn’t have to taste like pie or overpriced lattes. And sure, as lifters we can afford the extra calories, but wouldn’t it be nice to have a generous portion, one that actually fills you up, without topping out on your allotment for the day? You can with this. Metabolic Drive Protein Brownies Ingredients 1 can of pumpkin, 16-ounces (not pumpkin pie filling) 1 cup chocolate Metabolic Drive® Protein (or 3 heaping scoops) 1 cup Splenda 2 tablespoons unsweetened cocoa powder 1/4 teaspoon salt 1/4 teaspoon baking soda A pinch of coarse ground salt Option: Nuts or seeds to sprinkle on the top Directions Preheat the oven to 350. Mix all the ingredients together. Get a medium-sized pan. (I use a round 9-inch cake pan.) Spray it with coconut oil, then dust it with protein powder to keep the brownies from sticking. Spoon the batter into the pan and distribute evenly. Lightly sprinkle the top with nuts or seeds (if using) and the course ground salt. Bake for about 18-20 minutes or until done. Cut it into 6 pieces, and enjoy! Nutritional Information Per Slice Calories:88 per slice, without nuts/seeds Fat:1 gram Carbs:9 grams Protein:11 grams
Origin: Tip: Metabolic Brownies – The Best Recipe Ever
5 Things Natural Lifters Can Learn From Pros
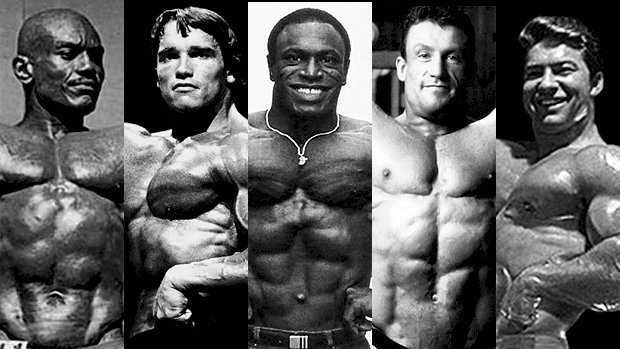 Should You Train Like a Pro Bodybuilder? Yes… and no. Blindly following the training of top bodybuilders might not work well for an average person training naturally. The physiology of both types of athletes just isn’t the same: Bodybuilders that use performance enhancing drugs have an elevated level of protein synthesis. Not so with natural lifters. The natural guy has to trigger protein synthesis with his workout, while the enhanced bodybuilder uses his workout mostly to drive nutrients to the muscles to take advantage of the elevated protein synthesis. The high level of anabolic hormones used by the pros can counterbalance an excessive increase in cortisol. In the natural bodybuilder, excessive cortisol release will not only kill protein synthesis, but will also trigger the expression of the myostatin gene, either of which will halt any possible muscle growth. Anabolic steroids increase glycogen storage and thus negate or prevent glycogen depletion. Glycogen depletion in itself is very catabolic and natural trainees are more at risk. Because of these differences, enhanced bodybuilders (especially if they have good genetics on top of all that) can tolerate more volume and can respond better to lighter “pump” work. They can also train a body part less frequently. But despite these differences, the top bodybuilders often come up with important parts of the muscle growth puzzle, and these elements can and should be used by natural lifters. Here’s what you can take away from some of the top Mr. Olympia champions: 1 – Larry Scott, Training Density Scott was the pupil of the great Vince Gironda, a man who was decades ahead of his time. Both Gironda and Scott were true thinkers and tinkerers, inventing several variations of exercises to make them more effective at isolating the desired muscle. However, their most important contribution was the emphasis on training density – doing hard work with very short rest periods. Having a high density of training (short rest periods) while still lifting heavy is one of the most powerful growth triggers. That’s one of the reasons why I like clusters, multi-rep clusters (2-2-2-2-2-2 or 3-3-3-3-3-3) and rest/pause sets. At first your performance will drop, but you can train yourself to be more resilient and stay strong even with short rests. The benefits of high density training (while staying with reasonably heavy weights) are mostly in the body composition department – it will help you get leaner while adding on muscle. The benefits to the cardiovascular system are also important, since good health is actually the cornerstone of muscle growth and fat loss. If you want to make crops grow, you can have the best fertilizers and use the best farming methods, but if the soil is poor you’ll have lousy growth. It’s the same with muscle. A healthier body will progress faster. As an example, adding muscle (naturally) without a healthy cardiovascular system to support it is virtually impossible because the added muscle poses a threat to survival! 2 – Sergio Oliva, Explosive Lifting Before being the first truly freaky bodybuilder, Oliva was an international level Olympic lifter for Cuba. His upper back and forearms can certainly attest to that. Much of his physical foundation was built on the Olympic lifts and heavy pulls. While you might not have to learn the Olympic lifts to benefit from them, explosive pulls like snatch-grip high pulls, push presses, and heavy Olympic deadlifts will really help a natural lifter build a thick back and shoulders. Other great bodybuilders enjoyed doing the Olympic lifts from time to time, Robbie Robinson and Mike Mentzer being two of them. The benefit of explosive pulls is an improved neural efficiency that will translate into better/earlier fast twitch muscle fiber recruitment. If you develop the capacity to recruit the fast twitch fibers earlier in the set, it means that you’ll fatigue/stimulate them sooner and with fewer reps. Additionally, you’ll burn less glycogen to get the job done. That means more glycogen for more growth. On a side note, the more efficient you are at recruiting the fast twitch fibers, the fewer reps you can do at a given percentage of your max. But that isn’t a bad thing. Quite the contrary! It simply means that by being better at hitting the money fibers, you provide the same stimulation without causing as much fatigue (glycogen and neurotransmitter depletion). These big explosive lifts also have the benefit of increasing muscle hardness and density. 3 – Arnold Schwarzenegger, Training Frequency Arnold was known for burying his training partners. He’s one of the rare exceptions that possessed an extremely resilient nervous system and a fiber type that allowed him to be really strong, yet have amazing set-to-set endurance. He also had a pain threshold second to none. Arnold was one of the rare people who could hit failure on 2 or 3 sets of an exercise and then proceed to make his fifth set the best one. He
Origin: 5 Things Natural Lifters Can Learn From Pros
5 Self-Improvement Tips for Lifters
 The Question How can T Nation readers improve their lifestyles to become even more awesome than they already are? Give them something to try for the next week. David Otey – Strength and Conditioning Specialist Shift your bedtime forward by an hour. Different hours of the day are more productive than others. A one-hour shift in your day can give you a more productive hour that normally would’ve been squandered watching TV, eating unwanted snacks, or trolling the internet. So try this: Move up your bedtime by 60 minutes, then wake up 60 minutes earlier. For example, if you usually go to bed at 10:30 PM and wake up at 6:00 AM, try going to bed at 9:30 PM and waking up at 5:00 AM. Here’s an example of how to use that time: Prepare healthy food for the day. Get to the gym before the rush. Get your ab work done if you don’t already do it. Add in that cardio work you’ve been putting off. Getting one hour back in your day means you’ll be getting 7 hours back over the course of the week. It’s a shift from wasting time to making time. – David Otey Dan John – Strength Coach and Performance Expert Seek the middle ground. Create a routine. Get organized. Seek the Middle Ground I used to work with a guy, Phil, who did something interesting. During Lent, he gave up his health. He was one of those guys who combined yoga with meditative movements from every corner of the world, drank cocktails made of frog bile and various magic herbs and oils, and spent lots of time on his little rug balancing rocks. But, every spring, he stopped all of it. He ate doughnuts, drank coffee, and smoked cigarettes. He stopped doing everything healthy. When Easter came around, he told me he couldn’t wait to get back to his ascetic lifestyle. It never made sense to me. But, like the Atkins Diet, spending a few weeks emphasizing one thing after years of doing the opposite seems to help. So, on some level, I understand it. The only issue is that it goes against the thousands of years of Western tradition. Achilles’ search for “Arete,” striving for virtue that will last well beyond your lifetime, is based on understanding that “somewhere in the middle” of the extremes is the road we seek. Many people I work with are actually just like Phil. They just live on another extreme. They focus on a thousand things at once, answer every ping from the phone, scroll through social media for hours, try every diet and supplement idea all at once and leave everything in life unfinished, cluttered, and messy. And that brings us to the next point. Get Organized I have a new piece of advice for personal trainers working with new clients trying to lose fat: Walk with him or her out to the parking lot and look in the backseat of their car. Nearly universally, the backseat is a mess. Fast food bags, clothes, crap, and God knows what cover most of the seating area. If the backseat is cluttered, the car is cluttered, and this person’s life is cluttered. And the car smells of old McDonald’s French fries. You know that smell. And, yes, this might sound simplistic but the secret to fat loss is cleaning the backseat of that car. Stick with me here. The mind will struggle to focus on something as difficult as fat loss if everything is a mess. Significant fat loss is one of the MOST difficult things you can do without surgery, and a chaotic environment will make it even harder. Set a Routine Establish a bedtime. Two hours before, set the coffee maker (or whatever) for half an hour before your alarm clock. Take your supplements and medications. I take fish oil, vitamin D, and magnesium. Make your “to do” list for the following day. If you can eliminate one or two items (fill out a form, send an email, etc.) do it. Then if you’re a messy car person, here’s what to do every day for the next week: Day 1:Clean and declutter the backseat of the car. Day 2:Clean and declutter the glove box, the little wells in the driver and passenger seats, and the general front area of the car. Day 3:Open the trunk, if you dare, and clean it up. Put away all the stuff you should have put away years ago. Day 4:Clean and declutter your bathroom. Day 5:Declutter your clothes. Donate things you don’t wear. Day 6:Clean and declutter your fridge. Day 7:Open your computer and reorganize your folders. Put things where they belong. Add new folders and clean up the mess. Every minute decluttering seems to clear the mind more and more. As I type this, I noticed that my desktop needs a quick sweep; thirty seconds later, my mind is clearer and more laser focused. To quote the greatest philosopher of our times, Barney Stinson: “Challenge accepted.” – Dan John Chris Albert – Trainer, Gym Founder, Marine Corps Vet Take gratitude to the extreme for one week. We hear about people keeping gratitude journals these days. In them they write down three things that they’re grateful for every morning. The idea there is that, if you reflect on gratitude, you’ll have a more positive mindset and it will carry
Origin: 5 Self-Improvement Tips for Lifters
Tip: 3 Strength Training Mistakes to Avoid
 Strength Basics Getting stronger is pretty simple when you break it down. If you’re doing basic, whole-body compound movements like squatting, hinging (deadlifting etc.), pushing, pulling, and carrying heavy objects, then you’re on the right track. Unfortunately, there are a lot of people out there selling gimmicky programs and exercises that will make you anything but strong. To help you reach your goals and make sure you’re not wasting your time on someone else’s BS, don’t make these mistakes. Mistake 1 – Overcomplicating Exercises When it comes to compound movements, simple is generally better. Holding a kettlebell by the handle overhead with one arm as you do a horizontal banded press with the other arm while standing on one foot on an unstable surface is not “achieving core activation, balance, and coordination.” It’s just making you look like a douchebag. Being a functionally strong human being requires that your muscles work together to lift or resist an external load. If you’re trying to do too many things at once, your body won’t be able to recruit the necessary motor neurons to get your muscles to synergistically fire. If your body can’t get an appreciable amount of muscle involved to lift or resist an external load, then you won’t get strong. It really is as simple as that. Picking simple compound movements like the back squat, trap-bar deadlift, pull-up, and press – and doing them with a lot of weight – will make you infinitely stronger than doing combined exercises such as lunging while doing curls. Trying to do multiple movements in one exercise is like a baseball pitcher thinking he needs to take up juggling in order to throw the ball harder. Confusing your body arbitrarily doesn’t mean you’re getting any closer to achieving your goal. Mistake 2 – Doing Too Much Isolation Work If you’re a natural lifter, you need to start seeing your body as one unit instead of a lot of individual parts. If you’re the person who does chest/triceps on Mondays, legs on Tuesdays, and back/biceps on Fridays, you’re probably not seeing the results you’d like see. It’s not from a lack of effort, but from a lack of good strategy and programming. You’re in a weird situation where you’re both doing too much work and not nearly enough work at the same time. Performing ten different chest exercises for 3-5 sets each on Monday is too much volume that day (if you’re not juicing). At the same time, you’re doing nothing with the chest the rest of the week, so it’s not being worked frequently enough. If you’re on this type of program, your progress is going to stall out quickly. Instead, try to do whole-body lifts three times per week. Not sure where to start? Use the 3 day per week template below. This program will have you doing five exercises per day and will allow you to train your body frequently enough to get some results. You’ll squat, hinge, lunge, push, pull, and carry heavy objects – all the stuff that makes a person strong. Day 1 A1 Back Squat:5×5 A2 Dumbbell Bench Press:5×8 A3 1-Arm Dumbbell Row:5×10 B1 Farmer’s Walk:3×20 yards B2 Pallof Press: 3×10 each side Day 2 A1 Standing Barbell Strict Press:5×5 A2 Pull-Up:5×8 A3 Step-Back Lunges:5×8 each B1 Waiter’s Carry: 3×20 yards B2 Hanging Knee Raises:3×10 Day 3 A1 Trap Bar Deadlift:3×5 A2 Incline Dumbbell Bench Press:5×8 A3 Chest-Supported Row:5×10 B1 Suitcase Carry (a farmer’s walk carrying weight only on one side):3×20 yards B2 Cable Chop: 3×10 each side Mistake 3 – Using Percentage Training (If You’re a Newbie) When you’re just starting out, using a program based off a percentage of your one rep max is a mistake. Asking strong guys what program they’re doing can help you with your goals, but only if you have a similar training background. If you’re a beginner and the person you’re asking recommends a program based off a percentage of your 1RM, you should probably find a new program. New lifters shouldn’t be basing anything off of a one rep max because they don’t have the experience to perform a true 1RM. The first couple of weeks when you begin a weight training program are some of the most fun weeks you’ll ever have. You’ll make tremendous progress because you’re learning to recruit motor neurons to carry out new movement patterns. The strength gains you make for the first 4-8 weeks will come in leaps and bounds, so you shouldn’t be limiting yourself by basing your program off of the perceived 1RM you could do on day one. Instead, try to work up to a weight that causes you technical failure: go as heavy as you can until your technique starts to break down. Do this for approximately 6 months to a year as you vary your exercises and rep ranges. Adopt a program based on percentages AFTER you’ve become proficient at your
Origin: Tip: 3 Strength Training Mistakes to Avoid
