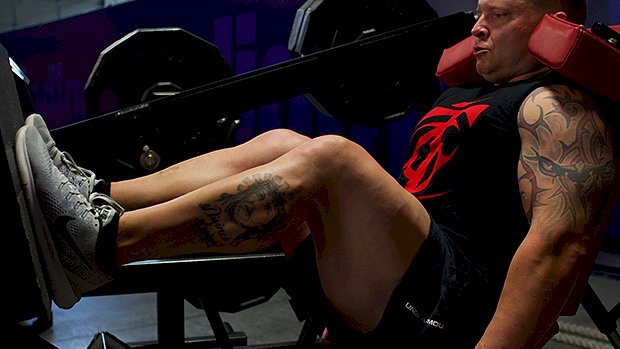
 On leg day, after your squats and lunges, a machine exercise like the leg press can add direct quad training volume without accumulating a lot of systemic fatigue. Foot placement matters for muscle activation but not at the cost of joint pain or lost range of motion. Knee-dominant exercises will always be quad dominant so any foot position used for this will train your quads effectively. Start by placing your feet narrow and lower on the press platform, but work higher and or wider if this allows better range of motion or eliminates joint pain. Maintain a strong foot arch while externally rotating the hips to keep your knees from collapsing inward. Keep your core flexed and rigid. Descend to the fullest range of motion available without allowing your hips to lift from the seat and causing your back to round. Don’t ego-lift and micro-rep like a jackass. Avoid a hard lockout at the top to avoid injury. Use a load which allows 12-15 reps to hit failure. This brings intensity, volume, mechanical tension, and metabolic stress into play. Drop set the last set 1-3 times for added destruction. If your leg press is occupied, swap it out for the hack squat machine. The same principles
Origin: Tip: Master the Leg Press
Tag: Tip:
Tip: How to Peak for a Powerlifting Meet
 Does Supercompensation Work? A lot of the information you read about peaking for a competition revolves around “supercompensation.” You dramatically increase training volume and intensity for 7-14 days then, one week out from the competition, you bring training stress way down and increase carbs to supercompensate. This leads to an increase in performance. Sounds sciency and smart. But does it really work? Well, it depends. If you’re an endurance athlete, it might. It seems to work pretty well for swimmers. But if you’re a strength athlete, it won’t do anything. It’ll give the illusion of working, but it really doesn’t. Here’s Why First, when we talk about supercompensation we’re really talking about increasing glycogen storage in the muscles. The theory? By dramatically increasing training volume and reducing carb intake, the body will upregulate the enzymes responsible for storing glucose. When you flood your body with tons of carbs and reduce volume for 3-7 days before an event, the body will store more glycogen than it normally would if you had not done things to “deplete” it. In theory, by storing more glycogen (supercompensation) you have more fuel available for your event and you’ll perform better. This can work if your sport is dependent on the amount of stored glycogen you have. Endurance sports might benefit from higher glycogen storages, and glycolytic sports certainly would. But strength sports like powerlifting and weightlifting are not at all dependant on glycogen stores for performance since the main fuel in these sports is ATP-CP. While glycogen supercompensation might help the bench press and possibly the squat by providing an increase in passive joint stability – as noted in Question of Strength 58 – it’s certainly not the main driver of performance. Does That Mean You Shouldn’t Deload? No, you should. But you must understand what the deload will do so you can plan it properly. It also means you shouldn’t do a stress week or two (7-14 days) prior to the deload to create a supercompensation effect. You can’t supercompensate the nervous system. You can’t supercompensate the endocrine or your muscle mass. Just because you’re trashing those systems by training too much for a short period of time, it doesn’t mean that these will rebound even higher. The nervous and endocrine systems don’t function like your glycogen storage. Here’s what happens during a deload and why it can give the illusion of supercompensation of neurological resources. First, You Need to Understand Two Things 1. The connection between cortisol and adrenaline Cortisol increases the conversion of noradrenaline into adrenaline. The more cortisol you produce, the more adrenaline will increase. Four main training variables can lead to an increase in cortisol (thus adrenaline) during training. Those are… Volume:The more energy you need, the more cortisol you release. Intensiveness:The closer to the limit you’re pushing your sets, the more cortisol you produce. Psychological stress:Mostly related to the amount you’re lifting. Neurological demands:Learning new exercises, using more complex movements, or doing a complicated workout structure. 2. Beta-adrenergic downregulation When you overstimulate the beta-adrenergic receptors, they downregulate. In layman’s terms, this means when you’re producing a boatload of adrenaline that connects to the beta-adrenergic receptors, these receptors can downregulate. As a result, you respond less and less to adrenaline. Since adrenaline increases strength, speed of contraction, and motivation (among other things), if you respond less to it, strength and power will go down. On the other hand, the more sensitive your receptors are, the more strongly you respond to adrenaline and the more force your muscles will be able to produce. Now Let’s Connect the Dots If you dramatically increase training intensity and volume (stress week), you produce more cortisol. This leads to a very high level of adrenaline. This high level of adrenaline can downregulate the beta-adrenergic receptors, decreasing strength potential. After that stress week, you feel like crap and your performance drops. Then you deload, reduce volume, intensity, and maybe even frequency. You drop assistance exercises, which decreases neurological demands too. This all leads to a decrease in cortisol levels, and in return, a much lower level of adrenaline. The beta-adrenergic receptors now become much less stimulated and they recover their original reactivity. Now you respond to your adrenaline again. You regain your strength and motivation. You think, “My deload worked, I supercompensated!” No, you didn’t. You just recovered the responsiveness to adrenaline that you lost by doing too much! A study by Fry et al. (2006) found a 37% downregulation of the beta-adrenergic receptors after only two weeks of very high intensity/high frequency work. By doing one or two weeks of high demand work prior to a competition, this
Origin: Tip: How to Peak for a Powerlifting Meet
Tip: Do SST for a Mind-Blowing Pump
 As anyone who’s lifted weights for longer than a six-month stretch knows, resistance training is plagued by the principle of diminishing returns. The longer you do it, the slower the gains. But rather than accept this fact, a lot of us devote a whole lot of time and mental horsepower into figuring out ways to get around it. Often, the solution is to just eat better (you dope), or to use supplements, drugs, or new training methodologies to get us back into growth gear. Swiss bodybuilder and trainer Patrick Tuor took that last route, designing something called sarcoplasma stimulating training, or SST. It involves a whole lot of time under tension, reps, and sweat, all designed to get an acute muscle pump, which researchers such as Brad Schoenfeld have suggested plays an important role in muscle growth. Of course, any mutt can come up with a training methodology, but Patrick Tuor was lucky enough to have his SST system chosen for laboratory testing by the Catholic University of Brasilia. What They Did The scientists no doubt laid out a generous assortment of churrasco steak with chimichurri to lure 12 Brazilian young men, all of who had been weight training for between 2 and 8 years, to participate in their study. Each participated in three different biceps/triceps training sessions. During the first session, they trained in a “normal” way, doing 8 sets to failure with their 10RM (the most weight they could lift for 10 reps). The other two sessions required the lifters to use Tuor’s SST training methods. The first, as follows, is coined the “contraction type” version of SST: Warm up. Set of 10 using 10RM weight. Rest 20 seconds. Set done to failure with that same 10RM weight. Rest 20 seconds. Set done to failure with that same 10RM weight. Rest 20 seconds. Remove 20% or the load and go to failure, using a 4-second concentric (lifting) phase and a 1-second eccentric (lowering phase). Rest 20 seconds. Remove 20% of the weight and go to failure, using a 4-second eccentric phase and a 1-second concentric phase. Rest 20 seconds. Remove 20% of the weight and perform an isometric (static) hold to failure with your arms bent 90 degrees. The second version of SST they tested is the “rest interval variable” style: Warm up. Set of 10 using 10RM weight. Rest 45 seconds. Set done to failure with that same 10RM weight. Rest 30 seconds. Set done to failure with that same 10RM weight. Rest 15 seconds. Set done to failure with that same 10RM weight. Rest 5 seconds. Set done to failure with that same 10RM weight. Rest 5 seconds. Set done to failure with that same 10RM weight. Rest 15 seconds. Set done to failure with that same 10RM weight. Rest 45 seconds. Eighth set to failure with that same 10RM weight. The goal was to figure out what effect SST had on lactate levels and muscle thickness. What They Found Oddly enough, at least to me, the SST style of exercise didn’t increase lactate concentration any more than regular strength training. However, both styles of SST led to immediate increases in muscular thickness, with the “contraction style” training being slightly more effective than the “rest interval variable” style. The results prompted the scientists to write: “Highly trained subjects may benefit from changing their resistance training routines by using the SST method, as this method may offer a superior muscle training stimulus…” How to Use This Info You may have raised an eyebrow when you read that the SST style resulted in greater muscle thickness in just one training session. Well relax that eyebrow. It wasn’t because of an increase in actual sarcoplasmic hypertrophy; just a bigger pump. But a bigger pump isn’t something to take lightly. For one thing, a pump represents an increase in cellular hydration (the raising of water content in the muscle cells), which in itself appears to be a stimulus for muscle growth. Further, a pump apparently activates a membrane protein named “integrin” that’s responsible for triggering anabolic processes within the cell. (Biotest’s Plazma™ protocol is based almost entirely on this physiological fact. The idea behind the supplement is to “force-feed” key nutrients into the muscle cell during the time the muscle cell is most responsive to nutrient uptake and growth signaling, otherwise known as the pump. Based on the scientists’ findings, Plazma would marry well with the SST style of training.) While the current study involved only biceps and triceps, I experimented with both the contraction style and rest interval variable style of SST training during recent back and chest workouts. While both created a lot of ouch, each led to an extremely satisfying pump, with the contraction style edging out the rest interval variable style in pressure exerted on the seams of my T-shirt. SST is definitely worth trying, particularly if you’re a veteran trainer who’s having trouble urging your muscles into new
Origin: Tip: Do SST for a Mind-Blowing Pump
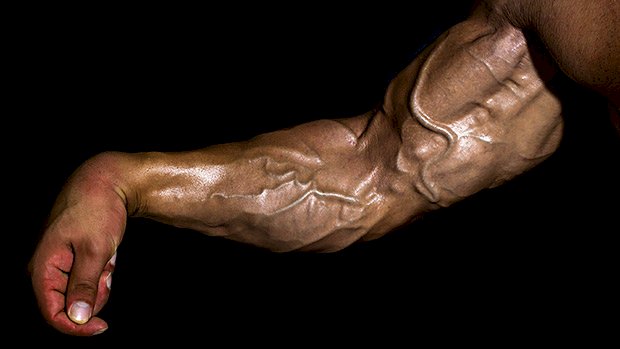
Tip: BFR for Big Arms
 Blood flow restriction (BFR) training is a specialized technique that can help you build sleeve-popping arms. It involves wrapping a restrictive implement such as bands or cuffs around the limbs while lifting. This type of training comes with a warning though: Mind-blowing and sometimes painful pumps may be experienced. Here’s what you should know before diving in. Blood Flow Restriction: The Basics Research on hypertrophy shows a load of 65% or more is required to build significant muscle size. But research on BFR shows loads as low as 20-30% create the same muscle-building effect. That would mean you’d theoretically build as much muscle with 65 pounds as you normally would with 200. The advantages of requiring less weight are obvious when it comes to rehab, as well as building muscle without undue stress on other body structures – the type of stress that causes elbow pain after a few weeks of heavy triceps training, for example. Trying to grow your arms can sometimes feel like you’re beating a dead horse. Week after week you hammer them hard with progressive overload, only to stop because your elbows and wrists have had enough. If this sounds like you, then BFR could be a way to manage your training load, reaching a point where your stubborn arms finally start to grow. What’s Happening? Occlusion training allows arterial blood flow to a region, your arms in this case, while restricting venous return. Basically, you’re allowing blood to flow into the muscle, but partially restricting its return out. To do this safely and effectively, using a purpose-made occlusion cuff is always best. This occlusion results in an increase in Type II muscle fiber recruitment and an increase in localized growth hormone and IGF-1 levels (by up to 300%). In return, you’ll see an increase in muscle protein synthesis by 45-55%, leading to greater muscular growth. The benefits of occlusion training are largely seen distal to the occlusion device. For example, placing it high on your arm will provide benefits to the rest of the arm below the cuff. (There’s some evidence to suggest that there are also benefits proximal to the cuff, though.) Selecting the Right BFR Device Today you can find a number of implements made just for BFR training. These are generally better than knee or wrist wraps. Some lifters even use medical tourniquets, but a proper occlusion cuff is best. Researchers use specialty inflatable cuffs that measure the pressure. You can buy these online. Cuff pressure is individual, depending on vasculature, tolerance level, or if you’re using it over or under a shirt. Just remember, greater pressure from the cuff does not directly correlate to how hardcore you think you are. Just keep it snug, not as tight as it’ll go. For the upper arms, you’re seeking around 100-220mmHg using an occlusion cuff, or a 7 out of 10 in intensity relative to your maximum tolerable level. Place the cuff at the top of your upper arms. It’s good if you’ve got a little pump prior to doing this. Find the right pressure and then begin your BFR training. You can leave the cuff on for up to 10-30 minutes, although if there’s any sensation of numbness, tingling, or major discomfort, take it off immediately. The BFR Arm Workout You can do this workout up to twice a week. You may feel you can do more or add in some extra exercises, but don’t. The aim of this workout is to stimulate, rather than annihilate, your arms into growth. To get your arms bigger you need to get them stronger too. That’s why the workout will start with some heavy lifts (producing a lot of mechanical tension) before your actual BFR exercises. The protocol often cited in research as having the greatest effects on hypertrophy is 30/15/15/15. This is exactly what you’ll be using. That means you’ll squeeze a near-maximal 30 reps out of your first set. Thirty seconds later you’ll aim for just 15 reps with the same weight, then do two more 15-rep sets. This will still be a struggle since your arms will have ballooned up! A. Weighted Dips or Decline Narrow Grip Bench Press:4 x 5-7 with a 4-second eccentric (negative) tempo. Rest 2 minutes between sets. B. Seated or Scott Hammer Curl:4 x 5-7 with a 4-second eccentric tempo. Rest 2 minutes between sets C. Overhead Triceps Extension with BFR:4 x 30/15/15/15. Rest only 30 seconds between sets. (See video above.) D. Cable-Behind Biceps Curl with BFR:4 x 30/15/15/15. Rest 30 seconds between sets. (See video
Origin: Tip: BFR for Big Arms
Tip: 7 New Ways to Attack Your Core
 Adding an extra rep to your max bench press is exciting. Adding more reps to your max number of sit-ups? Not so much. After you’ve achieved a certain level of fitness, that’s just boring and unproductive. So how can you make your core training more challenging? Try these. They’ll not only make your abs look better, they’ll also teach you to develop full-body tension that translates over to your big lifts. Plank Plate Shuffle Grab three 2.5 or 5-pound plates. Stack them on top of each other. With your opposite hand, bring the plates over one at a time to the opposite side of your body. Work on not moving your hips at all. TRX Body Saw Set up the TRX so that when your legs are “in” you’re parallel to the ground. Push your legs back as far as you can without going into low-back extension. Sandbag Pull-Through This can be done in the push-up position or the bear crawl position. Pull the sandbag to the other side of your body without rotating your hips. Put a weight on your back to make this even more challenging. Plank Push-Pull In the plank position, instruct your partner to provide resistance as you push out, then again provide resist as you row in. No partner? You can use a cable station. Wall Plank Find a spot on the wall where you can put your feet up. Make sure your body is parallel to the ground and hold the plank position. Deadbug with Plate Grab a 25-pound plate and assume the deadbug position. Flex at your shoulders so the weight goes over your head. The further back the harder this will be. Make sure your low back stays in contact with the ground the entire time. Bring one leg out and hold. Try putting both legs out or strapping on leg weights to make this more challenging. Earthquake Bar Offset Isohold Attach a kettlebell to one side of the bar. Be careful that it doesn’t tip. Unrack the weight and resist side bending. This can be done with a regular bar as
Origin: Tip: 7 New Ways to Attack Your Core
Tip: Nail the Walking Lunge
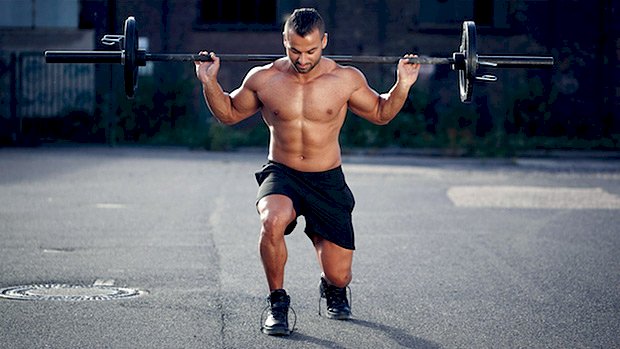 Finished with your squats? Good. Now do some lunges… and use a barbell. Why? Lunges add total quad demolition and single-leg work. Grabbing a couple dumbbells will work, but barbell lunges avoid grip and posture fatigue while allowing greater loading. You don’t have to have an upright torso for these despite what many personal trainers still say. Instead, use a torso angle that best allows you to keep a neutral spine and engaged core while maximizing range of motion and avoiding knee discomfort. Too often, staying upright can only be done at the expense of an aggressive lumbar arch. Lunges can be done with a vertical shin for more glute emphasis or with a forward knee for more quad focus, though all forms of lunges hammer quads. Emphasize the quad-dominant version by allowing your knee to travel as far past the toe as your ankle mobility will allow and your knee will tolerate (free of discomfort). Maintain firm heel contact with the ground on each stride. Pissing off your knees will shut down your quad training, so use the form combining the best quad emphasis with knee happiness. Stop touching your back knee to the ground. The extra little range of motion isn’t worth the impact on your kneecap. Alternate forward strides across a room or lunge in place if you don’t have the space to lunge across a floor. Do 3-4 sets to failure at about 10-15 reps per leg. Take each stride forward instead of crossing your feet over as if walking a tightrope. This only makes balance harder with no training benefit. Don’t have the space to do these at your gym? Swap them for Bulgarian split
Origin: Tip: Nail the Walking Lunge
Tip: One. Heavy. Rep.
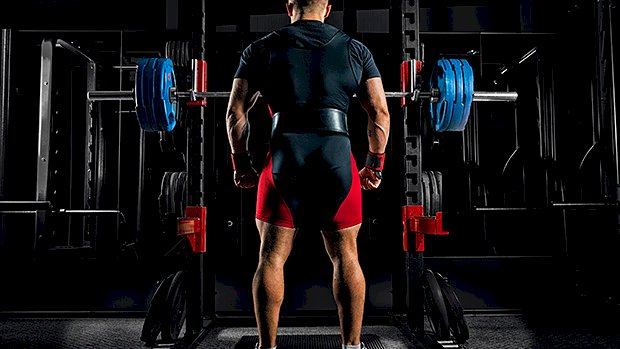 Warming Up for a Big One Young athletes often ask me about the best way to warm-up for a 1RM test on the bench press and squat. I’ll answer that, but let me first address coaches who test the 1RM with their athletes. I’m not a big fan of this practice in a group setting. That’s just asking for an injury and bad form. Put 60 young, highly competitive men in room to compare strength and it can be a recipe for disaster. I much prefer testing for a 3-5RM. Attempt the biggest weight you can get for 3-5 reps. And use the number of reps to estimate your 1RM. This is much safer and just as accurate. Here are the percentages I use: 5 reps = 87% 4 reps = 90% 3 reps = 94% If you get 315 pounds for 5 reps you estimate your 1RM as such: 1RM = 315 x 100 / 87 1RM = 315 x 1.149 1RM = 362 pounds But I digress… Warming Up for a 1RM The progression essentially has three phases. Note that you need to have a pretty good idea of what your 1RM will be, within 10 pounds if possible. If you’ve done heavy singles it should be fairly easy to evaluate where it’ll be. If you haven’t, you can use your sets of 3-5 reps. The percentages above will give you an idea of where your 1RM will be. Normally you’ll have two or three attempts to hit your max lift during the testing. The first two phases of the preparation will take you to that first attempt. Important: Your first attempt should always be a sure thing. There’s nothing worse than failing at your first lift. In a powerlifting competition you have to use that same weight (or go up). In sports testing you can still go down. But missing the lift will kill your drive and confidence. You want a solid lift to start. We normally shoot for 94-95% of your estimated maximum for your first attempt. Although, if you have no experience with heavy singles you might want to use 90% of your estimated max for your first attempt. Here’s the first phase of the lift warm-up: (The first two sections are adapted from Charles Poliquin’s progression.) Set 1:Empty bar x 10 reps Set 2:4 reps using estimated 40%, rest 10 seconds Set 3:4 reps using estimated 40%, rest 30 seconds Set 4:3 reps using estimated 60%, rest 30 seconds That was the low-stress phase. On those 5 reps, your focus should be on exaggerating tightness and acceleration. Focus on patterning perfect technique. Do NOT do these easier sets nonchalantly; respect the bar and use these sets to get into the perfect groove. Then continue with… Set 5:2 reps using estimated 75%, rest 60 seconds Set 6:1 rep using estimated 80%, rest 120 seconds Set 7:1 rep using estimated 85%, rest 120 seconds Set 8:1 rep using estimated 90%, rest 180 seconds The goal is to get the feeling of heavier weights and amp up the nervous system, but also estimate your performance capacity at that moment. For instance, if 90% felt like a ton, you might need to be conservative with your attempts. If it felt like nothing, you might be able to adjust your starting attempt to 98% and then go for 103% or even 105%. Then move on to… Set 9:Un-rack 105-110% of your maximum, walk-it out (if it’s a squat) and hold for 6 seconds. Then rest 180 seconds (to potentiate the nervous system and give you a psychological boost). Set 10 (opening attempt):1 rep using estimated 95%, rest 240 seconds Set 11* (second attempt):1 rep using estimated 100%, rest 240 seconds Set 12* (third attempt, if you have one):1 rep using estimated 105% * Note that sets 11 and 12 can be adjusted depending on
Origin: Tip: One. Heavy. Rep.
Tip: The High-Bar Squat for Big Quads
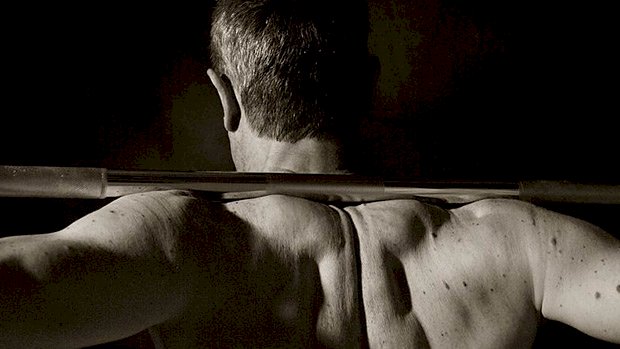 High-bar squats are your big-ticket move for leg size, but you have to get them right to really emphasize the quads. The Setup Place a barbell on your upper traps while squeezing your upper back muscles together to form a shelf. If you aren’t used to a bar on your upper traps it can feel uncomfortable at first. Get used to it. Just make sure the bar isn’t sitting on the bony ridges of your spine or your neck. Find your best foot position, allowing maximum hip mobility at the bottom of the squat and preventing rounding of your spine or knee discomfort. Start with heels around hip width and toes angled outward. Then adjust and use what feels best. We’re often taught to use a narrow stance for better quad recruitment. This may produce more quad tension but isn’t essential. If you can’t set up narrow you’ll still get excellent quad recruitment with good range of motion, loading, and reps. Form a strong arch by squeezing the ball of your foot toward your heel. Externally rotate your hips to get your knees vertically stacked with your toes. The stress and tension of the load should be directed through stacked bones, joints, and muscles. Protect your lower back by flexing the abs and locking your sternum down into your pelvis. Though the high-bar position keeps your torso more upright than the mechanics of low-bar squatting, this doesn’t mean your torso must be perpendicular to the ground. Too often, lifters create a vertical position by aggressively arching their lower backs. This can lead to potential injury. The Movement Maintain a neutral lumbar spine (natural arch) to protect your lower back. With abs locked down, elevate your chest and extend at the thoracic spine to maintain a slight but not excessive upright posture. If you’re tall with long femurs, no amount of exaggerated arch will allow you to sit vertically in a squat. Exaggerating a vertical torso also pushes the knees forward to maintain center of gravity – producing even more stress in the knee and possibly causing patella-femoral pain. This usually restricts the ability to squat deeper, which can lead to overloading a shorter range of motion squat and further aggravating joint stress. Most lifters subsequently abandon squats and knee-wrap their leg press because “they hurt my knees.” High-bar squats are more upright and quad dominant than low-bar squats. More emphasis on quads, and therefore knees, doesn’t mean your knees can’t handle the stress. Our joints aren’t fragile structures ready to explode if loaded. Creating strong muscles around your knees by using correct form will encase the knee with muscle to protect and stabilize it, while applying controlled stress to strengthen your connective tissue and bones over time. Just don’t be careless. Loading through the ball of the foot can cause knee pain. This may happen when your knees dive too far forward past your toes at the bottom of the squat. Your knees can and should go past your toes on a good squat. Often lifters let their heels rise at the bottom of a squat as the focus is in the front of the foot. Maintain your weight evenly through the entire foot and push firmly through your heel as you squat. If you can’t squat deeply without your heels rising, this means you have poor ankle mobility. So restrict your depth while working to improve your ankle dorsiflexion. Healthy, mobile ankles are crucial for good squatting. Sets and Reps Warm up with an empty bar or bodyweight set to mobilize hips, knees, and ankles and to sense any major joint discomfort early. Do 2-3 warm-up sets of 10-12 reps before moving up to working weight. Then, use 3-4 working sets of 8-12 reps. Adjust the weight so that you get within two reps of failure to optimize muscle growth. This will produce enough mechanical tension and metabolic stress to trigger a growth response. Occasionally jumping to 15-20 reps to near failure is an unpleasant yet effective way to break plateaus. High-bar squats are tough. Even sets of 8-12 will leave you winded while taxing your central nervous system. The goal is to do enough training volume to grow. Focus on developing the stamina to do more reps, sets, and weight. Hitting absolute failure is fine for curls and cable rows, but it increases the chance of getting hurt on heavy compounds and accumulates fatigue more rapidly than training effect. Excess fatigue cuts into training volume of subsequent sets and later exercises. As you progress through weeks of training, apply progressive overload with added weight, reps, and carefully timed sets. Rest as long as needed to recover to start the next set with excellent form for the 8-12 reps. Taking only 60 seconds of rest means you aren’t lifting heavy enough or giving yourself enough time to recover. Working quickly doesn’t burn more body fat. Instead it cuts into training volume and overall results. Taking 2-3 minutes of rest between your working sets should be
Origin: Tip: The High-Bar Squat for Big Quads
Tip: Nail the Back Lever. Here’s How
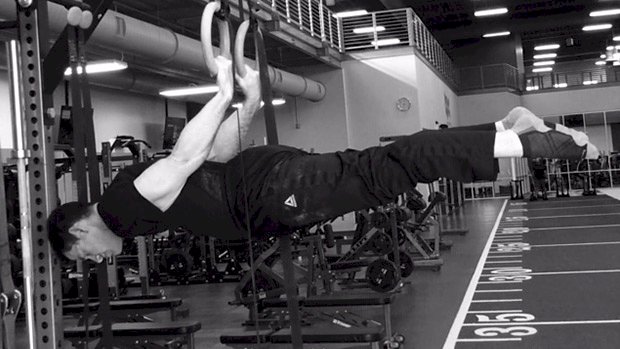 If you’re into calisthenics, at some point you’ll want to introduce yourself to levers. The back lever is one of the easier variations to start with. It’s not only a cool trick, but also a tremendous exercise to develop your isometric core strength. Learning how to isometrically brace your core and have all your muscles work together to achieve full-body tension will transfer to all of your main lifts. Whether you’re wanting to use this as a supplement to your big lifts, or you just want a fun trick to add to your arsenal of exercises, use these steps to nail the back lever. Step 1: Skin the Cat The back lever takes a considerable amount of shoulder strength and mobility. Before you start thinking about doing it, you’ll want to be able to skin the cat. This movement gets you used to going upside down, teaches you how to use your core, and preps your shoulders for the more advanced static holds. When you first try it, make sure to set up the rings so that your legs can touch the ground when you go through them. This will allow you to take pressure off your shoulders or stop the movement if needed. Step 2: Get Comfortable Hanging Upside Down Getting used to all the blood rushing to your head is another prerequisite before going for your holds. Holding yourself upside down with your legs straight and core braced will help you understand the initial positioning of the back lever and will build up your confidence. Step 3: Tucked Back Lever When it comes to levers, the longer you make your body, the harder the movement will become. Tucking your legs in will shorten your lever and give you more of a mechanical advantage. Make sure you can hold your tucked lever position at a dead stop for 3 to 5 seconds before moving to the next stage. Step 4: Bent-Knee Back Lever This movement is very similar to the tucked back lever, except it involves a little more extension at the hips, which increases the level of difficulty. Again, be able to hold your this position at a dead stop for 3 to 5 seconds before attempting to extend the knees. Step 5: Straddle Back Lever The next step is to move to a straddle stance. This gets you used to extending the hips and knees, and will get you stronger to progressively hold more of your bodyweight in a lengthened position. The beauty of the straddle-stance back lever is that you can make it more or less difficult by moving your legs further apart or closer together. Make sure you can hold your straddle position for 3 to 5 seconds before moving to the full version. Phone a Friend When you’re first learning this movement it will be difficult to tell when you’re parallel to the ground. Have a friend nearby to let you know or just video yourself. A friend can also help spot you, making the exercise considerably safer. Hand Positioning: Palms Up or Palms Down? Now, if you’re a gymnastics purist, you might say that a true back lever involves the palms facing the ground (supinated) when in the full lever. Although this is technically correct, it puts considerably more stress on the elbow and you can risk a biceps rupture. If you don’t have any formal gymnastics training, you’re going to want your palms facing the ceiling (pronated) to save yourself from an unnecessary
Origin: Tip: Nail the Back Lever. Here’s How
Tip: Curcumin Makes Fat Cells Kill Themselves
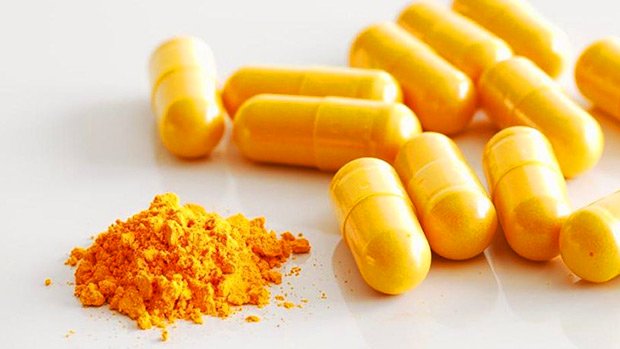 The list of stuff curcumin does keeps growing. It started off as an effective pain reliever and anti-inflammatory, but then we found out it also fights cancer, blocks estrogen, boosts testosterone, improves heart health, makes you stronger, dissolves arterial plaques, stops your knees from aching, reduces the risk of diabetes, and even helps prevent mosquito-born malaria. And now there’s new research showing that curcumin causes fat cells to undergo apoptosis, which is the term for cellular suicide. When apoptosis begins, the surface of the cell starts to bubble and churn, almost like it’s boiling. Then, its nucleus starts to fragment. Eventually, the cell tears asunder, spilling its disassociated guts into the interstitial sea of fluid. A cellular clean-up crew of phagocytes, one accustomed to wet work, arrives to dispose of the corpses and there’s no investigation because they know curcumin was to blame. This new curcumin research also shows that curcumin prevents pre-adipocytes – baby fat cells – from developing into full-blown adipocytes. These baby fat cells are urged to go into a different profession… or else. The Study, Short and Sweet The Taiwanese researchers who conducted this study already knew from a few recent studies that curcumin supplementation reduces a high-fat diet-induced increase in body fat, but they didn’t know the mechanism behind curcumin’s hate for plumpness. To figure it out, they exposed mouse pre-adipocytes to varying concentrations of curcumin for varying time frames. They also exposed pre-adipocytes to a low dosage of curcumin for an hour, followed by a 24-hour incubation period. They found that curcumin inhibited adipocyte differentiation. In other words, the supplement prevents fat cells from maturing and fulfilling their ultimate function, which is to store fat. The high doses of curcumin actually caused fat cells to commit suicide, while the lower doses prevented the maturation of the baby fat cells. They suspect it had to do with curcumin’s modulating effects on something known as the Wnt/beta-catenin signaling pathway, which helps determine the fate of cells. The authors, despite seemingly being tight-lipped PhD guys, seemed pretty jazzed, writing: “These findings suggest that curcumin supplementation could be an effective strategy for treating or preventing development of obesity by a curcumin-induced reduction in the number or pre-adopocytes and the fat mass of adipocytes.” What to Do With This Info When you think about it, curcumin’s effects on fat cells may have something to do with many of the other benefits listed in the opening paragraph of this article. Collectively, our fat cells are considered to be a major endocrine organ with a powerful impact on things like the regulation of appetite, insulin sensitivity, immunological responses, and vascular disease, so if curcumin causes fewer fat cells to form while causing others to expire, it makes sense that it would have so many beneficial side effects. As far as how much curcumin to take to experience any reduction in fat mass, it’s difficult to say. The scientists exposed the fat cells to a concentration of up to 50 micrograms of curcumin to make them commit hari-kari, and 30 micrograms to keep pre-adipocytes from forming into full-fledged adipocytes, but given that the body weights of us human is so diverse, it’s hard to extrapolate a suitable dosage. But, given that 30 micrograms is awfully small (a thousand micrograms equals 1 milligram), I feel confident in suggesting that the standard Biotest dosage of curcumin (two 500-milligram capsules a day) would bring the average person into therapeutic range. Even so, this and other studies make me suspect that curcumin might be more useful in preventing further fat gain than reducing it, but that’s just a guess. Regardless, I don’t think you can go wrong taking curcumin, especially when you consider all its other healthful
Origin: Tip: Curcumin Makes Fat Cells Kill Themselves
