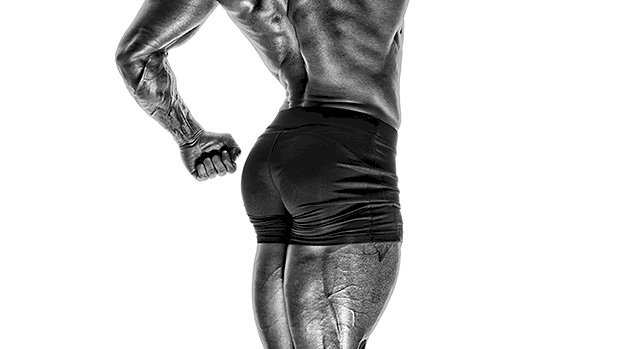
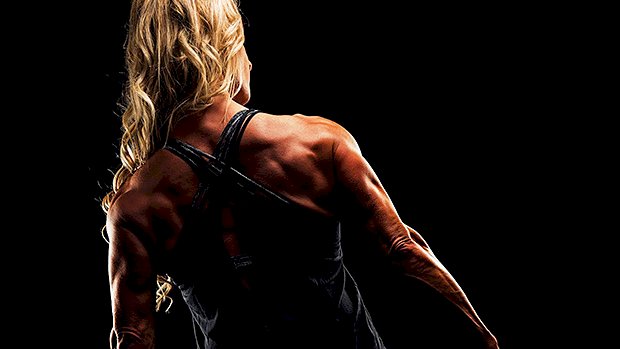
 Here’s a new way to perform back extensions for meatier hamstrings and glutes. Train at home? Train in a gym that doesn’t have a back extension or GHR bench? These exercises are great workarounds. 1. Bent-Knee Glute Extension Taking a few minutes to set this up is worth the glute gains. You can also use a Smith machine, which in a commercial gym setting might be more appropriate. Think of these as 45-degree back extensions. Set a bench to an incline (30-45 degrees works best) and throw a pad on the end for your hips. With this version though, you’ll lock yourself in position with your feet against an immovable bar. Everything about this position screams glutes. Your toes should be turned outwards and hips externally rotated. This frog-like position places a little more emphasis on the glutes as external rotators. (It’s not as ball-crushing as you might think.) Unlike a typical back extension with straighter knees, your knees stay bent to around a 90-degree angle. This slackens your hamstrings and forces your glutes to work harder as hip extensors. It’s one of the reasons why glute bridges and hip thrusts are so effective too. Lock yourself in with your hip crease on the edge of the bench, then execute by driving your hips into the pad. Keep a slight rounding through your thoracic spine and keep your chin tucked. Your arms can be crossed, or you can hold a plate or dumbbell to your chest to add load. A few sets of 15-25 reps will do the trick. 2. Hamstring Destroyer in Rack This exercise was popularized by Eugene Teo. Personally, I have no issues doing more than just squats in a power rack, but doing all your assistance work in there too might grind some gears, so I’d suggest using a Smith machine. Think of this as a horizontal back extension with slightly bent knees. Unlike the previous setup though, you’ll need to be further from the bar so there’s a greater angle at your knees. This will help get rid of the slack and place more tension through your hamstrings. With these you’re looking to maximally load your hamstrings in their mid to shortened position, which is made possible by the combined bent knee and extended hip (your hamstrings do both). These are also made more effective by your body alignment and foot placement. The devil is in the details with this one. Your feet should be parallel and the bar should be closer to your toes (versus mid-foot in the previous version). You need to feel secure, but placing the bar closer to your forefoot will increase recruitment of your gastrocnemius. This co-activation of your calf muscles will have an add-on effect, forcing your hamstrings to work harder. Lock yourself in with your forefoot to the bar and your hip crease on the edge of the bench. Keep a straight back position and initiate the pull with your hamstrings. Press your toes down throughout like you’re trying to calf-raise the bar up (you won’t). Then try not to squirm as your hamstrings and calves want to cramp. These are deceptively difficult. If performed correctly, they will rarely require more than your own bodyweight. Before you start adding load, try some isometric holds in the top position to really intensify things. 3. Glute Destroyer Take the hamstring destroyer, change a few body angles and the way you initiate the exercise, and now you’ve got an effective way to pump some blood into your glutes. Turn your toes outward, set your knee angle to 90 degrees (remember, this slackens your hamstrings), round a little through your thoracic spine, and tuck your chin. Initiate by clenching your butt cheeks and driving your hips into the bench. Imagine someone trying to steal your last dollar from between your butt cheeks in the top position. Your glutes will be active as both hip extensors and external rotators, working them hard in their shortened position. Pump out 2-3 sets of 15-25 reps, adding weight when
Origin: Tip: Monster Glutes, Meatier Hamstrings
Tag: Tip:
Tip: Kung Fu Lunges for Killer Quads
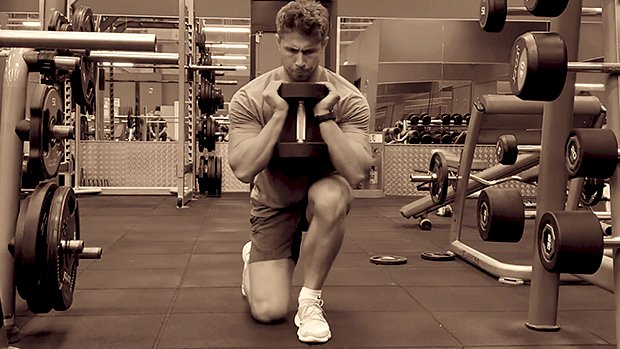 The “duck walk” is an ancient technique used in kung fu training. Martial arts aside, it’s a nasty way to finish off your leg workouts. Just grab a dumbbell or safety-squat bar, set a timer for two minutes, and go! Technique Tips Duck lunges are often performed with your knees coming out as you step forward. This gives more of a waddle-look to your lunge. But with this “in line” variation, we can emphasize full range of motion and give your quads a deep loaded stretch. Take a short lunging step. Stay down and imagine you’re LeBron James attempting to lunge in a house of Hobbits. Don’t stand up fully until you absolutely have to, or you’re turning around to come back. Notice how the back knee is traveling over the toe and getting close to the floor. You could just let your back leg follow its natural path, but emphasizing the back knee over the toe and towards the floor has a purpose. More on that in just a second. Try setting a timer for two minutes and see how many you can do. Over a few weeks, attempt to increase the amount you can complete in two minutes. When you hit two minutes without stopping, add a little weight. One or two sets will be more than enough. For a more advanced variation, a safety-squat bar is a good way to add load: Why These Work The constant tension:There’s a respectable amount of mechanical tension provided in these lunges, given the intense stretch of your quads under load. However, more so these create a lot of metabolic stress. That’s why they’re best reserved for the back-end of a workout when you’re in the mood for some punishment. It’s a traveling sissy squat:Take a look at what the back leg is doing. You might recognize the position as being close to a sissy squat, albeit with your torso a little more vertical. Because of this, your back leg is being subjected to some eccentric overload through a big range of motion. Your middle quads (rectus femoris) will be on fire. There’s knee-over-toe action:Just like walking up some stairs or riding a bike, there’s some knee-over-toe action that won’t cause your knees to blow out. Yes, if you’ve got a shady history with your knees then skip these. But if you have healthy knees these can help you develop your quads while also building some knee resilience. They’ll condition you:Nail your key exercises first: some kind of squat, hack squat, leg press, or whatever works for you. Then finish with just a couple of sets of these. It might feel like cardio, especially if going above five reps isn’t your forte. But those two-minute sets will help build a level of conditioning that’ll increase your work capacity for any workout. They’ll tax your entire
Origin: Tip: Kung Fu Lunges for Killer Quads
Tip: 4 Untraditional Delt Workouts
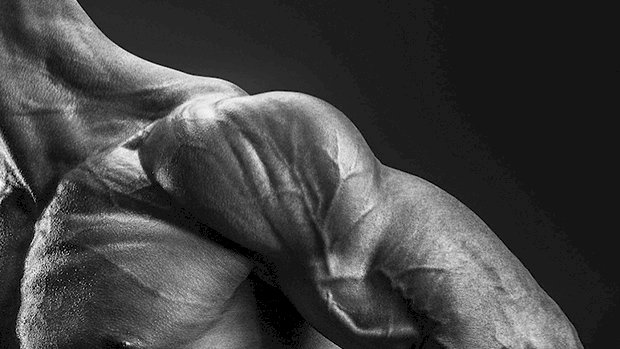 Combo Pyramids for Big Delts Heavy overhead pressing should be a part of your shoulder training, but for fully developed delts you’ll also need some higher volume, longer time under tension exercises. One way to do this is with combo exercises and pyramid training. Here are four shoulder exercises that use the pyramid loading scheme. Most of these are combo exercises, meaning two different exercises performed together. For most of these loading protocols, tap out at 6 reps because this already equates to 21 reps per exercise (or 42 if it’s a combo move) because of the pyramiding rep scheme. Kettlebell Swing to Press Grab a kettlebell that’s about 20 pounds lighter than what you’d use for a single-arm overhead press for 6 reps. Start with one kettlebell swing. Transition right into the rack position for a press. Do one press and go back to the kettlebell swing, but now for two reps. Complete two reps of the overhead press. Continue this pattern until you hit 6 reps of each. Snatch to Overhead Press Load up a barbell or a practice bar. Adjust your hands so that they’re outside shoulder width. The snatch is somewhat of a combination of a front raise and a snatch, essentially a front raise with some hip drive. For each snatch, do a wide-grip overhead press, ramping up to 6 reps. Overhead Press to Lateral Raise Pick two different weights. The overhead press weight will be heavier than the lateral raise weight by 10-15 pounds. In one hand, take the kettlebell or dumbbell into the rack position. The other hand is at your side with the lighter weight. Complete 1 rep of each, then ramp up by a rep until you get to 6. Sled Pyramid You’ll need a sled and some type of suspension training device for this. We’re going to be pairing an overhead press with a reverse flye. Ramp up by 1 rep for each round until you get to 6 reps. You’ll need a decent amount of space for this one, so use it when you
Origin: Tip: 4 Untraditional Delt Workouts
Tip: The Most Misused Machine in the Gym
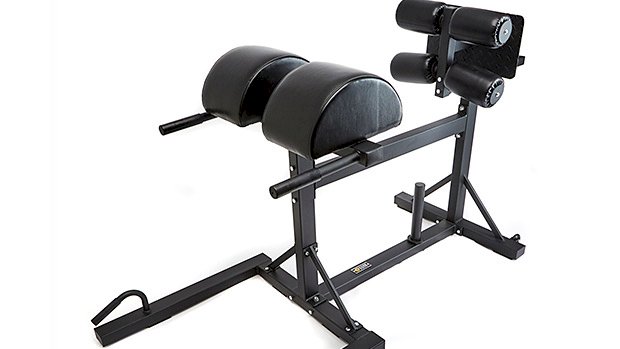 Of all the equipment in the gym, the GHD is one of the most misused. GHD stands for “glute-ham developer” (and sometimes “good hair day,” but that’s another topic). It doesn’t have the word “sit-up” or “abs” in the name, yet that’s what many people use it for. The most flagrant violation happens when people do really ugly looking sit-ups on it. They let their backs arch violently into extension and work their hip flexors, quads, and anything except their core to get each painful rep. This is a lower back disaster waiting to happen and should pretty much be avoided unless you have to do it in a CrossFit competition. Public service announcement: The primary purpose of this machine is to develop the glutes and hamstrings. Here are some legitimate ways to use the GHD, plus a common mistake to avoid. GHD: Traditional Begin with your thighs on the GHD pad, torso perpendicular to the floor and feet securely on the back platform. Your knees should be placed more on the back of the pad to prevent excessive stress to the back of the knee. Brace your core and contract your glutes and hamstrings while slowly extending your knees, lowering your body so that it becomes parallel with the floor. Do NOT hyperextend your knees by going to full lockout. Use your glutes and hamstrings to pull yourself back to the starting position. Maintain a straight line through the knees, hips, lower back, and neck for the duration of the lift. GHD: Dive The main difference between this and the classic GHD exercise is that you dive towards the floor instead of letting the body come parallel to the floor. This variation will act more like a leg curl and changes the angle of pull on the hamstrings. Your back should still remain neutral at all times. GHD: Hip Hinge This variation involves no joint movement through the knee. I like to use this with beginners so they understand how to hinge through their hips. You can do this version with the legs straight, but most lifters will rely too much on their low backs to make it to the top. Instead, opt for a slight knee bend and keep a straight upper body as you hinge through your hips. Most Common Mistake: Arching the Lower Back If you’re doing it like this, you’re going to have low-back issues. Your lower back should remain neutral at all times. You’re much better off cutting a few reps, moving the pin back on the GHD to make the lift easier, or doing the hip hinge-only
Origin: Tip: The Most Misused Machine in the Gym
Tip: The Back Burner
 Not only with this finisher light up your back, it’ll help “wake up” your rhomboids, making it an excellent tool for improving posture. How To Do It Set up in a good stiff-legged deadlift position. Make sure you’re “aware” of your hamstrings and you’re not putting strain on your lower back. Use two moderately heavy dumbbells that you can hold at the top position of a dumbbell row at maximum range of motion. This is your isometric hold position. Maintaining the full height of one arm/dumbbell, reach the other slightly forward and down to get a nice lat stretch, then row up and back to the retracted position. Repeat on the other side. Keep alternating and perform 5 reps with each arm (10 total) while maintaining the full retraction of the “resting” arm. Once you’ve completed 5 reps per arm, do 10 reps with both arms moving together, making sure you fully pull your elbows and shoulders back at the top and add a slight pause between reps. If you find yourself using any momentum or losing range of motion, drop the weight. There’s really no point in cheating by doing “bro-rep” dumbbell rows. Focus on retraction and recruiting the right muscles – the burn will come quickly. The full set will be: 5 rounds: 10 Alternating Single-Arm Rows (holding iso retraction) 10 Double-Arm Rows (pause between reps in retraction) Write down the weight you use your first time and try to increase the weight over
Origin: Tip: The Back Burner
Tip: No More Forearm Pain From Benching
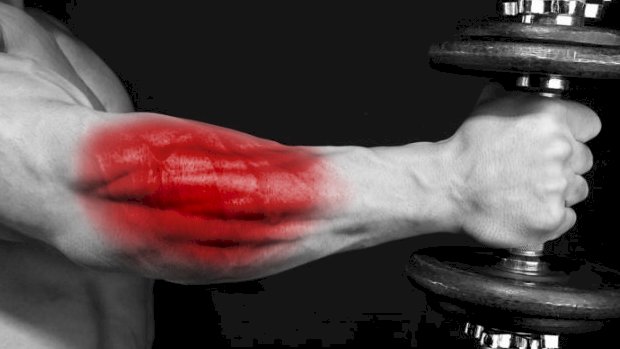 Forearm pain from bench pressing is common… and it’s misunderstood. The culprit is generally the brachoradialis, a muscle normally associated with hammer curls. The reason it can get upset is because the fixed hand position on the bar forces your forearm through a pronation and supination cycle as the elbow bends and straightens. That means you’re effectively being forced to turn your hand over towards an end-range “palms down” position in the bottom of a bench press. Then, as you press up towards lockout, the forearm supinates into a more neutral position. This happens without us really thinking about it. However, while the forearm pronates and supinates, the brachoradialis is loaded to stabilize the movement occurring between the two long bones of the forearm. It’s a little complicated, because the muscle changes functions through the movement, doing different things at different points. Small stabilizer muscles under big loads often leads to overload and pain. Yes, you can back off bench pressing for a while, or you can rub or needle the muscle. All that might make it feel better in some way, but none of it will resolve the problem. Solving the issue requires you to condition the problem range of movement, making that range more easily available and stronger so it has the capacity to deal with the demands of benching. That means specifically conditioning loaded forearm pronation through a horizontal pressing cycle. Sounds complex, but the hammer press is the simple answer: Hold a hammer out at arm’s length and pronate the forearm until the hammer is parallel to the ground. Start with a very short lever. That means holding close to the top of the handle, near the head of the hammer. Holding the hammer parallel to the floor, try to mimic the bench press movement. You’ll feel the forearm fire up and work, and you’ll feel the problem muscle in the relevant way. Some discomfort, up to around 4-5 out of 10 on the pain scale, is acceptable and therapeutic throughout the movement. Do slow and controlled presses. If you need to make it more challenging, work your way down the hammer shaft to make the lever longer. Because the movement goes through the same range of motion as your bench press, it’s the only way to ensure you’re conditioning the relevant parts of the relevant muscles/tendons so they can adapt and actually solve your problem. Since this is a therapeutic exercise, it should be done daily and only to moderate discomfort. You’re actually adding work to tissues that are failing to cope with their current workload, so go steady. It may take a week or two to adapt and improve. It’s worth the time investment though. You’re really solving the problem, not just masking
Origin: Tip: No More Forearm Pain From Benching
Tip: 5 Heavy Band Exercises for Legs & Glutes
 Here’s a useful way to set up a heavy band, providing both comfort and stability. Simply place a plate over the center of your band and stand on it. Compare doing this to just standing on a band and you’ll instantly feel the difference. The band will also stay closer to shoulder width throughout any exercise. Resistance bands have many uses. One is the ability to accelerate through increasing resistance. This can prime your nervous system, activate high-threshold motor units, and potentiate your whole body for a better workout. Banded single-leg RDLs are an excellent way to prepare for a heavy lower-body workout, especially if you do a few explosive reps, allowing the band to accelerate you back down. This will overload the stretch-reflex mechanism and prime your muscles for a good workout. Because single-leg RDLs done this way provide an element of stability (versus your standard single-leg deadlift) these can also be used as a teaching tool to improve single-leg stability and strength. 2. Banded Split Squat This is an excellent way to warm up your quads and get a bit of blood in there before your heavy lifts. Because of the angle of the band, there’s even greater quadriceps emphasis. As an alternative to the leg extensions and sissy squats, these can make for an excellent assistance exercise for your lower-body workouts. If you’re at home or in your Vegas penthouse suite wondering how you could do these without an Olympic-size plate, all you need is something flat and strong to place over the band. Or you could just step on the band. 3. Banded Pull-Through Cable pull-throughs are on par with 45-degree back extensions and reverse hypers for developing posterior chain strength in a manner that limits load through your spine. Loop a band around a post somewhere and boom… you’ve got yourself an effective pull-through setup. Because of the ascending resistance of the band, doing pull-throughs in this way tends to bias glute activation at the top, although you’ll get a nice stretch and a little load through your hamstrings at the bottom too. Excellent as a warm-up drill, to teach hip hinge technique, or to burn out your glutes. 4. Lateral Kneeling Hip Thrust Open up your tight adductors and wake up your sleepy glutes with these. Here you’re combining a band kneeling hip thrust with a great hip-opening drill. Throw these into your warm-ups for healthy hips and knees. They’ll also work as a high-rep booty-pumper – just don’t make eye contact. 5. Band ISO Bird-Dog A resistance band is one of the best ways to progress and load a bird-dog. So if bird-dogs are a frequent part of your training anyway, here’s how you can make them harder. You’ll be challenging the collapse of your extended arm and leg. This will help fire up everything from your hamstring to your opposing-side shoulder, and everything else in between. Bird-dogs are part of Professor Stuart McGill’s “big three” core exercises. It’s good to add them into your warm-ups, at the end of workouts, or supersetted with other exercises for long-term back health. Add a heavy band like this for a bigger
Origin: Tip: 5 Heavy Band Exercises for Legs & Glutes
Tip: 3 New Ways to Blow Up Your Legs
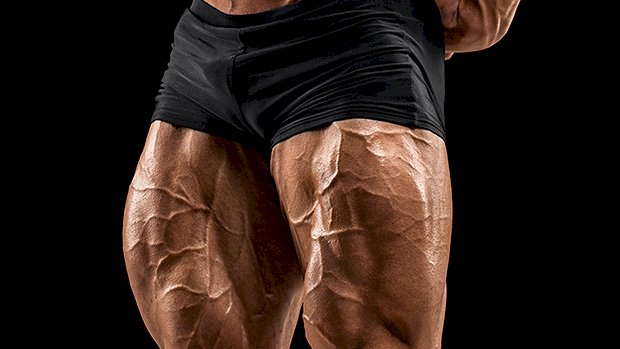 Whether you use a dedicated landmine device or you just shove a barbell into a corner (against a towel or even an old shoe), this style of training is worth adding to your program. These three variations will smash your lower body, but in a different way than you’re probably used to. Plus, this type of work has transferability to your big lifts. Getting jacked while being more functional? Win-win! Landmine Squat Unlike the goblet squat, the landmine variation changes the strength curve and actually turns the squat into more of a hip-dominant movement. Our society is plagued by lower back problems, which isn’t surprising given our daily postures. Extra work for the posterior chain is always a plus. This isn’t a movement for the faint of heart either. The loading capability will challenge even the most seasoned meathead. Build up to a heavy 8-10 rep set over the course of 5-6 sets. Landmine Reverse Lunge If you’re looking to change up your lunge variation, this is it. The landmine version affects the strength curve differently than a kettlebell or dumbbell pressed against the chest because of the biomechanics of the movement angle of the barbell. You’ll be surprised be the increased level of balance required as well. Try 3-4 higher-rep sets of 8-15 per leg. Single-Leg Landmine RDL The single-leg RDL is a challenging movement for just about anyone. It’s often used as an assessment tool and, as you can imagine, the loading capacity is quite low with it. But with the landmine variation, loading capacity is higher because the level of stability required is lower. Try 3-4 sets of 8-10 reps per
Origin: Tip: 3 New Ways to Blow Up Your Legs
Tip: Pummel Your Abs with Butt Scratchers
 “Butt scratchers” are named after how a dog looks when trying to wipe its butt on your carpet. If yours does this frequently, you may want to consult a vet. For humans though, mimicking this butt drag (except going backwards) is a surefire way to pummel your abs. Here’s what they look like: The idea is to tuck your pelvis under, behind your arms. Your butt isn’t touching the floor though; it should be as far off the floor as your arm length will allow. This “drag” movement makes these particularly useful at working your abdominals through both spinal flexion and posterior pelvic tilt. This combo means that butt scratchers are effective at working your superficial abs in their fully-shortened position. There’s zero abdominal load through most of the movement, but as soon as your butt drags behind you you’ll be lucky if your abs don’t cramp from the intense contraction. Try to hold it there for a brief second before letting your abs up for a breather. Awareness of your superficial abs can often be an issue when trying to develop them. You need to actually find them before you can target them with more loaded ab exercises that’ll make them grow. Butt scratchers will help you find your abs with very little load and have them wrecked after just a few sets. If you’re the type that feels abdominal crunches in your neck, or leg raises in your hip flexors or lower back, then butt scratchers are a novel alternative that’ll get the job done. No Sliders or Space? No Problem! If you don’t have a pair of sliders, don’t worry. For a fraction of the cost, a pair of furniture sliders will do the same thing and will slide on most surfaces. You’ll find these in many hardware stores or any gigantic online retailer named after a rainforest. An old towel will also slide comfortably on a wooden lifting platform or gym floor. As an alternative, butt scratchers can also be performed statically. Your hands stay in one position on the floor and you’ll rock back and forth. Again, the focus should be on tucking your pelvis under and behind your forearms. Statically, these can be done with your heels in a suspension trainer (TRX, etc.), on a foam roller, or with a Sorinex glute-ham roller or similar. If T-Rex arms let you down, an easy workaround would be to have something by your sides to elevate you higher. Push-up handles, yoga blocks, a few hex dumbbells, or step boxes will
Origin: Tip: Pummel Your Abs with Butt Scratchers
Tip: Set Your Hammies and Glutes on Fire
 The hip-banded RDL (Romanian deadlift) is a great way to load your hamstrings and glutes. Having a band pulling your hips back promotes correct RDL technique. It can also be a useful extrinsic coaching cue if you’re new to RDLs. Using the setup shown here will enable you to use more band resistance. You’ll be able to double up the band and have more control. Bonus: It seems to promote a better hip hinge – there’s something to hinge (take a bow) over. Of course, the band helps to add horizontal load through the hips, making it a potent butt-builder as well. To develop your hamstrings and the rest of your posterior chain, sets of 6-8 work well. To Hit the Hamstrings Harder:Steer clear of locking out, working a two-thirds movement at the bottom. To Hit the Glutes Harder:Lock out at the top with some posterior pelvic tilt for extra butt
Origin: Tip: Set Your Hammies and Glutes on Fire
