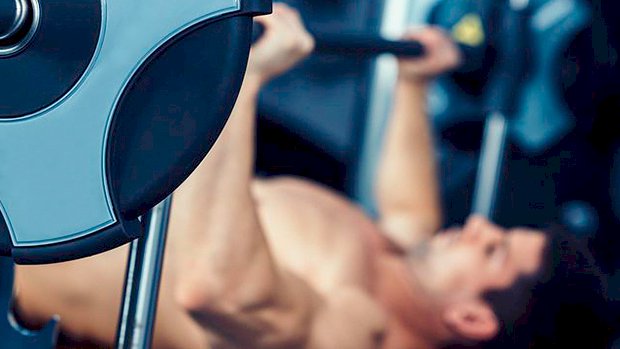
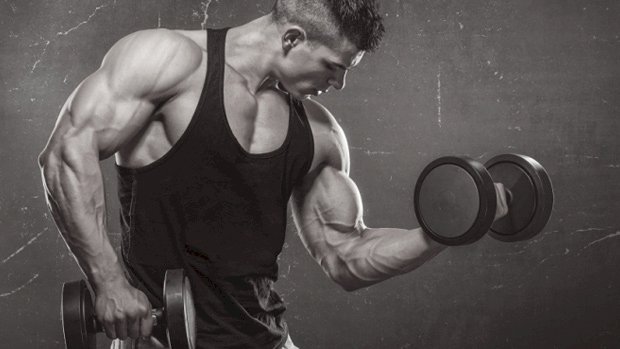
 High-tension training methods teach our bodies to exert more force. Plyometrics and the shock method are often used for lower-body power development (depth jumps, loaded jumps, and landing from various heights.) However, very few people use the same methods for the upper body. Such drills can be very effective at improving bench-pressing strength. Example: the ballistic bench press. This is the only exercise in which I consider using the Smith machine effective. The objective is to lower the bar to the chest, throw the load in the air, then catch it and start again. The load you use should be light, because the goal is not to just be explosive, but to be ballistic. Use a weight that’s about 20 percent of your maximum effort. If you bench 300 pounds you’d use 60 pounds for the bench throws. Lower the weight under control, quickly reverse the motion, and toss the bar into the air as hard as you can. But be ready to catch it on the way down unless you want to get decapitated. Note: This won’t work well with Smith machines that use
Origin: Tip: The Only Good Smith Machine Exercise
Tip: Get Ripped on the Rower
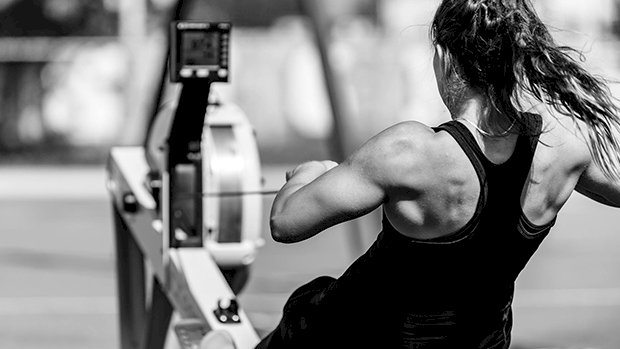 The Erg is the G.O.A.T. One of the major reasons people do cardio is to lose body fat. So it’s no surprise that the most common question people have is, “Which is the best cardio machine?” Let’s end this debate, once and for all. Purely considering the potential to burn the most body fat, the answer is the ergometer. The “erg” is better known as the rowing machine, and it’s hands-down the best fat burning cardio tool in the gym. Why is the erg the best choice for cardio? First, it’s one of the few pieces of cardio equipment that requires both your upper and lower body to operate the machine. This makes it literally twice as effective as only using your legs on most machines. Second, it’s low-impact so you can use it even if you have injuries or are overweight, without worrying about developing joint problems from repetitive high-impact activities like jogging on the treadmill. Finally, it’s a freakin’ brutal workout. Before I share my favorite fat-blasting erg workouts, you need to understand the basics of efficient rowing technique. The erg might be the best cardio machine, but it’s also the most poorly used piece of equipment in the cardio room. The Rowing Ergometer: Proper Technique There are two main positions in rowing: the catch and the pull. The catch: It’s basically the starting position, where you lean forward to grasp the rower’s handle. Use an overhand grip. Once you’re holding the handle, sit up tall with your shoulders pulled down and back, and your chest up. Your back should be flat, not rounded, in this position. It should maintain flat throughout your workout. The pull: Start with your legs – drive your heels through the foot-plate and use your legs for power. Next, keeping your back flat, hinge backward at the hips and lean back. Finally, pull powerfully with your arms. Since your legs are now extended, the chain should travel in a straight line without having to rise above your knees. Bring your hands into your ribs – not your throat – during the pull and keep your elbows tucked. At the end of the pull, your legs will be extended straight out, your knees will have only a slight bend, your torso should be leaned backward, and your arms will have pulled the handle toward your chest. Reverse the movement in the exact opposite manner: arms, torso, legs. You’re now back in the starting “catch” position. Repeat this at a slow pace to get the hang of the pattern: drive with your legs, lean backward, and pull with your arms; then straighten your arms, lean forward, and bend at the knees. The power comes first from your legs, then from a strong pulling motion once you’ve leaned back. Your upper body should stay straight, oscillating between “10 and 2” like a metronome when viewed in profile. Key Points Always maintain a strong core and upright posture. Avoid moving the chain up and down; it should travel in a straight line. Drive through your heels to produce the most power with your legs. Complete the movement by aggressively and powerfully pulling the handle to your ribs. Now with that technique work out of the way, we can get to the fun stuff – conditioning. The Workouts The best part about the rower, especially for someone who wants to torch fat without spending an hour plodding along on the treadmill, is that it’s well-suited for interval training. These workouts are absolutely brutal. Don’t believe me? Give these bad boys a try and let me know how it goes. Beginner: 5 x 200 meter sprints Row as fast as you can for 200 meters. When you’re finished, rest for twice as long as it took you to row before repeating the next interval. Aim for consistency across all five sets (the same pace and total time to complete the sprint). A shorter rower should complete this in 50-60 seconds, which means you should rest for around two minutes. A taller rower could complete this in about 40-45 seconds and rest for 90 seconds. Try to maintain your pace and work/rest times. Then progress this beginner workout by adding an extra interval every week or two, like this: 6 x 200 7 x 200 8 x 200 Intermediate: 4 x 250 meter sprints Row as fast as you can for 250 meters, but only rest for as long as the interval takes you to complete. A shorter rower will complete the work in about one minute and rest for about one minute. A taller or more experienced rower will take about 50 seconds and rest for the same amount of time. Progress this workout by adding more intervals each week: 5 x 250 6 x 250 7 x 250 8 x 250 Advanced: 4 x 500 meter sprints The working piece is going to take you about two minutes. The key is finding a pace you can maintain for the entirety of the set. Two minutes is taxing to your metabolic systems, which is good news for fat-burning, but bad news for your psyche. Avoid what rowers refer to as “flying and dying” – sprinting too fast out of the gate and coming to a painful halt when your oxygen consumption can’t keep pace with your energy expenditure. When starting with these longer
Origin: Tip: Get Ripped on the Rower
One Exercise to Rule Them All
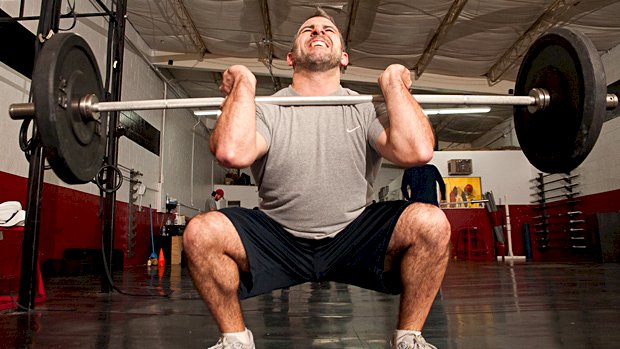 Lead Photo Credit: R. Frank Photography, CrossFit FBO Here’s what you need to know… The clean and press is the best accessory lift for increasing your bench, squat, and deadlift. Explosive lifting is missing from most lifter’s training programs, and it can pack muscle onto your frame quickly. Add the clean and press to your training in order to move the bar faster and more efficiently on all other lifts. Work towards a body-weight clean and press of 3-5 reps. Bigger Numbers, Better Body The clean and press combo is, flat out, the best accessory lift for vaulting the numbers of the big-three strength exercises. Let’s first define a clean and press so we’re all on the same page. We’re referring to a full “squat clean” where the bar is received in the rack position, followed up with a front squat. The pressing portion is a push press and not its wilder, more technical brother, the jerk. How to Perform the Clean and Press You have to progress through triple extension and receive the bar in rack position in a full squat. After you’ve landed in the full squat, return to the standing position and push-press the bar overhead. 1 – The clean It mimics an explosive deadlift, and the scoop or receiving portion recruits many of your upper body and core muscles. It’s no surprise that this part of the lift aids your deadlift. The next part of the lift requires you to front squat the weight. Firing from the hole in a deep front squat will do wonders for adding size onto your quads and improve your strength in the back squat. 2 – The push press Using your legs to dip briefly into a quarter squat, you drive the weight overhead with speed. This part of the lift will focus on strengthening your shoulders and get your upper chest involved while moving your arms to full extension. The best way to increase these lifts is to do them in a wisely structured program. Getting better at anything requires practice. Again, think of the clean and press as the best accessory exercise you can be doing for all of the main lifts and it should get its own day. Explosiveness = The Missing Link Explosively pulling weight from the ground, catching it, and tossing it overhead isn’t commonly done in most gyms, and you may think that these are only exercises for Olympic lifters and CrossFitters. Or maybe you think your explosive lifting days are over since you’re not playing hockey or football. Whatever the case, explosive lifting is the most common missing link in the pursuit of heavier weight on the bar and more pounds on your frame. The fear associated with cleaning comes from worrying about how it will affect your lower back, wrists, shoulders… and not knowing how to do it. But if you have healthy wrist mobility, shoulder mobility, and good elbow health, you’re prepared to clean and press. And, if you progress with the weights in a smart program, it’ll only strengthen your lower back. Then there’s the push press portion. Aggressively tossing weight overhead can be daunting, especially after you start working with weights heavier than 225 pounds. But if your form is correct and you progress in smart increments, it’s nothing to worry about. Keep the end goal in mind. Above all else, you want to increase muscle mass and continue to add weight on the bar for the big three lifts. Deadlifting, squatting, and benching heavy weight all put your body at risk for injury, so stop being a sissy and do what needs to be done. Why It Works for Muscle and Power Nothing puts muscle on an athlete’s frame faster than a power exercise. Strength exercises come close, but power definitely takes the edge. If a running back comes to me and wants to be bulletproof for the upcoming season, I give him explosive power exercises. When clients request better bench, deadlift, or squat numbers, I give them explosive power exercises. One of my new clients, who isn’t a beginner, began implementing explosive exercises in his program and he put on 12 pounds in under two months. Using a massive amount of force over a short period of time recruits a great deal of muscle fibers. When your goal is more muscle, maximal fiber recruitment is paramount. When you clean, the body has no choice but to recruit as many fibers as possible to produce the requisite force to complete the exercise. The push press also involves a massive amount of force development, and increasing the rate of force development is the key to lifting heavier. Move the Bar Faster Rate of force development (RFD) is how fast you generate force during an exercise or athletic activity. And if you aren’t lifting as fast as possible on the three lifts, you’re shortchanging your gains. As soon as you hit the concentric or lifting portion of the lift, you should be moving the bar as fast as you can in a controlled manner. Since moving the bar at a fast rate requires a great deal of force production, it stands to reason that you need to train RFD. The clean and press should be
Origin: One Exercise to Rule Them All
Tip: The Upper/Lower Split: Pros and Cons
 Most commonly, this training split involves 4 workouts a week with each session dedicated to upper and lower-body training in alternating succession, like this: Monday:Upper Body Tuesday:Lower Body Thursday:Upper Body Friday:Lower Body Pros For most lifters, training each muscle group twice a week is much more effective than only once. Many lifters enjoy the ability to give focused attention to a specific body region for an entire workout. Cons Twice a week may be less than optimal – especially for average to smaller guys who aren’t yet in the 1200 club (300 bench, 400 squat, 500 deadlift). Overall, this is a descent split, but there may be an even better way of organizing your training for the week. Check it out here: The Hybrid
Origin: Tip: The Upper/Lower Split: Pros and Cons
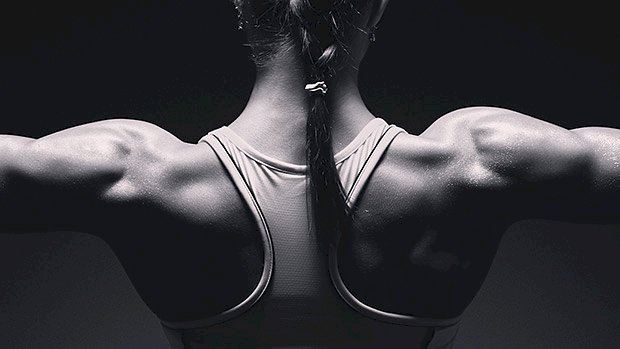
Tip: Do Fixation-Insertion Super Sets for Biceps
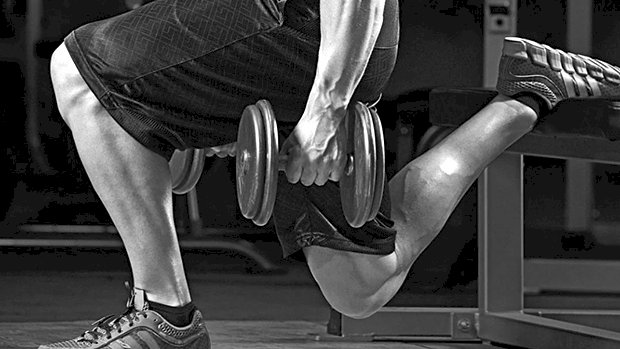
 In kinesiology, the origin of a muscle is what is fixated and the insertion is what moves. If you can superset movements that combine these two opposite functions, you stimulate muscle fibers at both ends and you get super compensation. Here’s a nasty super set for biceps: Do 4-6 reps of close-grip chin ups. Rest 8-10 seconds. Then do 8-10 reps of incline dumbbell curls. See photo below. Do five sets, resting approximately 2 minutes between sets. Here’s What’s Happening When you’re doing the chin-up, the origin is at the elbow and the insertion is at the shoulder. Then, when you do the incline dumbbell curls, it’s the opposite: the origin is at the shoulder and the insertion is at the elbow. Mechanically, you’re doing two extremes, and inducing fiber damage beyond
Origin: Tip: Do Fixation-Insertion Super Sets for Biceps
The Paleo Hybrid Diet
 Here’s what you need to know… The ultimate Paleo diet for lifters is a caveman-based diet with the re-introduction of a few starchy carbs and workout nutrition to support weight training. There’s no such thing as an essential carbohydrate, but tell that to the guy who’s combining high amounts of anaerobic training with no carbs and whose ding-dong has been lifeless for a year. The anaerobic energy production pathway runs on glucose/carbs. High intensity muscular contractions require glucose. The true value of an ancestral approach to nutrition is what it cuts from the average person’s diet. Let’s make this simple. The optimal eating approach for merging health with performance and physique enhancement is to follow a caveman-based diet – animal proteins and veggies, no junk – with the re-introduction of a select few starchy carbs and peri-workout nutrition to support weight training. That’s it. It’s a revamping of the classic “don’t eat crap, adjust the macronutrients to the demands of your modern sport” nutrition plan. And while the mainstream is starting to catch on, as evidenced by the legions of new paleo converts who ponder whether a caveman would’ve had access to rice cakes or quinoa, the dust is far from settled. Many office workers still follow high-carb diets better suited to athletes, and many strength trainers follow no-carb diets better suited for sedentary populations. The principle of specificity has been lost in the dogma-thumping, and people across the board are as confused as hell. Paleo Pondering What’s lost in all of the intellectual pontification and academic posturing is what should be the true goal of any educator – giving people simple, effective, actionable strategies that will help them produce results in the real world. So let’s allow the gurus to hash it out for dietary supremacy. You should focus on finding the most efficient path given your individual situation and goals. The Paleo Way The caveman theme is a simple theme. It works for practically everyone, from advanced athletes who have been information-overloaded by the fitness industry, down to complete beginners who don’t know (or care) much about nutrition and need a simple approach to get started. Paleo simplifies the overcomplicated and gives people actionable steps, instead of being frozen with “paralysis by analysis” listening to scientific debate. Cut out refined garbage and eat more plants and animals. I bet that will take 90% of people 90% of the way. Paleo calls bullshit on much of the “health” industry that preys on uninformed consumers. Organic crap is still crap. Gluten-free crap is still crap. Organic, gluten-free cookies are still cookies, and are not that great for your health or body composition goals. Wild salmon and spinach are gluten free as well. But apparently, in some elitist athletic and academic circles, you can’t even say the world “paleo” or “caveman.” Doing so would make you appear less cutting-edge or advanced, and certainly wouldn’t grant you access to the V.I.P. parties where everyone circle jerks over their credentials. So we have flowery language, unnecessarily technical diet strategies, and obsession over minutia. Aren’t you more interested in getting shit done? While the science behind them is crazy complex and could take a lifetime to fully master, the most effective diet and training programs are the simplest ones on paper. Crap-Loading and Other Crap Diet numbers are the most important variable to get right for physique results, so if that’s all you really care about (that’s all I cared about when I was 20, too), then crapload away: eat whatever junk food you want. But that doesn’t necessarily merge your physique goals with long-term health enhancement. Take it from someone who has worked with clients of all ages and former athletes who have messed themselves up with uninformed or extreme methods. It’s the cumulative effects of your diet over a lifetime that matter, not any 10-week timeframe. Serge Nubret once said, “Every sickness comes from food.” I think genetics and environment also play a part, but food is the thing you can fully control. Beyond theory, marketing material, “study wars,” and pointing to that one genetically gifted guy who can pull it off, you can’t tell me that when you step back from it all and just use pure common sense that you think shit-loading every day can be good for your long-term health. There are many athletes that look great on the outside but are train wrecks internally. They’re extremely unhealthy and dealing with side effects such as sleep disturbances, depression, elevated disease risk factors, metabolic damage, and digestive disorders. Ever wonder why there are so many dicks in the fitness industry? Maybe that’s part of it. Like it or not, food choices are important for optimizing overall health. If you still want to eat pizza and Pop Tarts every day, be my guest. Low Carb Is for Couch Potatoes The paleo approach certainly isn’t the
Origin: The Paleo Hybrid Diet
Tip: A Different Way to Do Pulldowns
 A former coach used to have me do pulldowns on my knees with a narrow neutral grip, and I’m still doing them years later, but with a couple adjustments. A tip from Nick Tumminello inspired me to try these with a diagonal torso angle (instead of a completely upright torso), and that change actually made it a lot more effective. Kneeling Pulldown, Diagonal Torso Leaning back forced me to have to sit down on a leg. So play around with the degree of your torso angle until you can get the tension where you want it. The second adjustment was putting one foot in front. You don’t have to, but I’ve found that it helps me stay anchored on the ground a little better when I’m using more weight than my bodyweight. The kneeling pulldown will hit your back in a different way than the standard (not-from-the-floor) pulldown, but consider it supplemental rather than a priority. You’ll probably want to do them at the end of your workout because you can’t really load them quite as heavily as you might need to. There are two reasons for this: If you load it with too much more than your own bodyweight you’ll need to fight gravity as your body tries to rise off the floor. That’s why I keep one leg bent out in front. There’s actually not enough weight in the stack. You’ll notice that I’m using almost the entire stack. Trust me, that’s not because I’m crazy strong. I can use the whole stack and, I suspect, that I’m able to do so because of the advantage you get by being on the floor instead of seated, the way you are with traditional pulldowns. So, if you’re not a person who can use the entire stack on any cable exercise, you’ll feel like a rock star doing this. And bonus – people who aren’t familiar with this exercise might assume you’re stronger than you really are when they see you using the whole stack, or anywhere near it. And I’m a fan of
Origin: Tip: A Different Way to Do Pulldowns
Tip: How to Make the Step-Up Work Better
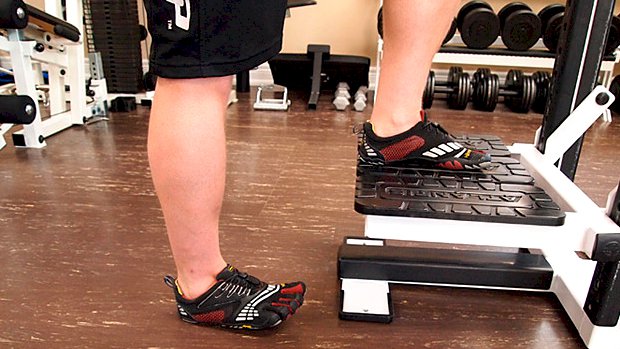 The Step-Up: You’re Doing It Wrong You don’t see a lot people doing the step-up. They probably tried it at one time but decided it just didn’t work. The problem is, most people don’t do it correctly. Most lifters unknowingly cheat on the step-up by leaning forward too much and pushing off the bottom leg. When you push off the floor leg, the leg on top of the box or bench isn’t doing much work. Make It Work: Curl Up Your Toes To keep from cheating on the step-up, curl up the toes of the foot that’s on the floor. Keep them curled up during the movement. This keeps you from being able to push off from the bottom leg so easily, because in order to push off you have to keep the toes down. As for bench or step height, you can go very high. The highest you can go is when the bench is so tall you’re up on your toes. It’s called the triple-jumper’s step-up and it involves the VMO and hamstrings more. It’s basically just a super high step-up. The key is that your knee shouldn’t buckle in as you step up. You can alternate legs or keep one foot statically on the bench until you do the desired number of reps. If you want more time under tension, use the static method where the foot up on the bench is kept in place. You can do step-ups using a barbell or dumbbells. They’re all good variations. Just keep your toes
Origin: Tip: How to Make the Step-Up Work Better
6 Ways to Keep Getting Stronger
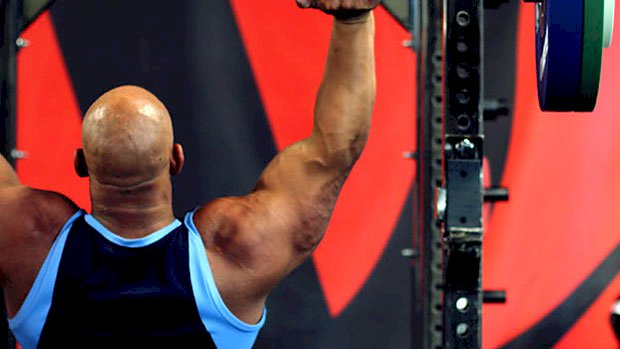 Here’s what you need to know… All progression models have their limits. These advanced strategies will allow you to keep getting stronger. End every single workout with a few sets of your worst lift. Use contrast series lifting. Do a series of 3 sets of an exercise using different speed dynamics with moderate weight, light weight, and then heavy weight. Perform isometric holds. Pick up the barbell, bring it to the weakest position, and hold it there for 12 seconds. Use next-day isolation work. Do isolation work for the weakest muscle involved in your main lift from the preceding day. Do the lift you want to improve the most twice in your workout. Doing 4 sets of an exercise twice during a session will lead to greater strength gains than doing 8 sets in a row. The Double Progression Model The stronger you get on the big, basic barbell lifts, the more muscle you’ll grow. Period. And one of the best ways to do that is to use the double progression model. First you select a rep range. Let’s say 5 reps per set. Then you select a number of sets to perform, 5 for example. You want to do all 5 work sets using the same weight and your goal is to complete all 5 sets using your target rep range. When you can complete all your sets with the same weight at the targeted number of reps, you’re allowed to increase the weight at your next session. Not being able to get all your sets done with the upper limit of the range – for example getting 5, 5, 5, 4, 3 reps – is fine, but it means you don’t get to increase the weight at your next session. However, double progression has its limits, just like any other progression model. At some point you’ll need to use advanced strategies to keep getting stronger. Here are six of my favorite. 1 – End Every Workout With Your Worst Lift If your bench press is your worst lift and the one you want to improve the most, add 3-4 sets at the end of every workout you do (on top of your regular bench press work). The reason for this is that the neural adaptations tend to be greater for the last thing you do in a workout. That’s why I like to end the session with a few high quality sets of a key lift or physical quality. When your goal is to bring up one specific lift, especially if it’s been stuck for a while, this should be your go-to strategy. The minimal load to stimulate rapid strength gains is 80%, so that’s the weight you should be using for your daily, end-of-the-workout sets. Use this strategy for at least four weeks. Pick one lift you want to focus on and perform 3 to 4 sets at 80% of your maximum. The number of reps will vary depending on what you did during the rest of the session. If you did a heavy pressing session, you might only get 2 or 3 good reps with 80%. If you did squats or deads, your upper body will be fresh enough to allow you to get 5 or 6 reps. The key thing is staying at 80% for all of your work sets. Ideally you would not reach failure on any of the sets. This technique works by improving neural efficiency for the target lift. You’ll improve intra- and inter-muscular coordination, which will allow you to rapidly gain strength in that movement. Rapid strength gains should be sustainable for 4-6 weeks. By the way, since you’ll hit the focus lift every day, you’re bound to have some residual fatigue and you might not feel stronger right away. The gains in strength on the target lift will show up about 10-14 days after you stop doing this strategy. You’ll get a big performance gain seemingly out of nowhere! Note that this also works well for improved muscle growth. One of my figure girls made very rapid gains in glute and leg muscularity by finishing every workout with four sets of front squats for four weeks. 2 – Contrast Series Lifting I adapted this method from a technique used in track and field, both with sprints and throws. It consists of doing a series of 3 sets (with a normal rest interval between sets) of a movement using different speed dynamics. For example, when working with a bobsleigh Olympian, we did one 60m resisted sprint (speed parachute), one overspeed 60m sprint (towed sprint with overspeed device), and one normal 60m sprint. We did the same thing with shot putters – throwing an overweight implement, followed by an underweight implement, and finally a normal one. In both instances you would have a slower movement, a faster than normal movement, and a normal one. This leads to greater gains in power. You can use this the same approach with basic strength lifts: Set 1: Moderate weight (70-80%) using a very slow eccentric tempo (about 5 seconds on the negative) and a 2-3 second pause at the bottom of the eccentric while still under load (e.g., not completely in the hole in a squat, not touching the chest on a bench, or the floor on a deadlift). The concentric or lifting part is then performed normally. Do 2-3 reps. Rest 2 minutes Set 2: Light weight (60-70%) done explosively. Control the lowering portion but explode from the bottom, trying
Origin: 6 Ways to Keep Getting Stronger
The 4 Mandatory One-Legged Exercises
 The Cause for the Pause Why train one leg at a time? Because a lack of single leg stability, strength, and power is linked to lower back pain and knee injuries. Plus, single-leg training is a powerful orthopedic health indicator. But it’s not always easy to get unilateral lifts right. That’s where pauses come in. They force you to perfect your technique. Better technique, better training results. Explosive Paused Dumbbell Bulgarian Split Squat The traditional Bulgarian split squat can help you identify functional weak links in single leg stance. Improving it takes motor control to create internal stability in the bottom position, which tends to be the most unstable. And the best way to improve your stability there is by adding an isometric pause at the bottom of each rep, then exploding out of the hole from that dead-stop position. You’re going to have to use less weight, but don’t worry. By increasing total time under tension to around 25-40 seconds per set, you can train yourself to repeatedly produce power in a more metabolically stressful environment while keeping movement patterns and muscular targeting on point. Do 6-10 reps per leg for 2-5 sets. If you can’t move explosively under control, then lighten the load until you can. Gradually add weight over time if you’re planning to go heavy. Paused Non-Alternating Dumbbell Walking Lunge Lunges are often left out of strength and hypertrophy programs because they’ve gotten a reputation for being lower back and knee killers. The non-alternating walking lunge with pauses at the bottom usually results in more pain-free training, less pissed off joints, and more size gains. While the forward lunge theoretically places more of an emphasis on the quads (due to the more vertical torso angle), this isn’t necessarily a good thing when it comes to longevity. More quad emphasis usually leads to more external loading and more front-sided knee pain, especially with harsh changes of directions in and out of the bottom position. Why? Because it leads to momentum and compensation. You can limit this by using a non-alternating step pattern. It places constant muscular tension on the lead leg. The goal here is to train unilaterally and get a metabolic stress-based pump in the lower body while sparing the knees. So another method we can use is adding short pauses at the bottom of each rep. Don’t rest your back knee on the floor, but rather hover over the floor with full tension for a half second before driving up with the front leg, lead by the glutes and hamstrings. While this movement can absolutely be loaded heavy, be careful not to lose the feel of it as the dumbbells get heavy. Stay strict on your tempo and technique for sets of 8-12 reps with pauses, and don’t forget to train both sides equally. Lead with your weaker leg first, then finish off each set with your more dominant side. Dynamic 90-90 Paused Reverse Lunge I hear it all the time from new athletes: “Single leg work hurts my lower back.” Most lower back pain can be attributed to two factors: a lack of stability through the lumbo-pelvic complex and/or a lack of hip mobility. So why not bring up both of these common deficits with this one movement? It’s important if you have motor control or balance issues. Test your hip and core stability with only one foot on the ground, and the raised knee and hip bent to 90-degrees. If you can’t hold this position for 30 seconds without losing balance and having to touch down, start doing single leg movements like this one. It’ll help you get strong and coordinated in single leg stance, and train you to stabilize and brace properly through the lower body and core. This will greatly transfer to your big lifts and keep you healthy in the long run. Start this movement by getting into that 90-90 position with one leg. You’ll notice that the heavier you load this exercise with dumbbells, the more challenging it’ll be to maintain stability. Pause for a full second at the top to tap into that lateral hip stability and glute activation, then drive that leg back behind into a reverse lunge. The back knee should graze the ground while your torso angle is positioned slightly forward to bias the posterior chain stability. From this bottom position, explosively drive back up into the original starting 90-90 position, leading with your hip flexors on the dynamic leg. Do this exercise in non-alternating fashion between 6-8 reps per side. Remember, the goal is to tap into your CNS and gain stability in the single leg stance, so keep your rhythm and tempo of the movement on point. This exercise can make your heart rate sky-rocket. It’ll smoke you without a ton of weight. Single-Arm Single-Leg Romanian Deadlift with Iso-Hold Do you suck at single leg RDLs? Does your lower back hurt? The two are related. And fixing this highly complex problem is quite simple: nut up and do the single leg RDL. My preferred setup for introducing and improving the single leg RDL
Origin: The 4 Mandatory One-Legged Exercises
