 Juiced to the Gills It’s hard to find a woman wearing yoga pants who isn’t carrying a Big Gulp-sized cup of blended fruits and vegetables. They’re practically inseparable – kind of like Thor and his hammer – but there are plenty of men that seem willing to swill this stuff too. They all put their heads on their pillows at night and sleep peacefully, believing that all that juice is helping them thwart a whole spectrum of diseases and ailments, along with making them slimmer with breath that smells like an Air Wick plug-in dispensing the clean scent of fresh-cut hay. They probably shouldn’t sleep so soundly, though. Juicing and plain old fruit juice carries a host of potential problems. Drinking too much of it or drinking it too frequently can make you pre-diabetic, fat or fatter, wipe out the microflora in your gut, and, according to new research, possibly increase your chances of dying by 24%. (1) It’s all because of the sugar they contain and, lest you think that sugar from pulverized fruits and vegetables is somehow better for you, realize this: All sugar, whether it’s from fruit, honey, Coca-Cola, or high-fructose corn syrup (HFCS): “Delivers the same sugars in the same ratios to the same tissue within the same timeframe to the same metabolic pathways.” (2) A Crock Filled With Horse Manure Instead of Honey I know what you’re thinking: “How can honey be just as bad as HFCS? For that matter, how can HFCS be the same as sugar from fruits, regular corn syrup, or table sugar? That’s certainly not what I’ve read.” The simple answer is that what you’ve read is a crock, like when your older brother swore to you that the movie “Ratatouille” was based on a true story. The more complicated answer is that regular corn syrup doesn’t have any fructose in it at all. It’s 100% glucose. By that standard, ANY corn syrup that’s manufactured to contain any fructose is automatically classified as HFCS. Consider that the HFCS most commonly used in industry contains only 42% fructose, while the much-revered-by-granola-crunchers honey contains 49% fructose. (3) Even plain old table sugar is a 50/50 blend of glucose and fructose. And yeah, fructose is metabolized differently and can more directly impact blood sugar than glucose in the short run, but the overall metabolic effects are the same as you get from any type of sugar. All of this begs the question, why then is HFCS so feared? The problem originated with a 2004 study that correlated America’s increasing fatness with the rise in HFCS production, but as we know, correlation doesn’t always mean causation. Hell, you could have made a similar case that America’s fatness was in fact caused by decreased use of the 90’s slang term, “Boo-Yah!” Again, correlation but not necessarily causation. A 2014 review in the journal Diabetes Care tried to smack down the fructose myth by writing: “The belief that sucrose is metabolized differently than HFCS is a myth. No study has shown any difference between the two… nor is there any difference in sweetness or caloric value.” (4) That means that all sugars, regardless of where they come from, can do equal amounts of harm, but juicing in particular poses a litany of unique problems. What’s the Deal with Juices? When you Osterize your fruits, you obliterate all the fiber so that the microflora in your gut have little to munch on. They end up kicking tiny buckets and their bodies are loaded onto the turd train leaving for Porcelain City at 7 AM. Not only that, but the carbs are so bladed up, so cut up into teeny-tiny pieces, that they can actually bypass a lot of the digestive process. That means insulin surges. Big ones. If the surges were tsunamis, your uncle’s goat farm in Nebraska would be washed away. Much of that huge bolus of sugar gets hand delivered to the liver, where it’s converted into fatty acids and then sent to your thighs, butt, waist, or wherever else you don’t want it, for storage. This grinding up also affects the volume of whatever fruit’s juice you’re swilling. Un-pulverized fruits and vegetables take up a lot of space and push against the walls of your stomach, which tells the brain to lay off with any more food. Not so much with juices. You might be able to eat a few whole kiwis, but you can probably drink a considerably larger number of them. More fruit equals more calories. More fruit equals more sugar. And more sugar is, as you know, a problem. You’re probably still clinging to the notion that the sugar in juices can’t be as bad as those in sugar-sweetened beverages like Mountain Dew, Coco-Cola, or Red Bull. They are. In terms of long-term effects on diabetes and overall mortality, there’s no difference between the two categories, at least if you believe the results of the big study I mentioned above. Sugar’s Current Employer is Death Researchers from Emory University, writing in JAMA, detailed the results of a study of 13,400 US adults over a mean of 6 years. (1) They found that each additional 12-ounce
Origin: Tip: Your Morning Orange Juice May Be Killing You
Tag: Your
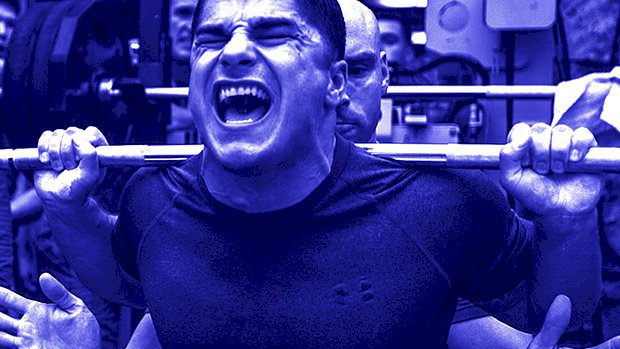
The Missing Half of Your Deadlift
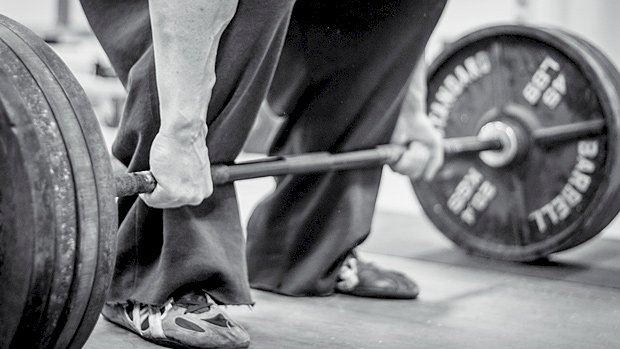 When JL first started powerlifting, he sucked at the deadlift, so he sought out the best. Chuck Vogelpohl became his training partner and his understanding of the deadlift changed forever. Sprinkle in a lot of coaching time with Louis Simmons, Dave Tate, Steve Goggins, and Eddie Coan, and JL turned into a professor of the deadlift. His best pull in a meet is 804 pounds and you don’t pull over 800 pounds without picking up a few tricks of the trade. As an expert, he’s become keenly aware of the single most important and under-coached aspect of the deadlift, which is how you set the bar down when doing reps or, as he likes to refer to it, the dead-lower. It’s the thing that almost all lifters are f*cking up and the reason their pull is stuck. So set yourself up for success by mastering the fundamental concepts that have been hiding from you in plain sight. Once you master the initial setup and the basic mechanics of the lift, you’ll quickly see that the greatest opportunity to improve comes from putting the bar down better. Mistakes Made When Lowering the Bar If you’re not methodical about the way you put the bar back down, you’re messing with your next rep. At best, you’re being inefficient. At worst, you’re putting unnecessary stresses on your joints and practicing sloppy mechanics. And that’s just not how people get strong and then stay strong. Here’s a list of the most common technical errors you’ll see when it comes to lowering the bar, or the steps that immediately precede it. Mistake 1 – Trying to be a gymnast When you’ve reached lockout, do you stop moving, or do you continue to extend through the spine? If you keep moving, be aware you get no extra credit for doing a back bend at the top of your deadlift. Just f*cking stop when the hips reach extension. The deadlift is a simple movement. Your hips move, your knees move, and even your ankles move. But nobody said anything about your lumbar spine. The truth is, many people fake hip extension by cranking on their lower back. Think of it this way: If your hips have stopped moving but you’re still driving forward, that’s how you know it’s your back moving. This nasty habit releases both lat and anterior core tension so that the big muscles that keep you safe are now relaxed. This increases your risks without any further improvement in performance. It’s not a great trade-off, especially since it’ll compromise your next dead-lower before it’s even started. Think of this as setting up the setup for your setup. Mistake 2 – Squatting the bar down from the top Quad-dominant people love to do this, but shooting your knees forward is a sign of a weak posterior chain and it’s a good way to hurt your back. If you’re intent on moving anything truly heavy, you need to keep it as close to your center of mass as possible. Shooting the knees forward and sliding the bar down the quads like they’re a ramp will launch you into shitty deadlift land. That makes things less efficient and compromises your ability to move some real weight around. What you want to do is hinge back and once the bar has cleared the knees, you squat down. The video contrasts “ramping the bar” with good form: Mistake 3 – Forgetting to squat in the bottom Telling people to squat at the bottom has helped us teach thousands of people to dead-lower correctly. A deadlift is nothing more than a Romanian deadlift (RDL) until the bar passes the knees, at which point you squat. As with any squat, the knees and butt must move down. People confuse this and forget the squat part, which causes major issues. Look at it this way: Assuming you’re not a contortionist, forgetting to squat down will exhaust your range of motion at the hips before the bar has touched down. With no more hip flexion to give, further movement has to come from somewhere. And if your hips and knees aren’t moving BUT the bar is still travelling down, that’s your spine doing the work, homie! You can’t lift massive loads safely if the movement comes from the sacroiliac (SI) or lumbar spine instead of the hips. You’ll also have to readjust everything to be in good position to pull your next rep off the floor; either that or crush your back picking it up in the same way you just set it down in. That’s more work, or more wear and tear, to get the same job done. The Rules on Dropping the Bar (Don’t be a Douchebag) You’re 40% stronger eccentrically than concentrically. This means if you’re not strong enough to lower the bar correctly, you shouldn’t be picking that weight up anyway. Now, if you’re in a meet or going for a max attempt, we’re cool with you letting all the tension out and doing a controlled drop before you celebrate a massive PR. This will happen at most four times per year. Generally speaking, though, don’t be a douchebag and drop the bar from the top. We don’t care if you have bumpers on the bar (which just means you aren’t very strong because you can’t go over 500 with bumpers), but don’t ever, ever, let go of
Origin: The Missing Half of Your Deadlift
Tip: Test Your Stability in One Minute
 There are three things you need to know: Most lifters skip crucial developmental exercises. Having range of motion doesn’t matter if you can’t control it. Chasing numbers before stability is a fast track to injury. I’ve lost count of the number of lifters I’ve met over the years with back and knee problems. Why so many? Because people can’t control themselves without using weight. Wait, what does that even mean? It means that most lifters get so caught up with increasing their numbers and getting stronger on paper, that they completely neglect the strength it takes to control their own body weight. This takes stability, and they have no idea they lack it because they never test it, which isn’t that hard to do. The Lunge Test Now, I’m not inventing some new-fangled “one exercise to fix all” here. This is a lunge, done slowly. So what’s the significance? All the lifters that come to me with long-term back or knee issues can’t do it. Even with impressive totals on their main lifts, they struggle to do one controlled rep on each leg. Can you do it? The Steps Set up by doing a lunge first so you know where to comfortably keep your feet. Extend both your knees so your legs are straight. Over 30 seconds, lower yourself down to the bottom of the lunge, keeping a consistent speed. Tap your knee gently to the ground while maintaining tension. Rise up slowly, taking another 30 seconds until your legs are straight again. Repeat on the other side. Tips and Reminders If it’s not challenging, increase the range of motion required by elevating both feet on plates or boxes. Remember, the purpose of this exercise is to have full control through complete range of motion. If you suddenly speed up a bit to avoid a certain position then that’s where your weakness lies. You may not completely lose balance or drop all the way to the floor, but if at any point you lose the consistent slow speed you can’t count that as a completed rep. Now take it a step further. Aim for 5 reps minimum on each side with no problems. If you can’t complete them, you’ve got your work cut out for you. Just add it to your warm-ups for a while and you’ll master it. Advanced Version The elevated version isn’t essential but it’s a nice way to improve your overall hip mobility and push that stability further. Don’t be afraid to push your body with more stability exercises. You’ll get that same satisfaction of being able to do something a lot of others
Origin: Tip: Test Your Stability in One Minute
Tip: Smoke Your Legs With an EZ-Bar
 Every gym has an EZ-curl bar, and it’s not just for arm day. It’s actually a great tool for lower-body training. Due to the unique shape of the bar, two positions work well: the front rack or front squat position, and the Zercher. The Front Rack Holding the EZ-bar in a California-style (arms crossed) front rack is as comfortable as it gets. Here’s how it looks with a rear-foot elevated split squat: Many struggle with the standard front rack because of mobility restrictions and jacked-up shoulders. The shape of the EZ-bar sits nicely on the shoulders, while the California grip adds to the comfort. The narrow width of the bar also makes it less awkward for beginners, as well as for times when the squat rack is taken up or space is limited. Having an EZ-bar in your garage gym is always a good idea. Benefits of the front rack include a more upright torso, a forward load distribution, greater quadriceps dominance, and solid trunk development. The Zercher Position The shape of the bar fits nicely in the crooks of the elbows, and a little padding increases the comfort of this sometimes-awkward setup. Here’s how it looks with a squat: That anterior load will fire up nearly every muscle in your body. It’s a good position to use if you’re limited on workout time, and it’s great for those involved in MMA and tactical strength and conditioning. In the Zercher position you can squat, lunge, split squat, hip hinge, and do step-ups and loaded carries. Preparation The front rack position is easy. For the Zercher however, you might want to use some elbow or knee sleeves, a towel, or fat grips for added padding. If there’s respectable weight on the bar it can be awkward to pick the bar up and get it into position. You have four options: Sit the bar on a gym bench and load it there. Take it from a kneeling or half-kneeling position. Use free-moving (independent) squat stands. This is the best option for bigger weights. Load the bar while it sits in a preacher bench and take it from there. Set the Zercher position off the floor. You’re also welcome to pick it up like a gorilla if your body allows you to. Exercise Options Zercher Good Morning (Staggered Stance) Front Rack Lunge Zercher Lunge Zercher Split Squat Step-ups and loaded carries also work great with an EZ-bar in either the Zercher or front rack
Origin: Tip: Smoke Your Legs With an EZ-Bar
Tip: Build Your Back With Bodyweight
 Mechanical drop sets (unlike regular ones where you just reduce the weight as you fatigue) allow you to switch to an easier modification of the movement, usually with the same weight. This helps you to increase metabolic stress and time under tension, both of which will stimulate hypertrophy. If you use this during the main part of the workout, shoot for 3-4 mechanical drop sets. If you use this as a finisher, then one set is more than enough. Do as many standard wide-grip pull-ups as you can. Use a weight vest or hang additional weight from a belt if you can do more than 15. Next, go to volitional failure on eccentric (negative) pull-ups. Jump up to the top position, then lower yourself as slowly as possible. Drop down under a suspension trainer or a bar and perform as many horizontal rows as you can (feet on the ground or elevated, depending on your level of fatigue). The suspension trainer is preferable as it allows your hands to rotate to maintain optimal shoulder position and to better engage the back muscles.
Origin: Tip: Build Your Back With Bodyweight
Tip: Ramp Up Your Prowler Training
 There are variables when it comes to sled pushing, like the height of the handles, the height of the pusher, and whether you push the sled with straight arms or bent arms. Since the bent-arm style usually involves a slightly more upright torso position, it tends to create a shorter stride length than when you push on the handles with your arms extended. Most people can push more weight on the Prowler-style sled with the bent-arm pushing style, so the weight-load you use can influence your arm position. When you’re pushing heavier loads for shorter distances or durations, you may want to choose the bent-arm position. Conversely, when you’re and pushing the sled for longer distances or durations with lighter loads, you may want to go with using the straight-arm position. Straight Arm vs. Bent-Arm Sled Pushes Here’s how to take advantage of this straight arm/bent arm distinction and get more out of your Prowler work: Straight-Arm, Then Bent-Arm With Same Weight: Take advantage of the fact that the bent-arm position is slightly easier because of the reduced range of (stride) motion. You can increase your work volume by extending a set of pushes by switching from the straight-arm version to the bent-arm version when fatigue starts to set in. Straight-Arm, Then Bent-Arm With Heavier Weight: Do 2-3 sets of straight-arm pushes. Then do a few more sets of bent-arm pushes using a heavier load for roughly the same distance or duration. Bent-Arm, Then Straight-Arm With Lighter Weight: This is the reverse of the previous strategy. Do a few sets of pushes with bent-arms, followed by a few more set with a straight-arm using a lighter weight. In this scenario, the bent-arm sets are done first using heavy loads for shorter distances or durations. You then do the straight-arm sets with lighter loads for longer distances or
Origin: Tip: Ramp Up Your Prowler Training
Tip: Crush Your Lats With This Exercise
 This is one of the very best bang-for-your-buck exercises for increasing strength and muscle mass while also maintaining and even enhancing mobility through the shoulders and back. As anyone who’s tried to stretch a fully pumped muscle knows, this is not a comfortable feeling. That said, this isn’t for beginners. Neutral-Grip Lat Pulldown, Accentuated Eccentric The neutral grip allows the lats to increase their range of motion into a stretch at the top of the movement while also helping the shoulder complex stay in a more centrated position. Both variables are great for longevity, orthopedic health, and muscularity. Rock back a little in this exercise to create almost a high-row angle on the concentric (pulling) portion of the exercise, then come back and normalize your torso position into neutral. Bring your head forward to really stretch through the eccentric (negative) portion of the exercise. If you master this movement, get a partner to force the eccentric by pressing down on the weight stack as you slowly let your hands and arms move up into a straightened position. (See video.) If you’re a sicko who loves the pain, add a 10-30 second forced stretch out of this exact position while maintaining neutral shoulder alignment and stretching through the lats. This will stick a fork in your workout, so program it on the tail-end of an upper body or back-emphasized training
Origin: Tip: Crush Your Lats With This Exercise
5 Ways to Unlock Your True Strength Potential
 Lift Bigger on the Big Lifts You are only as strong as your nervous system allows you to be. Explosive exercises and plyometrics are central nervous system (CNS) primers. When programmed strategically, they can unlock your power and strength potential in the big lifts. And if you’re an athlete, they’ll increase your explosive performance and make you neurologically efficient. Here’s what to do before bench pressing, squatting, and deadlifting. These moves will activate the muscles you’re about to use, prepare your body for explosiveness, and reveal your true strength potential. Bench Press Primer Twitchy Seal Jack + Explosive Medball Press A1. Twitchy seal jack, 3-5 reps A2. Explosive bentover medball press, 3-5 reps Do 2-3 total supersets with 30-45 seconds rest between bouts. Many lifters struggle with barbell bench pressing because it causes shoulder pain. But if bench pressing causes pain, it’ll also hinder your power and strength under the bar. You’d perform better without the pain. The first thing lifters often do is try to gain mobility. But more mobility isn’t going to fix your achy shoulders. What will? More activation and central nervous system stimulation. Before bench pressing, do an explosive CNS primer superset. Pair the jack with an explosive medball press. It’ll activate postural stabilizers of the core, hips, and shoulders AND trigger the type of heightened neurological state that produces powerful, pain-free presses. How to Do It The jack is a game changer for your performance. Don’t overlook it because of its old-school PE class history. It’s a safe and effective preparatory movement you can do anywhere. For the horizontal press, using the seal jack variation (arms in front of the body) is better because it moves the shoulders in and out of an end-range stretch. This slight stretch revs up the nervous system, especially when executed fast and with precision. Start with your arms elevated up so they’re about parallel to the ground with your palms facing one another and your thumbs up. Explosively complete 3-5 seal jacks, really focusing on moving in and out of that end range quickly and changing direction as fast as possible at the shoulders. These are about quality, not quantity. After a few twitchy reps of seal jacks, move directly into the medball press. Using a lighter medicine ball between 6-12 pounds, hinge at the hips with a neutral spine and engage the glutes and core to stabilize. You’ll be exploding the ball into the ground as hard and fast as you possibly can for 3-5 reps. Try to press with rhythm on these to elicit a heavy neural response that happens with quick repeat bouts. Keeping the total reps low and the quality high, shoot for 2-3 supersets with 3-5 reps of seal jacks and another 3-5 reps of medball presses, then hit the bench. You’ll enjoy the carryover to explosive performance. Deadlift Primer Twitchy Jumping Jack + Medball Slam + Horizontal Jump A1. Twitchy jumping jack, 3-5 reps A2. Explosive overhead medball slam, 3-5 reps A3. Depth broad jump from box, 1 rep Do 2-3 total supersets with 30-45 seconds rest between bouts. Because the deadlift is a relatively “slow” movement to the naked eye, it’s easy to forget that this lift needs to be one of the most explosive in your arsenal if you want to get stronger. But since the deadlift is notorious for being a backbreaker of an exercise, people gravitate towards doing passive prehab work on their spine, hips, and shoulders to prepare for pulling, which is exactly what NOT to do when trying to train explosively with maximal torso stiffness. Instead, match the deadlift with a neural primer that helps create maximal stiffness at the core while generating an immense amount of force output and fiber activation. How to Do It The first movement in the giant set is the old school jumping jack that’s performed with twitchy explosiveness in and out of a lat stretch in the overhead position. Why the jumping jack for deadlifts? Easy. The lats are some of the broadest muscles in the body with huge splaying attachment points throughout the back of the rib cage, lower back, and pelvis. You need them for deadlifting. By tapping into their activation you can help achieve better stiffness in the shoulders and torso during pulls. Stick with 3-5 fast reps, coordinating the feet with the arms up overhead. The deadlift is based on a hip extension movement pattern, so you’ll also need to train it with CNS primer movements. The overhead slam is the perfect way to train triple extension (hips, knees, and ankles extending) in a coordinated fashion. The slam also requires you to be explosive in the overhead position, which places an emphasis on both the lats and torso. Focus on fully extending the ball up overhead with the entire body and coming into a powerful flexion to slam the ball as hard as you can into the ground for 3-5 reps with maximal velocity. The final step is to do a depth broad jump. This is a hip-dominant jump
Origin: 5 Ways to Unlock Your True Strength Potential
Tip: Protect Your Wrists from Lifting Injuries
 Passive Wrist Stretches These stretches will help you to create range of motion in your wrist flexion and extension by using the floor as assistance. If you have tons of wrist extension and zero flexion, your wrists aren’t balanced, and your elbows are going to get pissed off in the long-term. Never force any stretch and always listen to your body. If you notice that your wrists feel tender the next day after doing these, that’s your sign to back off a bit. If they’re okay then you can start to push a bit further the next time. If even using the floor is painful, then step it back a bit. These exercises can be regressed by using the wall. Try doing them after a session with a lot of grip work. You’ll notice forearm tightness practically disappear within minutes. As a side note, doing “shoulder rotations” in any of these positions also makes for a great warm-up addition. Radial and Ulnar Deviation Radial and ulnar deviation is the side-to-side motion of the wrists. It’s neglected by almost everyone. If you practice advanced hand balancing then this is absolutely crucial, and if you do overhead squats or snatch presses, this thumb-grab stretch is an awesome way to alleviate some of the pressure caused by heavy
Origin: Tip: Protect Your Wrists from Lifting Injuries
Tip: Fire Up Your CNS For Better Lifting
 Use the Force This is a great way to begin any lifting workout. The idea behind “rate of force development” is to do an exercise that’s explosive in nature and that utilizes all of the body’s major muscle groups. Doing an explosive exercise prior to lifting fires up your central nervous system and gets your body physically ready to lift hard and heavy. Some lifters do rate of force development work by incorporating jumps, explosive push-ups, or variations of the Olympic lifts. While these are undoubtedly great ways to produce force, there are people that need less impact on the body. Heavier-set lifters and those recovering from an injury will have a hard time absorbing the impact from a jump. And beginners may not have the technical skills to perform Olympic lifting variations. If you’re one of these people, try out some of the exercises below before your next lifting session so you can still reap the power and strength benefits from force production. Medicine Ball Force Production Options Medicine Ball Chest Pass Similar to a basketball throw, step out with one leg while pushing off the other. Explosively extend your arms as you throw the ball to a partner or against a wall. This exercise goes well with any pressing day. Medicine Ball Thruster Make sure you drive your knees out as you squat down. Utilize the stretch reflex (the bounce you feel at the bottom of the squat) to rocket your body back into a standing position. Once you reach this standing position, continue to explode up while forcefully extending the arms. This exercise works great before squatting. Backward Medicine Ball Throw Keep a strong, flat back as you bend down towards the medicine ball. Explosively drive your hips forward as you go to rip the ball from the floor. Make sure you’re bracing your core the entire time and don’t hyperextend the back at the end of the throw. This exercise fits well on deadlift day. Jumping Force Production Options Banded Broad Jump This one is great for practicing a broad jump without as much impact. Placing a resistance band around your waist will greatly reduce ground impact as you land. Make sure you land with a flat back and knees tracking outward to prevent injury. Banded Lateral Single-Leg Hop This will feel awkward at first but it’s great for producing force laterally as well as activating the glutes and hamstrings. When you set up, remember to get your arms involved. Pretend you’re skating or running and hop using your opposite arm and opposite leg. Think of bringing your arms from your chin to your back pocket as you hop from side to side. Sets and Rep Scheme Remember that rate of force development is supposed to be explosive in nature. Don’t do these exercises as conditioning prior to training. Do 3-5 sets with no more than 5 reps per set. Give yourself plenty of time to recover between sets. These exercises are neural in nature which means you should be taking longer breaks between sets and should attempt to produce as much force as possible with each
Origin: Tip: Fire Up Your CNS For Better Lifting
