 “Butt scratchers” are named after how a dog looks when trying to wipe its butt on your carpet. If yours does this frequently, you may want to consult a vet. For humans though, mimicking this butt drag (except going backwards) is a surefire way to pummel your abs. Here’s what they look like: The idea is to tuck your pelvis under, behind your arms. Your butt isn’t touching the floor though; it should be as far off the floor as your arm length will allow. This “drag” movement makes these particularly useful at working your abdominals through both spinal flexion and posterior pelvic tilt. This combo means that butt scratchers are effective at working your superficial abs in their fully-shortened position. There’s zero abdominal load through most of the movement, but as soon as your butt drags behind you you’ll be lucky if your abs don’t cramp from the intense contraction. Try to hold it there for a brief second before letting your abs up for a breather. Awareness of your superficial abs can often be an issue when trying to develop them. You need to actually find them before you can target them with more loaded ab exercises that’ll make them grow. Butt scratchers will help you find your abs with very little load and have them wrecked after just a few sets. If you’re the type that feels abdominal crunches in your neck, or leg raises in your hip flexors or lower back, then butt scratchers are a novel alternative that’ll get the job done. No Sliders or Space? No Problem! If you don’t have a pair of sliders, don’t worry. For a fraction of the cost, a pair of furniture sliders will do the same thing and will slide on most surfaces. You’ll find these in many hardware stores or any gigantic online retailer named after a rainforest. An old towel will also slide comfortably on a wooden lifting platform or gym floor. As an alternative, butt scratchers can also be performed statically. Your hands stay in one position on the floor and you’ll rock back and forth. Again, the focus should be on tucking your pelvis under and behind your forearms. Statically, these can be done with your heels in a suspension trainer (TRX, etc.), on a foam roller, or with a Sorinex glute-ham roller or similar. If T-Rex arms let you down, an easy workaround would be to have something by your sides to elevate you higher. Push-up handles, yoga blocks, a few hex dumbbells, or step boxes will
Origin: Tip: Pummel Your Abs with Butt Scratchers
Tag: with
Tip: Isolate with Fisherman Rows
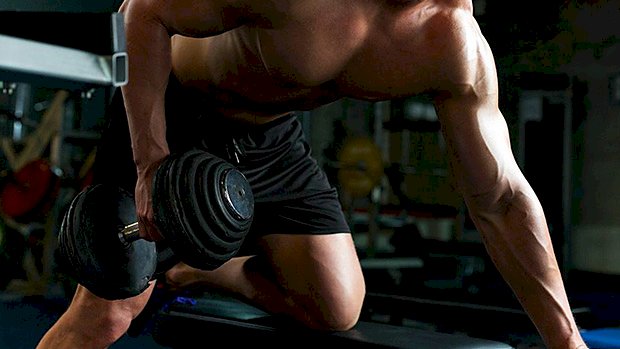 Dumbbell rows are a staple in many programs for unilateral pulling strength and development of the lats. Unfortunately, there are plenty of people who might not have the right conditioning to use the classic single-arm dumbbell row without risk, and others who just plain struggle to get a handle on proper form and technique. For lifters with a history of lumbar issues, the last thing they need is a one-sided load combined with an uneven hip position, which is what happens when they place one leg up on a bench while the other stays grounded. Moreover, finding the right places to put your hands and feet to promote a level hip position to avoid the pitfalls can be frustrating. Even healthy lifters can have trouble finding a position that gives the proper amount of emphasis to the right areas. Solution? Do the fisherman row: The major difference you’ll see right off the bat is the fact that both legs are mounted on the bench, not just one. This immediately stabilizes the pelvis so you don’t have to spend time trying to finding the least objectionable hand, foot, and knee position. Make sure to set up on an angle to the bench so the dumbbell’s path isn’t impeded. Since this setup places the arm a bit farther away from the bench, it also allows you to use a greater rotation at the wrist, which allows you to hit the upper back and lats from a slightly different angle while staying
Origin: Tip: Isolate with Fisherman Rows
Tip: How to Lift with Angry Joints
 Lift hard for long enough and you’ll eventually have some joint pain. Whether it’s the knee, shoulder, lower back, or wrist, something will probably flare up. Now, you could pop some pain killers and grind through it until your flare-up becomes a real injury… or you could do the smart thing and manage your injury. If you’re ready to check your ego, use some of these strategies. Increase Your Volume and Decrease Weight Your muscles may be able to take heavy daily lifting, but that doesn’t mean your joints can. Dropping the heavy lifting and increasing your reps will not only give your joints a break, it’ll allow your nervous system to recover while you shift focus towards muscle growth. The amount of effort you put into your workouts doesn’t need to change just because you’re going lighter. Taking shorter rests and increasing your reps will create more metabolic stress which will lead to greater hypertrophy. Also, higher reps will get the heart pumping hard which provides extra blood flow and circulation to your cranky joints. Partial Reps Partial reps create more time under tension and emphasize the “pump” when lifting. Limiting your range of motion to the middle two-thirds of your lift and avoiding the lockout will relieve excess strain on your joints. As an example, here’s the neutral, close-grip incline press: Use Bands as Upper-Body Assistance This can prevent excessive stress at the end range of motion on your pull-ups and push-ups. They’re a great way to add both higher volume and partial reps while allowing your body to be in constant motion for your calisthenics exercises. Banded Partial Push-Up Banded Partial Pull-Up Even if you’re capable of repping out 50 push-ups or 20 pull-ups, bands push your volume even higher and keep a smooth muscular contraction throughout your sets. Deload Your Spine for Lower-Body Work If you feel like you’ve shrunk a couple inches after compressing your spine with heavy squats, it may be time to deload. You can still work the squat movement without all the spinal compression. One of the best ways is with the belt squat. The belt squat takes the spine out of the equation because a belt is placed around the hips and the weight is applied from the waist down. No belt squat machine? Rig together your own variation. One way to do it is to use a couple straps, a hook, some boxes, a weight belt, and a heavy kettlebell or two. Kettlebell Belt Squat Ideally, keep your butt pushed against a wall. This will provide extra stability and allow you to use your glutes and hamstrings to a greater
Origin: Tip: How to Lift with Angry Joints
Tip: Should You Bench With Your Feet Up?
 Charles Poliquin used to have a term for guys who bench-pressed with their legs off the floor and their knees bent at a 45-degree angle. He called them “future orthopedic patients.” He thought that benching that way was plain stupid and totally useless, unless maybe Ludmilla, the one-eyed Russian former Olympic shotputter who works in custodial services at the gym was mopping up around the bench press and you had to lift up your legs because you were afraid of getting a meaty backhand across the face for mucking up her clean floor. I’ve always thought it was a stupid way to bench, too, and I can’t help but shoot condescending stares at any moron I see doing it. That’s why it was particularly painful to read this new study. It seems, cough, hem, haw, that benching with your feet off the floor actually increases the involvement of the pecs, delts, triceps, and even the muscles in the forearms. But then I thought about it a bit and decided that their findings, while legitimate, weren’t applicable to anyone who wants to add muscle or get stronger. What They Did Spanish scientists recruited 20 young men and carefully established their 1 RMs (the most weight they could lift for one rep). They then wired them up with enough electrodes to make them look like the dudes in a Marvel Comics origin story, just before something went horribly wrong and turned them into super heroes or super villains that spat lighting bolts out of their wazoo. After thoroughly warming up, the subjects performed 8 reps of bench press with 60% of their 1 RM with either their feet on the ground or their feet elevated. They did a set of 8 reps using a 2:2 tempo (both lowering and raising the bar to a count of 2). After an appropriate rest period, the participants repeated the lifts, doing the opposite (feet up or feet down) of their first test. What They Found Doing bench presses with the legs up significantly increased the recruitment of the pectoralis major (clavicular portion, sternal portion, and costal portion), anterior deltoid, triceps brachii (medial head), forearms (flexor digitorum), rectus abdominis, external oblique, and rectus femoris muscles. This prompted the authors of the study to write, in Yoda-speak, the following: “To perform the bench press exercise with flexed hips could be recommended for training in sports where the upper limbs and hip flexor muscles are required.” How to Use This Info While I don’t doubt the findings of this study, I’m still not going to do or recommend the “legs up” bench press. I’ve got several reasons. For one, the slow tempo they used in the study doesn’t reflect how people normally bench and I’m pretty sure that lifting explosively, or at least quickly, would show a different recruitment pattern. Secondly, their study showed that there’s more activation of the rectus femoris in the legs-up bench than there is in the conventional bench. The trouble with that is, the bench, when it’s done with any amount of significant weight, is actually a whole-body lift with all kinds of involvement from the legs. Clearly, these guys were using a weight that was so light that it didn’t require any drive from their legs. If they had used a heavier weight, it would surely have shown a higher level of recruitment of the rectus femoris than just lifting up your legs so Ludmilla can mop under your feet. Third, other studies have shown the opposite – that the conventional bench recruits more muscle than the legs-up version. (Of course, those studies used a BOSU ball underneath the lumbar spine to introduce instability, and the weight of the lifter plus the weight on the bar just might have smushed the ball down so it was, in effect, close to being a flat or semi-flat surface.) Lastly, recruitment of motor units isn’t the end-all and be-all of hypertrophy or strength. What matters more is the mechanical loading the muscle fibers are subjected to. Look at it this way, if you were to put on a chicken costume, climb atop your house and jump off, you’d recruit a whole lot of pectoralis-muscle fibers as you frantically sought to achieve flight, but all the flapping in the world wouldn’t lead to additional strength or size. What you need is adequate load, but if you attempted legs-up benches with much more than the 60% of 1 RM used in the Spanish study, you’d eventually run into the same problem you do with any type of instability training – having to balance the bar lengthens the amount of time between the eccentric and concentric part of a movement, resulting in a much-impaired stretch-shortening cycle, which impedes strength gains. Also, the limiting factor in any kind of instability training becomes the strength of the stabilizer muscles involved in the lift. In other words, muscle fiber recruitment of the chest, delts, and triceps ultimately would suffer because the amount of weight you’d need to coax the muscle to grow would likely be more than you could balance and keep from ending up an orthopedic
Origin: Tip: Should You Bench With Your Feet Up?
Tip: Build Big Shoulders With Bodyweight
 The handstand walk is a long-term skill to acquire, but it’s definitely worth learning. The progressions are quite attainable and provide a unique pump that’ll make your triceps and shoulders burn like nothing else. An added bonus is the open shoulder position, which helps with thoracic mobility. Plus, having your weight on your hands builds a crazy amount of shoulder stability that you just don’t get with barbells. Mastering the Handstand Walk All you need is something to elevate your feet. This could be a box, bench, sofa, bed, chair, etc. Then you have five different exercises: Holding the handstand position, aiming for a vertical torso Shoulder taps Walking from side to side Feet elevated push-ups Pike push-ups Which exercises you use will be based on your individual level and skillset. I recommend practicing each exercise individually until you’re confident. Set markers to hit for each exercise such as: 30 second holds 20 shoulder taps unbroken A 360-degree walk around (both directions) 10 elevated push-ups 5 pike push-ups If you can do these easily then you can start having fun. For example, try using a set of 20-30 shoulder taps as a drop set after heavy presses! The Descending Ladder Workout One of my favorite rep schemes for these movements is a five-round descending ladder: Round 1 10 shoulder taps Walk halfway around the box 5 pike push-ups or elevated push-ups Walk back to where you started (if you initially walked to the right, walk left to go back) Round 2 8 shoulder taps Walk halfway 4 pike push-ups or elevated push-ups Walk back Round 3 6 shoulder taps Walk halfway 3 pike push-ups or elevated push-ups Walk back Round 4 4 shoulder taps Walk halfway 2 pike push-ups or elevated push-ups Walk back Round 5 2 shoulder taps Walk halfway 1 pike push-up or elevated push-up Walk back Aim to break up your sets as little as possible. If you can do all five rounds unbroken – without coming down between the sets – you win! The prize is shoulder gains and a massive
Origin: Tip: Build Big Shoulders With Bodyweight
Tip: How to Get Better Results with Chin-Ups
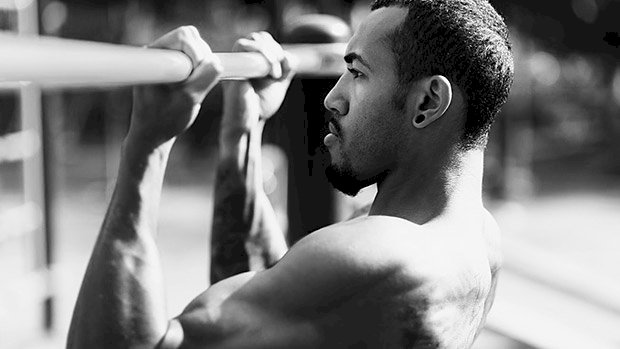 Chin-ups are a classic lat and biceps builder. Rings will amplify your benefits. Here’s Why The supinated grip draws your elbows in. This position is more joint friendly for your shoulders and hammers your lats as shoulder extensors. You get some serious mechanical tension on your biceps. Rings keeps you honest. If you start jerking and kipping, you’ll be swinging around the gym like Tarzan. Free moving handles reduce joint stress. This allows you to do more weight and more volume. Tips Take an underhand, supinated grip. Keep your chest up, shoulders down, and lean back a bit. Focus on driving your elbows down as you lift. Focus on squeezing your biceps as you come to the top. Extend your elbows as you come down, but don’t go limp. Good Alternatives Use the rotating handles that come with some high-end racks, or use the D-handles found at most gyms. All you need is a small chain and carabineer you can pick up from a hardware store. If you have to use a fixed bar, alternate every 1-2 months between supinated and neutral (palms facing each other) grips to reduce the risk of joint
Origin: Tip: How to Get Better Results with Chin-Ups
Tip: Build Your Back With DUDS
 Try this lat-dominant drop set on back day after you’re done with your heavier, progressive-overload work. Pulling For The Pump Don’t let the “DUDS” acronym fool you: they’re far from a dud finisher. Pick literally any lat pulldown or pullover variation and do this: Do an all-out set to failure (5 to 8 reps). Cut the weight in half and double the number of reps (10 to 16). Immediately cut the weight in half again and double the number of reps (20-32). If you need to take mini 10-second breaks to finish, go ahead. I’d suggest doing it on a well-designed pullover machine. Think of it as metabolic-stress type work, which should come at the end of a workout and only be done for ONE set. Don’t abuse it! Maybe sprinkle it in every other
Origin: Tip: Build Your Back With DUDS
Tip: Can You Boost Testosterone with Diet?
 The Testosterone Boosting Diet? Is there a way to boost testosterone, or at least optimize it, via diet alone? First off, think of testosterone like a sex and reproduction barometer. It’s partly responding to the environmental inputs. When it comes to diet, the question is: Is there enough food to drive metabolic demand? Not too little and not too much? If so, bring on the T! The metabolism wants the “goldilocks effect” when it comes to testosterone. This is why fat couch potatoes and ripped, show-ready bodybuilders have no motivation, no desire for sex, and soft, non-responsive, or less reliable erections. So, the first thing to remember is, don’t go too low for too long in any one of the macronutrients (protein, carbs, and fats). That can be a T killer. The second thing is to balance training with recovery. But this topic is a nuanced one, and I don’t want to come down too hard on any one dietary practice. I’ve seen slightly overweight individuals go on keto diets and measure notable positive changes in T levels. I’ve seen that same diet cause issues in libido, muscle gains, and erections. The discrepancy is explained by the individual. If I had to give a general rule of thumb (which is usually dangerous and stupid), I’d say… Don’t go below 20% fat. Don’t go below 30% carbs. Keep your protein above 20%. A 40-30-30 (carbs-protein-fat) ratio if you’re trying to gain muscle or compete in a sport is great. A 30-40-30 macronutrient ratio if you’re wanting to lose fat is good for most. Oh, and some studies suggest that if you’re low in magnesium, zinc, or vitamin D you may get a T boost from supplementation. ZMA® along with appropriate sun exposure and 2000-5000 IU vitamin D daily (take with your biggest meal) may be some good insurance. So to repeat… Stay away from extremes in leanness and extremes in fatness. Stay away from extreme macronutrient and calorie imbalances. Train enough, but not too much. If your T is optimized, you should feel it. Your brain will be focused and driven. Your exercise performance and recovery will be on point. You’ll be lean and feel fit. And your penis will be responsive, recharged, and
Origin: Tip: Can You Boost Testosterone with Diet?
4 Ways to End Back Day With a Bang
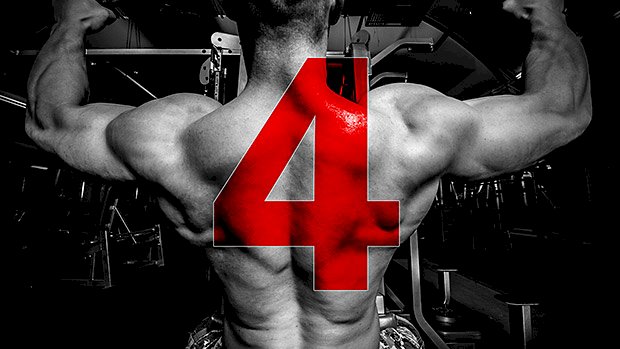 One of the things that separate the wolves from the sheep in the iron game is back development. It’s easy to train the stuff you can see in the mirror. It gives you the “warm and fuzzies” that come from immediate gratification. But some of the largest and most impressive muscular structures – with the biggest potential for growth – reside on the back side of the body. A guy who puts in years grinding away on his upper back and lats – embracing the aching stretches and the powerful pulls – will end up with a physique that ultimately blows away the one developed by the dude who’s just pressing, flying, and curling his way to mediocrity. So let’s get into the good stuff. Use these four lat-dominant finishers to level up your lat game and end your back day with a bang! 1 – The Rack Pull-Up Marathon Fellow T Nation contributor Paul Carter has sung the praises of rack pull-ups here before. If you’re after more width, this is a monster. This finisher uses the rack pull-up as the foundation and, from there, we’re just going to manipulate leverage and body position to create a nasty mechanical drop set. Set up a bar in a Smith machine or rack at upper-chest height. Set an incline bench out in front of you to prop up your straight legs. When you’re at the top of the pull-up, your thighs should be as close to parallel to the floor as possible. Then do the following: Rack Pull-Ups:max reps Modified Behind-The-Neck Rack Pull-Ups:max reps Modified Rack Pull-Ups:max reps Feet-Elevated Scap Depressions:max reps Use straps. Don’t take any rest between any of the above exercises, outside of what it takes to transition. On the second and third exercises, use as little lower-body assistance as necessary to complete the reps. 2 – Pulldown Lollapalooza This is an efficient mechanical drop set requiring only a high pulley and a rope attachment. You won’t even have to change the weight. Do the following: Straight-Arm Pulldowns:12-15 reps to failure (upright position) Straight-Arm Pulldowns:max reps (bent over position) Bent-Over “J” Pulldowns:max reps Hybrid Motorcycle Row/Face Pull:max reps Bent-Over Lat Pulldowns:max reps Take no rest between exercises. This protocol has a nice flow to it and you’ll appreciate the pump. 3 – Twelve Angry Reps If you have access to a dual-adjustable pulley or freedom-type trainer, give this one a shot. You’re going to hold the reps constant from exercise to exercise while also adding a bit of weight at each transition. Do the following: Straight-Arm Pulldowns:12 reps (use about a 15-rep estimated max weight) Split Stance High Rows:12 reps (add a plate beyond what you used in the first exercise) Half-Kneeling Lat Pulldowns:12-plus reps (add a plate beyond what you used in the second exercise) Half-Kneeling Lat Pulldown ISO Hold:for max time Take about 10 seconds or so to transition between exercises, recover just a bit and change the weight, with the exception of the last exercise where you’ll take 20 seconds to recover from the previous movement. 4 – DUDS (Double-Up Drop Sets) Don’t let the “DUDS” acronym fool you: they’re far from a dud finisher. Pick literally any lat pulldown variation and do this: Do an all-out set to failure (5 to 8 reps) Cut the weight in half and double the number of reps (10 to 16) Immediately cut the weight in half again and double the number of reps (20-32). If you need to take mini 10-second breaks to finish, go ahead. I’d suggest doing it on a well-designed pullover machine. When to Use These These are finishers. They’re not meant to replace heavier, progressive-overload back work. Start your back workouts with the big, basic exercises (rows, chin-ups, pull-ups, lat pulldowns, etc.) and chase rep and/or weight personal records. The four protocols above are metabolic-stress type work and should come at the end of a workout and only be done for ONE set. Don’t abuse these; maybe sprinkle them in every other week or
Origin: 4 Ways to End Back Day With a Bang
Tip: Nail Both Heads of the Biceps With This
 Rise Ups This is a very effective mechanical advantage drop set. You’ll start face down but spin around on the subsequent set, finally ending up standing, hitting both the long and short heads of the biceps hard in the process. Dumbbell Spider Curl:8-12 reps (to failure) Incline Dumbbell Curl:Max reps (same weight, same incline) Strict Standing Dumbbell Curl:Max reps (same weight) Standing Cheat Dumbbell Curl:Max reps (same weight) 90-Degree Isometric Hold:Max time (after last cheat rep) Do the first variation using a weight you can lift for 8-12 reps. Then go for maximum reps on the exercise variations that follow. Do this as a finisher for one or two sets after your heavier biceps
Origin: Tip: Nail Both Heads of the Biceps With This
