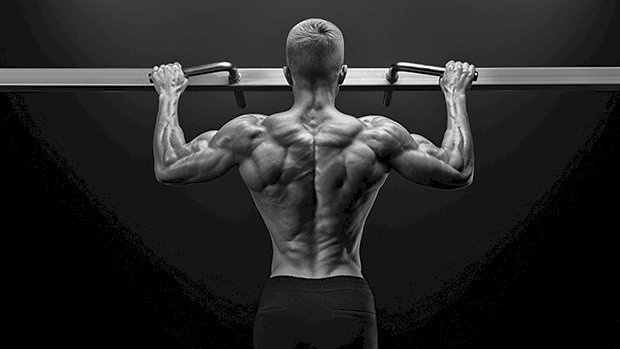
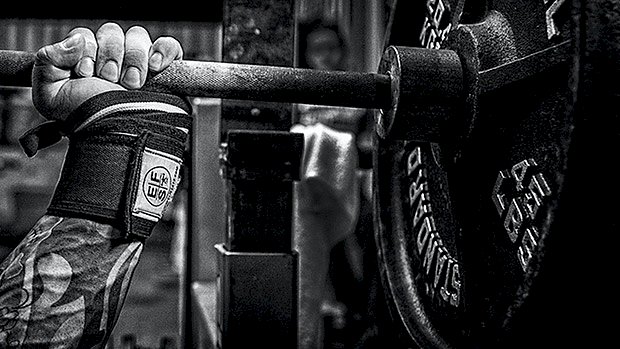
 More than 30 years ago, my PE class tested everyone on pull-ups. I did two full reps at a bodyweight of 120 pounds – not exactly top of the class. My friend Dave didn’t fare much better. We decided we’d had enough humiliation and went on a pull-up rampage. A few months later I could do 14 reps and I was the third best in school. Dave was the second best and could do 17 reps. How did we train it? We chose the only way we knew – doing them every day. Greasing the groove and fine-tuning the nervous system works well for upping the reps in pull-ups, but we didn’t know anything about that. We just did it every day because we thought that was the best way to get better. We actually weren’t that far off! Frequency and Mixed Loading I’ve competed in powerlifting and bench press competitions for more than two decades. As such, the “big three” have been my main focus, but pull-ups have stayed with me as one of the main upper-body assistance exercises. Now I can do one with nearly double my bodyweight. Pull-ups are worth doing several times weekly, but not just with bodyweight – and therein lies the secret. Most people focus on improving the number of reps they’re able to do, but they should be concentrating on beefing up their pull-up 1RMs. This will actually increase your ability to perform more bodyweight reps. Here’s a program that will take you there. It still involves doing a lot of high-frequency training with bodyweight pull-ups, but the magic lies in the medium-frequency days that use pull-ups plus added weight. The Program To succeed, you should already be able to do at least several strict bodyweight pull-ups, which means you’re strong enough for added weight attached. Once you’ve checked that box, you’ll be alternating between two workouts: High-Frequency Training – Pull-ups using only bodyweight: 5 x weekly (weeks 1, 2, 5 and 6). Medium-Frequency Training – Pull-ups with added weight: 2 x weekly (weeks 3 and 4). Do bodyweight reps for the first two weeks. Week 3 and 4 will involve doing pull-ups with plates attached to your belt. You’ll then go back to bodyweight reps for weeks 5 and 6. Rotating between bodyweight and weighted pull-ups will give you the best of both worlds. The slightly lighter training and faster reps in weeks 1 and 2 will build power and set you up for the heavier, low-rep strength training in weeks 3 and 4. The lighter weeks will also give you time to recuperate from the heavier loads, but at the same time upgrade your technique and pulling power. As with any specialization program, when you do more of something, you should do less of something else for the rest of your body. Doing too much might halt your progress. Focus on a select few key exercises and your strength progress will likely be better. Start out by testing your 1RM (bodyweight + weights attached). Once you’ve determined that, start the program: Week 1 Days 1-5 – 2×5 reps Week 2 Days 1-5 – 3×5 reps Week 3 and 4 Day 1 – 2×5 reps (warm-up), then 3×2 reps with added weight. Use approximately 85-90% of 1RM. Day 2 – 2×5 reps (warm-up), then 3×2 reps with added weight. Use approximately 80-85% of 1RM. Week 5 Days 1-5 – 2×5 reps Week 6 Days 1-5 – 3×5 reps Week 7 Test your 1RM Remember, when you do pull-ups, pull with speed and force without getting sloppy. Stay tight, pressurize your abs, and pull like you mean it. The eccentric or lowering phase should be controlled. Not sloppy fast, not slow. Once you’ve tested your new 1RM in week 7, start over again while adjusting your poundages based on your new 1RM. Reasons to Do Pull-Ups in the First Place The pulling work aids in balancing out all the pressing work you probably do. The lats are also a very important core-stabilizing muscle group. Strong lats will benefit your bench press and give you a solid platform to press from. Strengthening your lats will assist in stabilizing the bar on your shoulders in a heavy squat and will contribute tightness in order to maintain proper upper-body stability in the
Origin: Tip: End Pull-Up Humiliation
Tag: Tip:
Tip: The Secret to Stronger Glutes
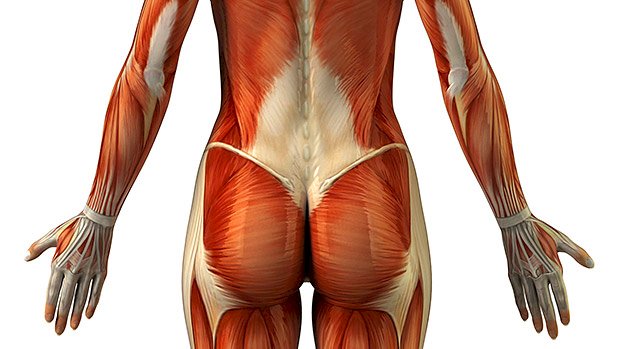
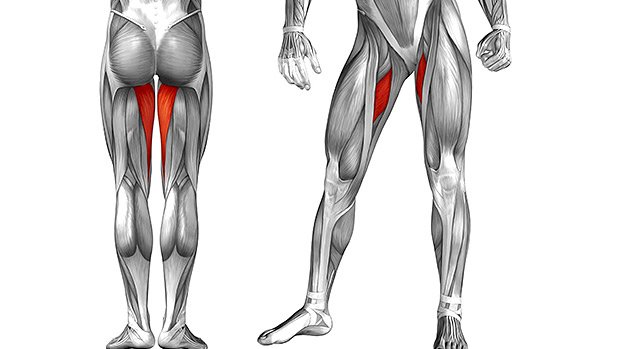 In my early days of training, something that really bugged me was coaches talking about the importance of “torque” and “tension” and “bracing.” To be honest, I had no idea what they meant. As far as I could see, they were just going up and down. It looked the same as what I was doing. Skip forward a few years and I started to pick up what bracing meant: keeping air in the belly to keep the spine safe. It’s a pretty simple concept, but not for someone whose athletic background involved computer games. Skip forward a few more years and I’m coaching. I’m noticing a high number of people, especially those who play sports, commonly getting groin injuries from squatting heavy. What’s going on? I realized that the usual fix for groin issues was to make the glutes stronger. The main exercises prescribed involved a resistance band and abduction. Yes, you will feel your glutes doing those, and they’re great exercises for a burn. But you may have left out an important part of the puzzle: if you constantly leave out the adductors they’ll never be able to compete with the overriding strength of the glutes. The actual issue – an imbalance between two opposing muscles – will never be resolved. This is the idea of torque and tension: opposing muscles having a good relationship with each other so that they work well together to create balanced strength. Throughout all your banded glute rehab exercises, the band is simply playing the role of the adductors. For the glutes to be able to pull outwards during a squat, the adductors have to be strong enough to pull inwards to give the glutes something to work against. If they’re weak, the knees will collapse and you’ll either have a horrendous looking squat or strain your adductors because your glutes overpowered them. Making the glutes even stronger will only make the issue worse. Yes, you may temporarily feel better, but it will be more because you rested your adductor and it healed, not because your glute drills worked. Luckily, there’s an easy fix. Literally all you have to do is take off a few reps of your glute exercises and add in an exercise that involves the adductors, such as a Copenhagen plank or, my current favorite, the adductor bridge (which I’m hoping I invented, but probably didn’t) which we demonstrate in the video. If you teach your adductors to fire with the glutes, they’ll work together more efficiently and you can spend more time getting stronger, rather than having to do rehab drills every couple of months. How to Do the Adductor Bridge Set up in a 90/90 position. (See minute 2:15 in the video.) Place one hand on the floor beside the externally-rotated hip. Press your knee on the internally-rotated leg into the ground. Lift yourself up by pressing through the hand and knee at the same time. Repeat for 10 reps and add pauses at the top for extra fun. Repeat on the other side. Go and lift some weights!
Origin: Tip: The Secret to Stronger Glutes
Tip: A New Way to Murder Your Hamstrings
 Looking for a new way to build your hamstrings? Try these. Triple-Threat Hamstring Bridge A1:Long Hamstring Bridge (toes down) x 5-10 A2:Medium Hamstring Bridge (toes down) x 5-10 A3:Regular Hamstring Bridge (heels down) x 5-10 Do 5-10 reps in each position, finishing each with a 5-10 second isometric hold – contract as hard as possible and battle against gravity. Master bodyweight before you add a barbell (or even use a sandbag across your hips). Besides being a good hamstring builder, these can also work as an activation exercise with bodyweight only, helping feel your hamstrings later in the workout. This is a form of mechanical drop set. You start with the hardest position (knees straight, toes down), and finish with the position where you have the greatest mechanical advantage (knees at 90 degrees, heels down). Adding isometric holds into the equation allows you to get a little more time under tension in each position. Isometrics will help you tap into the abundance of high-threshold motor units your hamstrings contain. Hams, Not Glutes You probably already use a combination of hamstring curls and hip hinges (RDLs, back extensions, pull-throughs, etc.) to train your hamstrings, but bridges are often left out. Normally, lifters do glute-dominant bridge variations. To hit your hamstrings, you make a few changes: Driving through your toes encourages a co-contraction of your calves and hamstrings. “Active insufficiency” of the gastrocnemius increases hamstring activation. Using a larger angle at the knee increases hamstring length and moment-arm length, placing more tension through the hamstrings. Elevating your feet on a box or bench changes leverage factors to bias more hamstring dominance, as opposed to elevating your back (hip thrusts) which will bias the glutes. All of these factors can be manipulated to target your hamstrings during
Origin: Tip: A New Way to Murder Your Hamstrings
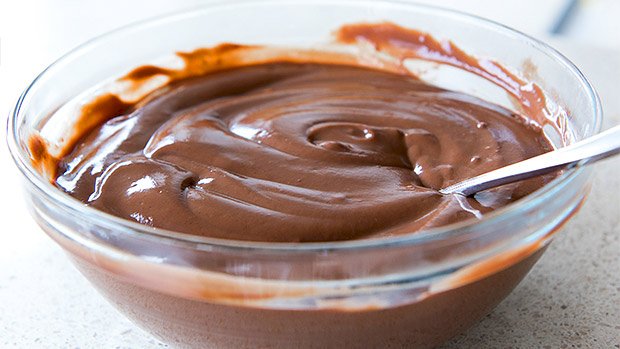
Tip: Sweet Potato Protein Brownies
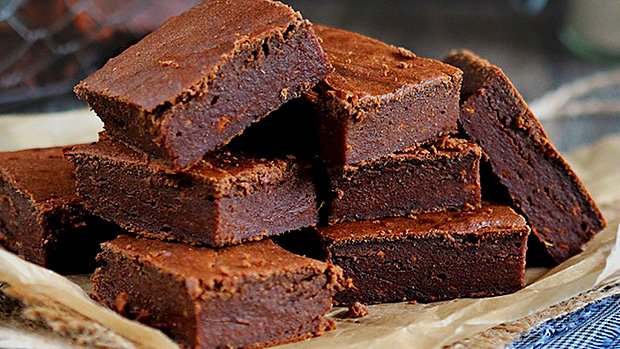 The typical brownie might make you go weak at the knees, but there’s always a cost. After all, it’s a devilish mixture of fat and sugar. The good news is, you can make a more macro-friendly brownie that won’t sacrifice on flavor or fudginess. These are made with a sweet potato base for good carbs without the sugar crash. There’s zero gluten and lots of fiber. They also have a Metabolic Drive® Protein kick, with 6 grams per brownie. Here’s the best thing about them though: At just 95 calories per generously-sized brownie, zero added sugar, and only 3 grams of fat, you wouldn’t be pushing it if you had more than one at a time. Ready to make them yourself? Here are the ingredients you’ll need and the directions. Brownie Ingredients 2 Baked medium (about 16 ounces) sweet potatoes, skins removed 3 Scoops (90 grams) chocolate Metabolic Drive® Protein 3 Whole eggs 1/2 Cup unsweetened cocoa powder 2 Tablespoons olive oil, or macadamia nut oil if available 2 Tablespoons any milk 1/4 Cup semi-sweet chocolate chips Optional Icing Ingredients 1/2 Cup powdered erythritol (not granulated) 1/4 Cup PB2 powdered peanut butter Directions Bake your sweet potatoes and let cool before beginning. Then scoop out the insides. (Don’t waste the skins; they’re great in stews and one-pot meals for extra texture and fiber.) Preheat your oven to 350 degrees Fahrenheit or 180 degrees Celsius. Line a brownie tin or deep baking tray with baking or parchment paper. Use a food processor or immersion blender to blitz the sweet potato into a smooth mash. Add the rest of the ingredients except the chocolate chips. Blend until a thick batter is formed. Scrape the sides of your food processor a few times to ensure it’s well-combined. Fold in the chocolate chips, then pour into your pre-prepared tin. Spread evenly. Top with a few extra chocolate chips if you’re going for the fancy finish (add macros accordingly). Bake on the top shelf of your oven for around 14-16 minutes – a shorter bake time will produce a more gooey brownie. Let it cool a little, then cut into 18 squares. These brownies are good warm, but if you can resist the temptation and allow them to refrigerate overnight, they’ll transform into the fudge-like brownie you’ve been waiting for. For Icing (Optional) Mix together equal portions of PB2 peanut butter powder with powdered erythritol. Add a little water at a time to get your desired texture. This creates a peanut-butter-flavored icing that makes for an extra decadent topping with very few calories. Nutrition Info Per Brownie Recipe makes 18 servings. Calories:95 Carbs:17 grams Fat:3 grams Protein:6 grams Fiber:7 grams
Origin: Tip: Sweet Potato Protein Brownies
Tip: Block Training For Beefy Abs
 Every Day Abs? My strategy for ab training? Using blocks of intense abdominal training where I hit them every day for 4-6 weeks. You can recover rapidly from pretty much any abdominal exercises except those full range GHD sit-ups you see in CrossFit. (This movement creates a powerful stretch of the rectus abdominis – especially when done with the speed they use – which will cause a lot of muscle damage, and require more recovery time.) Daily ab training at an adequate level of intensity is one of the fastest ways of improving abdominal aesthetics, provided you’re lean enough to show them. The “abs are made in the kitchen” mantra isn’t quite accurate. Abs are simply revealed in the kitchen: you must be lean. Building them through direct training will increase the likelihood of seeing them. It’ll also make it easier to see them at a slightly higher body fat level. For example, even when I’m at around 13-15% body fat I can still see a clear 6-pack because the muscle bellies of the rectus abdominis are so thick they create a contrast between themselves (the “packs” portion) and between the tendinous sections that separate them. In contrast, I’ve known plenty of figure competitors who don’t do loaded abdominal work (or any abdominal work) to avoid “making their waist bigger” who show no abdominal separation even at very low levels of body fat. Training abs with added resistance – so that you fatigue at 6-12 reps – is how you increase the thickness of the muscle bellies and increase abdominal separation. You also need to do your ab work the right way. Use this approach when training abs: Start by flexing the abs as hard as you can before even starting the rep. Imagine getting punched in the stomach. While maintaining the tension, initiate your rep. Don’t go up too fast. Focus on being able to maintain the tension. At the end of the concentric range of motion, once again try to contract your abs as hard as you can. They should already be contracted hard, but you likely can increase the contraction even more. Do the eccentric or negative while trying to maintain maximum muscle tension. I like to superset one loaded ab exercise with an unloaded one. You do 3 sets of one superset every day. A few suggestions: Option 1 Exercise Sets Reps A1 Seated Cable Crunch Facing Machine 3 6-12 A2 Swiss Ball Crunch 3 6-12 Note: The goal is to make each rep so hard that it’s impossible to get more than 12 reps. Option 2 Exercise Sets Reps A1 Seated Cable Crunch Facing Away From Machine 3 6-12 A2 Hollow Body Hold (Max time 30-45 seconds) 3 45 sec. Note: If you have other ab exercises you respond well to, feel free to use them
Origin: Tip: Block Training For Beefy Abs
Tip: How to Really Train Your Forearms
 High-Frequency Forearms Want bigger, stronger forearms? Train them often. Forearm exercises don’t cause much, if any, muscle damage, especially for exercises with less eccentric loading like the wrist roller or Thor’s hammer (see video). But even wrist flexion and wrist extension will cause little damage. Furthermore, these exercises have a very small impact on the nervous system because they’re very simple and done with light weights. Energy expenditure is low too since it’s a short range of motion and smaller muscles are involved. None of the factors requiring more recovery time are present with forearm training. Unless you go absolutely crazy with the volume there’s no reason you can’t train forearms every day. Why Do I Want Big Forearms? Because big forearms look cool. Hey, they’re the only thing that’s 100-percent showing in a T-shirt! Having well-developed forearms will do more for you than simply attracting admiration. Bigger and stronger forearms make it easier to build bigger biceps. Coach Charles Poliquin wrote about this phenomenon 20 years ago. The body hasn’t changed since that was written. By building bigger, stronger forearms you’ll be able to handle more weight in both curling and pulling exercises, which will increase the stimulation on the biceps and back muscles. Bigger forearms and a stronger grip also help the bench press. Look at the top bench pressers in the world; they all have thick forearms. To bench heavy weight you need a strong grip. The harder you can squeeze the bar, the less the wrist will tend to cock and get the bar misaligned. (The bar should be directly above the wrist joint. If the wrist is cocked, the bar moves away from that alignment.) On top of that, big forearms create a bigger “body” on which to spread the load of the bar. This can decrease stress on the shoulder joint. One Caveat and a Program You shouldn’t overdevelop one part of the forearms. For example, the wrist flexors tend to be trained a lot more than the wrist extensors (the flexors are involved a lot when curling and pulling) and the forearms supinators are often dominant over the pronators. Just like any other muscle imbalances in the body, this can lead to problems like tendonitis. So if you want to jack up your forearms and train them every workout (or every day) then work on flexion/extension one workout, do supination/pronation on the next, and do grip work on the third. Then just rotate through that. Since forearm exercises have a short range of motion, you’ll need to do either higher reps or use a slower tempo to create enough fatigue and trigger growth. Sets lasting 30-60 seconds should be your target. I actually don’t count reps when doing forearm work. I put a timer on and keep working until I’ve achieved failure or close to it in the 30-60 second range. But I’ll prescribe a number of reps in a couple of the examples below for the sake of simplicity. Workout A – Flexion/Extension Exercise Sets Reps Rest A1 Wrist Roller 3-4 30-60 sec. 1 min. A2 Wrist Curl 3-4 10-12 90 sec. Workout B – Supination/Pronation Exercise Sets Reps Rest A1 Thor’s Hammer Pronation (4 second negative) 3-4 10-12 1 min. A2 Thor’s Hammer Supination (4 second negative) 3-4 10-12 1 min. Workout C – Grip Exercise Sets Reps Rest A1 Pinch-Grip Deadlift (Hold 30-60 sec.) 3 2 min. A2 Fat-Grip Hold (Hold 30-60 sec.) 3 2 min. You can use other exercises if you prefer, but you get the
Origin: Tip: How to Really Train Your Forearms
Tip: Train Like This or Die Sooner
 After 40, Just Give Up After a man turns 40, his muscles atrophy, his strength wanes, and his belly grows. And women over 40? Well, they just wilt like old banana peels. They even have to start buying “mommy swimsuits” at JCPenny, complete with butt-hiding ruffles. At least that’s what a lot of people seem to think. As a T Nation fan, you already know those people are full of shit. Heck, with all we know now about training, nutrition, and supplementation, your 40s and 50s might just be your best years. But there is something that takes a Kamikaze dive in your middle years. After the age of 40 or so, even physically fit men and women start to lose their ability to produce power. And power, not strength, may be the key to longevity. What is Power Exactly? Power is your ability to produce force and velocity. Moving weight fast – be that a barbell or your own bodyweight – recruits a lot of motor units. While strength and power overlap in many ways, power is the rebar in the concrete foundation of athleticism. In the gym, you can get more powerful by doing Olympic-lifting variations, torpedo’ing medicine balls, performing jump squats, and swinging a kettlebell like you’re mad at it. Generally, you use lower loads, but try to move those loads with speed and ferocity. Acceleration is key. Outside the gym, sprinting up a set of stairs relies more on power than strength. “Functional strength” is all the rage, but functional power may be even more important. So what does power have to do with living longer? Let’s ask Mr. Science. The Study Researchers gathered up 3,878 men and women between 41 and 85. This age range was chosen because power starts to diminish after 40. All the participants took a power test, this one involving the upright row. (Maybe not the best exercise choice, but easy enough for non-meatheads to learn.) Then the scientists just sat around for several years. They caught up on Grey’s Anatomy and did some fly fishing. After seven years, they tracked down the study participants to see who died, which must’ve been awkward. The Results In a nutshell, those folks who displayed above-average muscle power in the original test outlived those with below-average muscle power. But those study participants who scored a little below average on the power test were up to five times more likely to suffer an early death. Those who scored WAY BELOW average on the power test were 10-13 times more likely to be chilling out in a coffin or a lovely urn. Researchers concluded that power is strongly related to all-cause mortality. How to Use This Info No, you don’t have to give up your strength or hypertrophy training and become an Olympic weightlifter, a full-time CrossFitter, or a plyo-obsessed skinny guy. The researchers noted that becoming super-duper powerful doesn’t seem to extend your life any further than simply becoming more powerful than the average Joe or Jane. Just be above-average powerful. In the gym, add some power training to what you’re already doing. Try power cleans or some O-lift variations. (I like the easy-to-learn muscle snatch.) Throw some medballs, try to accelerate a lighter bar quickly using the core lifts, and toss in some plyo push-ups, sprints, and jumps. Then tell those people that think life is over after 40 to suck
Origin: Tip: Train Like This or Die Sooner
Tip: Eat This Before Bed and Stay Lean
 Is Nighttime Eating Bad? Yes and, um, no. The devil is in the details, or in this case, the devil is in the macronutrient makeup of your pre-bed snacks. Previous studies on nighttime eating paint an ugly picture. Eating a late-night meal or big snack before bed leads to more fat gain. (See: The Meal That Damages Metabolism.) In short, fat metabolism is impaired. Eating more before bed (as opposed to earlier in the day) also raises insulin, fasting glucose, and triglyceride levels, which adds up to a negative metabolic profile (1). Even if those Netflix snacks fit into your caloric limits for the day, the body just doesn’t seem to “handle” those calories as well, which might lead to a disruption of your appetite-controlling hormones. But these studies were usually conducted using “average people food.” And the average person is chubby and makes really crappy food choices. So what happens if you switch out the carby or fatty snacks for pure protein? New research published in The Journal of Nutrition sheds some light. The Study Researchers gathered up a bunch of weight-training women for this study. In one experimental condition, the buff women consumed a casein-containing protein shake (30 grams of protein) during the day. In the second condition, they consumed the same protein shake 30 minutes before going to bed. The researchers dragged out all their fancy machines for this one and used various methods to measure overnight fat oxidation and subcutaneous abdominal adipose tissue (belly fat) metabolism. The Results The protein shake did not blunt overnight lipolysis (the breakdown of fats) and was not expected to increase subcutaneous abdominal fat (2). The lead scientist summarized by saying, “Essentially, you can eat protein before bed and not disturb fat metabolism.” Important Details The 30-gram protein shake did not contain a significant amount of fat or carbohydrate. So if you want to switch out your normal, metabolism-disrupting snack for a shake, be sure to use a low-carb protein powder that contains a lot of casein, preferable micellar casein like that found in Metabolic Drive® Protein®. The test subjects were resistance-trained women, though this should apply to men too. If you’re not lifting weights, this info may not apply. Try This Drinking a protein shake while watching TV at night doesn’t feel much like snacking. Here’s how to change that: Mix one or two scoops of Metabolic Drive® Protein into a very small amount of water or unsweetened almond milk. You want it to be very thick and creamy, like pudding or yogurt. Partially freeze your protein goop. About 15-30 minutes should do it. Eat it with a spoon. It’s damn close to pudding or soft-serve ice cream and feels a lot more “snacky” and satisfying than just chugging a shake.
Origin: Tip: Eat This Before Bed and Stay Lean
Tip: The Truth About Rate Coding
 Here’s a question I received recently: “I’ve heard that you shouldn’t vary the weight you’re using on an exercise by more than 10 percent in a workout, otherwise it just confuses the nervous system and you won’t gain as much strength. This has something to do with what’s called ‘rate coding.’ Any truth to that?” For weight training, no. It’s based on a bad understanding of how the nervous system works. For example, this 10 percent rule means that you couldn’t do something like this because the load changes by 15 percent from the heaviest to the lightest: Set 1:8 reps, 150 pounds (75%) Set 2:6 reps, 160 pounds (80%) Set 3:4 reps, 170 pounds (85%) Set 4:2 reps, 180 pounds (90%) Look at this objectively: What about warm-ups? If you can’t have more than a 10 percent difference in weight on an exercise within a session it means you can’t warm-up. If your heaviest work set is going to be 600 pounds then it would mean that anything lighter than 540 pounds in that session would hurt your gains. Just for fun, try squatting 600 without a warm-up to see how it goes for you! Yet, this “you can’t vary the load on an exercise by more than 10 percent” is a pretty common belief, especially for those of us who had Coach Poliquin as a mentor. He put a lot of emphasis on that idea. Where Did This Idea Come From? It actually comes from track & field, coach Charlie Francis to be exact. This was Ben Johnson’s coach, and he was light years ahead when it came to the nervous system and its role in sprinting. He noticed that when his sprinters did resisted running (sprinting with a parachute) and the speed of the athlete decreases by more than 10 percent, the athlete’s sprinting technique changed. For example, he’d run more upright and would have a slightly slower stride frequency. Charlie’s recommendation was that you shouldn’t do resisted running with 10 percent or more resistance as it changes sprinting technique. Coach Poliquin took that 10 percent rule and applied it to weight training. But Sprinting Isn’t Lifting Weight training is not speed-dependant and the technique is much simpler. Even if your speed slows down when lifting, it doesn’t affect your capacity to make the lift or get stronger or bigger from it. It also won’t change your technique. In sprinting, both will happen. The argument used to justify not varying the load by more than 10 percent in a workout is something called “rate coding.” Essentially, the proponents of this principle say that the body programs the speed at which the recruited muscle fibers will “twitch” as the set starts. That programming is called “rate coding.” The heavier the weight is, the faster the fibers will twitch. If you change the weight from set to set too much you confuse the nervous system by changing the motor program on every set. It’s appealing and sounds scientific. However, it’s not accurate and just shows a bad understanding of physiology. See, when you’re lifting heavy weights the firing rate of the muscle fibers will actually change during the set. In fact, once a weight starts feeling heavy (80 percent of what you can lift at that moment) every rep after that will have a different firing rate. The firing rate doesn’t stay the same from rep to rep. With weights lighter than 80 percent of what you can lift at that moment, you increase force production by recruiting more muscle fibers. Once you reach around 80 percent you’re recruiting all the muscle fibers you can recruit. From that point on, any increase in force production will come from increasing the fibers’ firing rate (mostly the fast twitch fibers). Here’s where real physiology contradicts the 10 percent principle: The recruitment pattern changes with every rep because the “relative load” changes every rep. If you start with 70 percent on the bar, the relative load is not 70 percent for the whole set. The weight on the bar doesn’t change, but YOU get fatigued. As you get fatigued you also get weaker. If you get weaker and the bar weight stays the same, it means the bar will feel relatively heavier compared to what you can lift right now. It looks something like this: Rep Weight on Bar Fatigue Relative Weight 1 70% 0% 70% 2 70% 3% 73% 3 70% 6% 76% 4 70% 9% 79% 5 70% 12% 82% 6 70% 15% 85% 7 70% 18% 88% 8 70% 21% 91% 9 70% 24% 94% 10 70% 27% 97% When you hit failure, it means that the relative weight is 100% or more of your capacity at that moment. Now, let me show you what muscle fiber recruitment looks like depending on the weight. In our example above, from rep number 1 to rep number 4 or 5 you would compensate the fatigue by increase muscle fiber recruitment. From rep 5 and onward you can’t bring in any new fibers, so from that point on you start making the recruited fast twitch fibers twitch faster (higher firing rate). If the 10 percent principle were true, we’d be in trouble because even within a set there’s more than a 10 percent variation. What’s important here is that
Origin: Tip: The Truth About Rate Coding
Tip: The Ultimate Glute Warm-Up
 I love quick and effective warm-ups. The best ones are made up of drills that complement each other and help you sneak in some mobility work without having to spend loads of time stretching. Combining the couch stretch and kettlebell swing will deliver both. Do 3 Rounds: 30-Seconds Couch Stretch, each side 10 Kettlebell Swings Focus on opening your hips completely and squeezing the glutes throughout both exercises. The couch stretch, when done correctly, is one of the best mobility drills to open the hip flexors and improve your hip extension. The kettlebell swing is all about an effective hip hinge and building strength and power during hip extension. So, the first exercise opens that range in your hips, then you directly apply that same motion to a strength movement. This will not only give you better glute activation but also stop your hip flexors from tightening up again. Many people get stuck in the “stretching forever” cycle because they stretch and stretch and never actually strengthen their new ranges. Their body can’t keep the new open position, so it goes back to being tight. Try this quick warm-up for a few weeks and see what difference it makes to your
Origin: Tip: The Ultimate Glute Warm-Up
