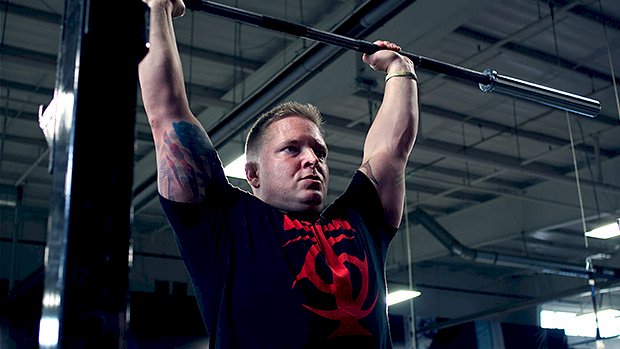
 Pain and injury from shoulder pressing are generally caused by not having the requisite flexibility to do the movement safely, such as: Limited shoulder flexion. This causes you to press the weight too far forward, or to have an arch in your lower back to compensate. Limited thoracic/upper back mobility. This restricts scapula movement, again causing the barbell to travel forward. One shoulder has more mobility than the other. This can cause anything from a subtle imbalance to a major twist during pressing. Assess and Fix It One of the most effective ways to test the flexibility required for an overhead press is with this lat stretch variation. Not only does it tell us a lot about our overhead mobility, it’s also one of the most effective ways to achieve a better position. We want to see a straight line through the hands, elbows, and shoulders that continues down the spine when the ribs are tucked down and the abs are engaged. This shouldn’t be uncomfortable and there should be no nipping sensation in either shoulder. Video yourself while you do the test and watch your back to assess your mobility. Here are a few things to look out for: The arms not being in line with the spine: This means limited shoulder flexion. It will hinder your ability to do all overhead movements. An arch in the lower back: This is a common compensation and can make your overhead presses look more like an incline bench press. Generally, this will come down to a bad habit or a lack of thoracic mobility. One arm lower than the other: This indicates that one shoulder is too tight or overused, OR one shoulder has been over-stretched and made too mobile. This is very common for people with past injuries that have gone too far with self-massage. You can now use the assessment exercise as a drill to help fix the problem! Using very light fractional plates, go back into the same position with your arms above your head until you feel a stretch, then maintain it (but don’t force it). If you can manage 30 seconds, that’s great. It’s okay if you need to break sooner; the more you practice the drill the easier it’ll get. Aim for 3-5 sets for 30 seconds at a time. Over the 30 seconds, your shoulders will fatigue, relax, and start to give up that extra range. It’s important to do some light barbell presses right after this drill. Once you’ve created new range it’s more likely to “stay” if you then strengthen it. However, if you know you’re really far off from a good overhead position, just stretching for now is fine. If one shoulder happens to be lower or higher than the other, you need to even those up during this exercise or you could make the problem worse. Ideally, have someone with you to tell you when your shoulders are wonky or uneven. If you have one shoulder that’s too high it might take a while to loosen up, but you can try adjusting your shoulder position to see if that helps. If you have one shoulder that’s too loose, you need to actively lift it up to the straight position and try to maintain it to build stability. For the drill, aim for 10 reps for 3-5 sets. If you find this really challenging, then definitely practice and don’t forget to integrate it into your overhead press afterwards. As with any good mobility drill, once you can do this well and not find it challenging, the frequency you need to use it will dramatically decrease. When your arms are even – with no compensations – then a quick run-through once a month is more than enough. Don’t settle for having bad shoulder flexibility. Take the time to fix it, then you can enjoy your training knowing you have the best possible
Origin: Tip: How to Test & Improve Overhead Flexibility
Tag: Tip:
Tip: Realistic Gains After 40
 Progress After 40 for Advanced Lifters How much muscle can a natural, advanced lifter build in his 40s? Well, I’d love to tell you that an advanced lifter in his 40s can keep building tons of muscle… in part because I’m over 40 too. But it’d be a lie. It’s not even an age thing (although that plays a role), but a matter of training experience and adaptation. To me, “advanced lifter” means at least 15 years of hard training. That means you’ve gained quite a few pounds of muscle already. The human body has a limited capacity to build and keep muscle naturally. This is largely dependent on our genetics. The ACTN3 genotype, myostatin levels, body structure, and many more factors come into play. We don’t fully understand all the factors yet, but the fact is that the average human male can add 30-40 pounds of muscle above what his normal adult weight would be over the course of his training career. Of course, using anabolics will bypass many of the limiting factors that prevent a natural from growing to Mr. Olympia size. I’m also talking about pure muscle weight. With those 30-40 pounds you’d likely add some extra pounds in the form of glycogen, water, and collagen. Not to mention that you could add some fat and still look great. You might add 50-60 pounds of scale weight over your career, but only 30-40 pounds of that weight would be muscle. The closer you are to reaching those 30-40 pounds, the slower and harder your gains will be. So let’s take a 40-year old man who’s at a normal adult weight who would be around 175 pounds without lifting. And let’s say, after 15 years of training, he’s now 210 pounds with a similar or better body fat percentage. By lifting for all those years, he added around 30-35 pounds of muscle to his frame. Realistically, he can now hope to add 5-10 pounds of muscle at most. If a second 40-year-old man gained only 10 pounds over the course of his training career (because he hasn’t been training hard and smart consistently), he has the potential to gain more muscle than the first guy if he trains the right way. Why is the more dedicated and experienced lifter going to have a harder time building a lot of new muscle? First because of adaptation. His body is well adapted to lifting. It’s very hard at that point for training to represent a stress. If the training is no longer a stress, the body won’t change because extra muscle isn’t needed to do the work. If you want to increase the training stress you need to: Lift more weight or… Do more volume or… Push your sets harder But there’s the catch-22. All three of these things can jack up cortisol and might stop progression. Furthermore, you can’t always push them up. There will be a point where it’s hard to add 5 pounds per 6-8 weeks on a lift. And if you already train to failure or close to it, there isn’t much room to increase there either. And adding volume – especially in older lifters – is one of the best ways to halt progress. It’s also not very practical for the real world. A normal human being with a job and family can’t spend 2-3 hours in the gym every day. An advanced lifter needs an extremely high training stress to keep progressing, but doing just that might actually do more harm than good. Also, as you get older your physiology changes, and not for the best when it comes to building muscle: Testosterone levels tend to decrease. Growth hormone and IGF-1 can decrease. Stem cells decrease due to a lower IGF-1 level. Stem cells are required to repair muscle damage. Fewer stem cells means that you don’t repair and build muscle as easily. Your body likely has more chronic systemic inflammation. This can significantly decrease your capacity to build muscle (among other things) in part because it reduces insulin sensitivity. You lose nerve cells and have atrophy in others. This will decrease strength. And if strength goes down, it can be harder to maintain, much less add, more muscle tissue. The muscle tissue is adapted to a certain level of loading. If your nerves no longer allow you to produce as much force, the lower level of muscle tension produced when training might not be enough to fully stimulate growth. Finally, as you’re getting older, life tends to take over. If you have a full-time job and a family, you have a lot more stress. That can also impact your capacity to progress. Now The Good News Don’t stop trying to improve because it’s possible to surprise yourself and achieve more than you thought. I got into my best shape at 41 and I’m still able to improve a bit. Here are a few guidelines that tend to help older lifters keep making progress: 1. Don’t always train hard. I know this sounds counterintuitive, but periods of maintenance training can help re-sensitize your body to training. Call it “strategic deconditioning” if you want. For 3-5 weeks, do the minimum necessary to avoid losing muscle. If you’re a dedicated lifter, that’s going to be much less than you think. Do less volume, don’t push your sets
Origin: Tip: Realistic Gains After 40
Tip: The 6-12-25 Protocol for Biceps
 Back in 2005, Charles Poliquin popularized something called “lactic acid training” with his German Body Composition programs. The basic idea was to train in a way that produced lactate, which in turn increased growth hormone to boost fat loss and protect muscle mass. The more advanced rep scheme involved doing 6, 12, and 25 reps with short rest periods between exercises. Yeah, it burned. Lactate is commonly associated with that local burning sensation in the muscles, but “lactate burn” is a misnomer. In reality, lactate actually consumes those H+ ions associated with the burn. All that aside, we can use some of the same set and rep scheme in German Body Composition to attack a weak or underdeveloped muscle group. Try this for lagging biceps: A. Neutral-Grip Pull-Up x 6 B. T-Bar Row (Pronated Grip) x 12 C. Dumbbell Hammer Curl x 25 Important: Take no rest periods between movements! Your “rest” is just the amount of time it takes to move between exercises. After the hammer curls, rest two to three minutes and repeat this giant set three to four more times. Can I Do It With Other Body Parts? Yep, just follow these guidelines for exercise selection: 1st Exercise:Multi-Joint Movement, 6 reps 2nd Exercise:Multi-Joint Movement, 12 reps 3rd Exercise:Single-Joint Movement, 25
Origin: Tip: The 6-12-25 Protocol for Biceps
Tip: Another Jaw-Dropping Benefit of Creatine
 We’ve already established that creatine isn’t just a bodybuilding supplement and that nearly everyone from young to old could potentially benefit from its regular use. It’s been shown to strengthen heart function, possibly deter Alzheimer’s and other neurodegenerative diseases, lower blood sugar, aid in the repair of bone, prevent arthritis, reduce fat accumulation in the liver, help people with fibromyalgia, lower blood sugar, and yes, grow muscle in athletes. The way its list of effects is growing, I wouldn’t be surprised if it turned out to cure dogs of mange, take stains out of corduroy, and ward off vampires. Speculative benefits aside, it’s recently been found to have a new, hugely exciting super power. Researchers from UCLA have found that creatine can act as a “molecular battery” for immune cells by storing and distributing energy to fuel their fight against cancer. Creatine and Killer T Cells Dr. Lili Yang, head of the research team that made the discovery, found that creatine uptake is crucial to the anti-tumor activities of CD8T cells, which are also known by the decidedly much cooler name, killer T cells. When these killer T cells are called into action to fight a tumor, they have to compete with fast-growing tumor cells for metabolic resources like glucose, amino acids, and lipids. Without an adequate supply of these resources, these killer T cells are literally marching off to war without breakfast… and a hungry army can only go so far. Creatine, however, supplies these T cells with critical levels of ATP (the energy currency of the cell), thus enabling them to fight with continued fury. What the Researchers Did Yang and her researchers engineered mice so that their killer T cells were deficient in the gene that’s responsible for creating creatine transporter molecules. That means that their T cells couldn’t take creatine in and were consequently far less capable of fighting tumors. However, when they received creatine supplementation (either oral or IV), their T cells found new life and regained their cancer-fighting mojo. They then tried giving creatine to non-engineered mice with normal transporter molecules and found that they too became more efficient at fighting colon cancer and melanoma tumors. “…these findings suggest that killer T cells really do need creatine to fight cancer,” said Yang, in a press release. “Without it, they simply can’t do their jobs effectively.” There’s more good news, too. The beneficial effects didn’t require the use of creatine doses that would bloat a buffalo. The amount they gave to the mice was comparable to the doses recommended for athletes and bodybuilders. The Broader Implications While Yang and her colleagues found that creatine was effective in fighting colon cancer tumors and melanoma, she speculated that the treatment could be of use in fighting many different types of cancer. Furthermore, she thought that creatine could be combined with many other current cancer therapeutic modalities, as well as traditional chemotherapies and radiation therapies. How Best to Use Creatine If you’re already using creatine to increase athletic performance or grow more muscle, great. You can take some satisfaction in knowing that it’s also doing your body a whole lot of good. However, if you’re not an athlete and you’ve never dreamed of taking creatine, you should give strong consideration to adding it to your list of mandatory daily health supplements, right up there with your vitamins, fish oil, and fiber. There’s just too much good research out there to ignore. Creatine’s a little different than most supplements, though, in that you have to “load up,” which is just a way of saying that it takes several days for your cells to reach maximum storage capacity. A lot of bodybuilders choose to load up on creatine by taking 5 grams four times a day for 5 to 7 days and then continuing at a dosage of 3 to 5 grams, but there’s a much easier way to do it. Just take about 5 grams a day, every day. By the time 30 days have passed, you’ll most likely have reached maximum cellular storage capacity, at which point you can just continue with taking 3 to 5 grams a day. Make sure you use a micronized version where the grains are absorbed better than brands sold by the big box stores or your local drugstore.
Origin: Tip: Another Jaw-Dropping Benefit of Creatine
Tip: The Evil Butt Workout of Doom
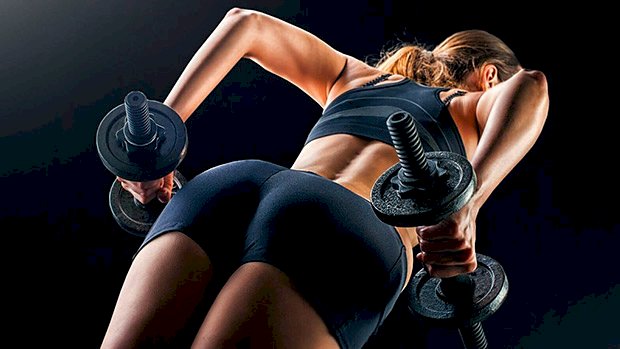 I’m a fan of big supersets, especially for people who can only train a few days a week. If you’re getting plenty of recovery time then it’s okay to push harder in your sessions. When it comes to leg training, there are a few aspects we can play with: Strength (Heavy, low rep) Endurance (Light, high rep) Explosiveness (Plyometric, fast movements) Normally you’d train each of these separately, either on different days or in different sets. For example, working on a heavy squat set, moving to some higher-rep work, then possibly finishing up with something more explosive. But what if you combine all three into one amazing giant set? Well, you’re in for a whole world of gains! On your next leg day, try this combination. I apologize in advance if you need to use any stairs the day after. Complete 5 sets of: 5 x Back Squats:At 70% of 1RM 20 x Step Back Lunges:Moderate weight (unbroken reps) 20 x Jumping Lunges:Unbroken reps Take a three-minute break after set one and two, then a four-minute break after set three, and a five-minute break after set four. Trust me, you’ll need it! The rest allows you to keep the intensity high during each set. (You can also attempt this workout with lighter weights and less rest. You’ll get a totally different kind of stimulus.) If it’s your first time doing this workout, err on the side of caution and go a bit lighter. Later, use weights that are challenging. Add this workout to your training once a week for 8-12 weeks. Progressively load the back squat and lunge each time and you’ll really get the benefits of strength, muscle growth, endurance, and mental fortitude. This is a character-building workout, and not everyone can get through the full five rounds. The butt DOMS after this can be laughable, so make sure you don’t have to be at an important, formal event the next
Origin: Tip: The Evil Butt Workout of Doom
Tip: Bulletproof Your Biceps
 Biceps tears are common in powerlifting. Using an alternate grip when deadlifting? That underhand arm is at risk. Tears are even more common in strongman. Tire flips and stone lifting are the usual culprits. Happens in bodybuilding too. And if you’re a fan of ring dips or muscle-ups, then you too are at risk. Tears happen when the biceps are loaded and then suddenly lengthened. In a deadlift, they generally happen if the arm isn’t 100-percent straight at the start but then straightens during the pull. In strongman, tears occur when a stone or tire slips. As the object drops, the athlete tries to stop it, rapidly loading the biceps as they lengthen. To some extent, it’s a problem you can’t always prevent, but you can definitely lower your risk. Lessons From the Biceps Femoris Soccer players have hamstring tear problems. A huge amount of money and time has gone into trying to prevent them. What people have found is that the risk factor involves the way the hamstring is loaded (and overloaded) as it lengthens – the same mechanism of injury as biceps tears in strength sports! Research has also found that strengthening the hamstrings as they lengthen helps reduce the injury risk. The most famously researched exercise has been the Nordic curl. How can we use this for our biceps? We use a Nordic curl for biceps, otherwise known as the biceps glide. This exercise loads the biceps as they lengthen. The Biceps Glide Loading and conditioning the biceps this way will, over time, reduce the risk of tearing when mixed-grip deadlifting, stone or tire lifting, and in life in general. Notes When you first do this exercise, you’re fatiguing the biceps through the risky range of movement and loading pattern. Initially, you might slightly increase risk. So go gently at first, progress carefully, and for 72 hours stay away from other movements that may also put your biceps at risk. As you improve at this exercise, you could use them as a warm-up to activate the biceps before a high-risk movement. This needs to be done lightly and for low volume without fatiguing the biceps. Once you’re proficient with glides, you can load them up heavier to condition the biceps, but in sessions 72 hours away from full-body, high-risk movements like deadlifts and strongman events. The movement itself will always have a risk. It has to in order to have a positive conditioning effect. It’s very low and controlled risk relative to the movements where biceps tend to pop, but you should still treat it with respect. Ease into it and be progressive.
Origin: Tip: Bulletproof Your Biceps
Tip: Does Getting Ripped Make You a Weakling?
 Can You Maintain Strength While Cutting? Many things can contribute to strength. As such, you can lose strength for many reasons while dieting down. The two main reasons you lose strength when trying to get lean are: 1. You’re losing muscle. This is the most obvious one. But it should never happen unless you get down to lower than a real 8 percent body fat. If you keep training hard (but smart), have a high protein intake (1.25 to 1.5 grams per pound of body weight) and an acceptable deficit (not losing more than two pounds per week) you won’t lose muscle. 2. You’re losing tightness. This is the most common reason for losing strength. Normally what happens is that you get weaker on the big basic lifts (bench, overhead press, and squat) but your strength on isolation exercises for the muscles involved will be the same or even higher. By losing muscle glycogen, intramuscular fat, water, and fat, your strength leverage becomes worse and the joints are less “compressed.” If you accumulate a lot of glycogen, water, and fat inside the muscle and water/fat outside the muscle, you’re creating pressure around the joint which stabilizes it. This passive stabilization makes you stronger. When you lose it, the body feels less “safe” and force production is more easily inhibited as a protective mechanism. Let’s Address the Muscle-Loss Thing The reason why people lose muscle while dieting is NOT the caloric restriction. To maintain or even increase muscle, your body needs protein and enough calories to fuel the repair processes. “Yeah, but Thib, if I’m in a caloric deficit I don’t have enough calories to fuel the repair process!” Really? When you’re in a deficit you still walk, move around, and train, right? Of course! But you’re in a deficit… by definition you are not taking in enough energy to fuel all of that. How can you still function? Well, by using stored energy for fuel. And the same can be done to fuel the muscle repair and growth process. Even in a deficit, if protein intake is sufficient you should be able to repair and even grow some muscle by relying on stored energy and the ingested protein. I’m not saying you can build as much muscle on a deficit. When you eat less – especially when you go lower in carbs – you get a lower level of mTOR and IGF-1, which can make it harder to build muscle. But you should still easily be able to maintain what you have. So why then are people losing muscle while dieting down if it’s not because of the caloric deficit? Because they’re afraid of losing muscle. That fear leads to the fulfillment of that fear. So let’s say a dude decides to get shredded. He cuts calories and maybe starts doing cardio. But he heard that he’ll lose muscle when trying to get lean. At first, he feels smaller in his clothes and doesn’t look shredded yet. It’s even harder to get a pump (because of lowered carbs and sodium). So in his mind, it must be because he’s “losing muscle.” So what does he do? He trains with more volume and intensity. He goes to failure more often, uses a ton of set-extending techniques like drop sets, rest/pause, and supersets for 90-120 minutes sessions using short rest intervals. The higher volume and intensity both dramatically increase cortisol levels. Cortisol is already elevated more when you diet down (since it’s involved in energy mobilization). And this chronic output of cortisol greatly increases the risk of losing muscle since cortisol breaks down muscle tissue. You also create a lot more muscle damage. Under normal circumstances this would be fine since you need the damage to grow. But if you create so much damage that you can’t repair it all before protein synthesis comes back down (24-36 hours after your workout) you might lose muscle! When you’re dieting down, you shouldn’t try to use your lifting workout to burn more calories (by increasing volume), nor should you panic and jack up the volume. If anything, when you’re dieting your capacity to tolerate volume and adapt is lower. You need to do less, not more. Just make sure you push hard on those sets. The Loss of “Tightness” or Joint Stability This is likely the main cause of strength loss while dieting down, especially in the initial phase of dieting. The more stable a joint involved in a lift is, the stronger you’ll be. If the joint is more stable there’s less of a strength leak. Also, if the body feels “unsafe” it won’t allow you to use all of your strength potential. When you’re on a fat loss regimen you lose… Subcutaneous fat Intramuscular fat Muscle glycogen Intramuscular water Extracellular water When you lose intramuscular fat, muscle glycogen, and intramuscular water you “deflate” your muscles. As a result, these muscles aren’t pushing as much on the joints. The bigger the muscles are, the more “packed” the joint is, even passively. This makes the joint more stable. When that happens, you’ll lose strength on the multi-joint movements, mostly the pressing movements – the shoulder is an
Origin: Tip: Does Getting Ripped Make You a Weakling?
Tip: 4 Exercises You Aren’t Doing (But Should)
 If you have a decent training program, you’re likely doing some variation of the squat, deadlift, overhead press, and pull-up or row. What’s missing? The exercises that help you become more proficient at these lifts. Here are four exercise that’ll increase your mobility, improve your balance, and strengthen your underused muscles. 1 – The Dumbbell Sumo Plié Squat How To Do It Get in a wide stance with your toes pointed out and heels planted firmly into the ground. Hold a dumbbell at crotch height and squeeze your shoulder blades tightly together to establish a strong, flat back. As you squat down, drive your knees out and back. At no point should your knees roll forward, nor should there be any space between your crotch and the dumbbell. Come to a full pause at the bottom and focus on the stretch through the inner thigh. Maintain tightness as you straighten your knees and come back to a standing position. Why You Need It The sumo plié squat is an excellent way to gain mobility in your squat and train your glutes and adductors to fire simultaneously. The relationship between the adductors (inner thigh muscles) and glutes play a huge role in stabilizing the knee when squatting. Your adductors pull your leg in toward the body and your glutes are responsible for hip extension, abduction, and external rotation. When your adductors are overly tight or weak and your glutes aren’t firing properly, your knees will cave in under a heavy load. This generally happens when these muscle groups aren’t in sync and you have improper timing when recruiting the glutes or adductors. 2 – The One-Arm, One-Leg RDL How To Do It Start with both feet together and shoulder blades tightly squeezed. Hinge at the hips by bringing one leg back. This should be the leg on the same side as the arm that’s holding the weight. Maintain a neutral head position by keeping your chin tucked and focusing on a spot on the floor about a foot away from your grounded leg. Stop the movement when your hand is even with the knee of your grounded leg. Use your glutes to drive your hips forward and come back to a standing position. At no point should there be any rounding in your lower back. Why You Need It This will help prevent your hips from shifting during the deadlift, which is common. Most of us have one leg that’s stronger than the other, so compensation will naturally occur under a heavy load. If you’re not sure what this hip shifting this looks like, here it is: To avoid a hip shift, strengthen your hinge pattern unilaterally to reduce muscular imbalances. The one-arm, one-leg RDL not only strengthens your glutes, hamstrings, and spinal erectors, but also improves pelvic stability and balance. 3 – Pike Push-Up How To Do It Begin on all fours with your legs straight, hips elevated, and palms slightly turned in. Bend at the elbows and lower your head down toward the floor as you keep your hips high. Once the top of your head reaches the floor, “scrape” your nose along the ground and continue moving forward. Pause when you feel yourself about to fall forward. Drive back to the starting position by keeping your nose right next to the floor for as long as possible. The goal is to drive yourself directly backward creating upward rotation through your shoulder blades. For shoulder health, drive your elbows out when lowering and tuck them in towards the body as you become more parallel with the ground. Why You Need It It’ll help your overhead press. The overhead press requires lots of mobility through the thoracic spine to get the bar into a proper finishing position. You drive the bar up and backward, then fully lock out the elbows with the bar above the head. Many people can’t get into this position because they lack the mobility or kinesthetic awareness to create upward rotation and elevation of their shoulder blades. The pike push-up addresses a lack of mobility because you have to press yourself back toward your legs to complete a rep. This forces your shoulder blades to upwardly rotate and elevate when completing the press. 4 – The 45-Degree Inverted Row How To Do It Set a bar up a little above waist height. Hold it using an underhand grip and position your body at about a 45-degree angle in relation to the bar. Use a supinated grip (palms up) so that your elbows are forced into your sides when pulling. Pull yourself up towards the bar so that your upper abdomen/ribcage comes into contact with it. Lower yourself down slowly, focusing on maintaining tightness through your core. Why You Need It The mid-back is often neglected during pulling exercises. Too often, people overuse their upper traps when rowing or their biceps when doing chin-ups. This decreases the amount of strength they could actually get out of their lower traps, rhomboids, and lats. To get your back to grow, you need to make the line of pull easier and work your muscles from a different angle. The 45-degree inverted row allows you to focus on
Origin: Tip: 4 Exercises You Aren’t Doing (But Should)
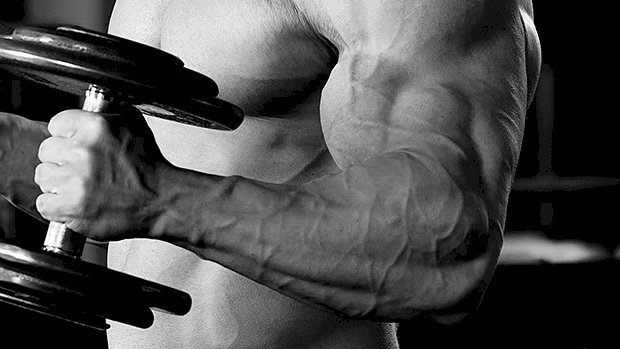
Tip: The Surefire Way to Build Biceps
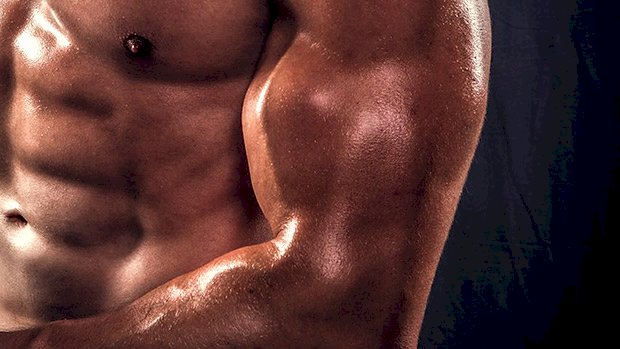 To build your biceps, like any muscle, you’ll need to work them through their full contractile range. This means doing a variety of exercises that’ll overload them in all positions: shortened, lengthened, and mid-range. Incline dumbbell bicep curls are what most people use for the lengthened position, which makes sense at first. Only problem is, they don’t overload the lengthened position. At the bottom, the biceps are stretched but there’s no lever arm. As you curl, the lever extends further away from the body increasing the amount of mechanical work being done by the biceps. So, while you may fully lengthen the biceps into a loaded stretch, you haven’t overloaded this portion of the range. The mid-range is where most of the work is being done. The Solution: Low-Cable Curls The line of pull from the low cable means that the biceps are working hard out of the starting (lengthened) position. The resistance profile of the lift also does a good job of mimicking that of the muscle throughout the entire range. At the bottom, the lengthened position is challenged. As you curl up into the mid-range (your strongest position), the lever lengthens slightly, then at the top (weaker position) the lever drops off a little. This makes the exercise extremely effective throughout the entire range because it places optimal levels of tension at each point on the strength curve. Nothing Is Perfect The one drawback of this exercise (compared to the incline dumbbell curl) is a lack of stability. Sometimes when people first try the low-cable curl, they struggle to keep their shoulders stable. This causes them to start swinging their shoulders or shrugging up, which creates momentum and takes tension off the biceps. Try to “lock the shoulders down” to focus all of your attention on the biceps. With incline dumbbell curls, you have a bench to drive into and provide artificial stability throughout the shoulders. This makes it easier to focus on only working the biceps. So I often teach people the incline dumbbell curl first to build a habit of putting the biceps in a lengthened position while also programming some scapular stability work. Then they progress to the low-cable curls for enhanced biceps growth once they can control the
Origin: Tip: The Surefire Way to Build Biceps
Tip: This Plank Isn’t For Pantywaists
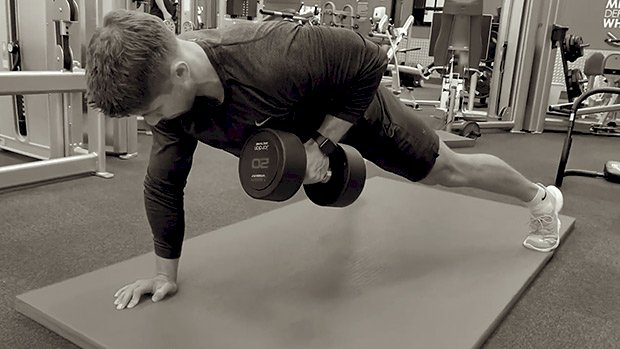 Are you still busting out traditional planks like your life depends on it? Well, hovering a few inches off the floor on all four limbs probably isn’t going to get you where you want to be. Sure, the plank is one of the most basic core exercises for developing muscular endurance. And while there’s a lot of evidence this can help with low-back pain and posture, most of life doesn’t happen when you’re planted statically on your toes and elbows. Try increasing the intensity of your planks by adding load and throwing in an anti-rotation component. Resisting extension and rotation will carry over far better to just about everything, from walking to landing a right hook. Do this drop set: A1. Iso Row Plank (left): 10-30 seconds A2. 3-Point Plank (left): 10-30 seconds Rest 30 seconds A3. Iso Row Plank (right): 10-30 seconds A4. 3-Point Plank (right): 10-30 seconds Rest for just 30 seconds between A2 and A3, but for everything else go straight from one set to the next. Then after A4, rest as needed before you start the whole thing all over again. Do three rounds. This move will also hit those obliques and QLs (quadratus lumborum) harder too. With an iso row plank, using a wider stance will allow you to use more weight, but feel free to go narrower if you’re chasing more instability. Start with the weight, drop it, then keep holding. It’s that
Origin: Tip: This Plank Isn’t For Pantywaists
