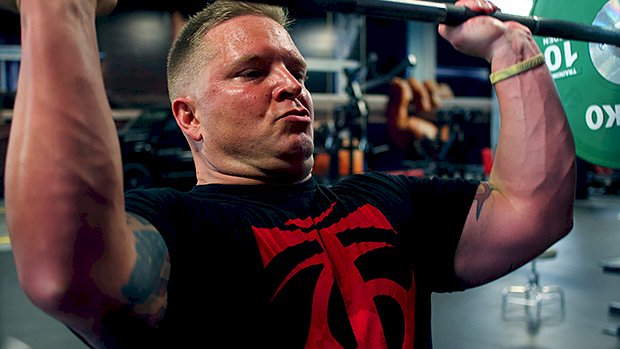
 Comfortably holding a heavy weight over your head takes some serious shoulder stability and a good amount of mobility through your thoracic spine. You’ll need stable and mobile shoulders to nail a good overhead lockout position with everything from barbell pressing to the Olympic lifts and even handstands. If you’re struggling overhead, try these exercises to strengthen your shoulders and improve your overhead game. 1. Wall-Facing Handstand Do you have the prerequisite mobility and motor control to achieve a good overhead position? This will let you know. The movement requires you to be mobile and strong through your thoracic spine (and stable through your lumbar spine) to get your body up against the wall. It’s great for the upper body because it dynamically challenges you to stabilize your shoulders as you walk yourself towards the wall. It also forces you to learn how to properly brace your core by pulling your ribcage down so you don’t go into excessive lumbar extension during an overhead lift. How to Do It Begin with two hands on the ground and one leg against the wall. Walk your hands backward as you bring your other leg against the wall. Stabilize your lower back by engaging your core and pulling your ribcage down. Walk yourself backward until your nose touches the wall and you’re in a vertical body position. Keep your arms straight and press yourself away from the floor so that you achieve protraction and elevation through the shoulder blades. Hold until you start to lose protraction through the shoulders. 2. L-Sit Alternating Bottoms-Up Kettlebell Press Wow, that’s a long-ass name for an exercise, but it does the job! Pressing and stabilizing heavy weights overhead requires a strong rotator cuff as well as an efficient bar path. This exercise forces your rotator cuff to stabilize your shoulder for the entire press and will teach you how to press weight up and back. It has the added benefit of firing up your nervous system and improving your grip strength since it requires a strong grip to keep the kettlebell upright. Placing yourself in the L-sit position requires more core activation and will keep you from arching your back to complete your reps. How to Do It Begin seated with your legs straight in front of you. Hold two kettlebells upside down with your elbows bent and wrists straight. Pull your ribcage down to brace your core and press one kettlebell up and back. Finish the press with your biceps next to your ear and pause at the top to make sure the kettlebell is stabilized overhead. Slowly lower the kettlebell back down and repeat on the opposite side. 3. Bottoms-Up Kettlebell Swing This is a dynamic lift and requires almost all the muscles in your body to work together to stabilize the kettlebell overhead. This movement is similar to the bottoms-up kettlebell press in how it challenges shoulder stabilization, but it requires more timing and arguably more athleticism since you have to “catch” the weight at the top. Although the movement of the kettlebell will have a significantly bigger “arc” than a barbell, this can be a great tool to get better at the Olympic lifts since it involves hinging the hips and catching the weight overhead in one efficient movement. Your ribcage should be pulled down and you should finish the lift with your biceps next to your ear, pausing for 2-3 seconds before lowering. How to Do It Begin with your feet slightly wider than hip width. Maintain a strong flat back as you hinge your hips back, bringing the kettlebell between your legs. Explosively drive your hips forward, swinging the ‘bell upward. Catch the kettlebell by the handle with your arm straight and biceps next to your ear. Your shoulder should be in a neutral position when you catch the ‘bell. Maintain a neutral spine as you press up on the kettlebell, maintaining tension throughout the entire body. Hold the kettlebell by the handle at a dead stop for 2-3 seconds for the rep to
Origin: Tip: Get Stronger Overhead – 3 Exercises You Need
Tag: Stronger
Tip: The Missing Exercise for a Stronger Bench
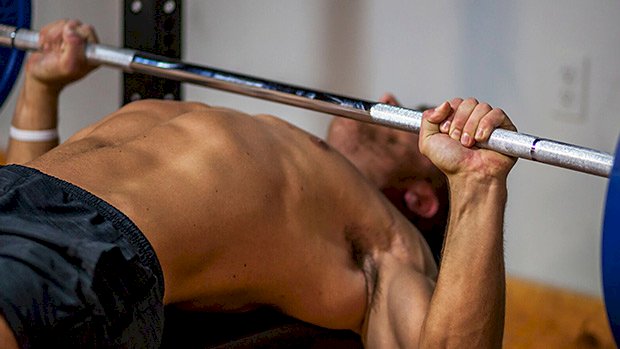 You can’t fire cannons from a canoe and you can’t bench press big weights from unstable shoulders. The external rotators of the shoulders are important for shoulder health. But they also play a role in stabilizing the arms during bench presses and can contribute to a stronger bench. Some guys know all this and do their best ostrich impression. They stick their head in the sand, neglect training external rotation, and play ignorant when their shoulders hurt and their bench stalls. Other guys are more proactive. They do dedicated external rotation work and… still end up with a stalled bench press! Why? They forget one-third of the muscles involved and use exercises which ignore how these muscles actually function during a bench press. The rotator cuff muscles play an important role in shoulder stability. These muscles work like “active” ligaments to maintain proper alignment of the shoulder and reduce excess movement. Two of the four muscles work to externally rotate the upper arm. These are the teres minor and infraspinatus. These both get worked with your classic external rotation, rehab-style exercises. But there’s one other muscle that can contribute to externally rotating your humerus. The Forgotten Muscle By strengthening the posterior (rear) deltoid, you can increase your stability on pressing exercises AND build more impressive-looking shoulders. To make your rear-delt work maximally efficient, combine it with the function of the external rotators during a bench press: isometrically contract to hold the upper arm in position. Don’t go back and forth, externally rotating the shoulder as you do with the pink dumbbells in your typical rehab drills. One Exercise to Do It All Use the supinated-grip rear delt flye: This exercise places you into external rotation and requires you to work to maintain this position while the shoulder moves through flexion and extension. This mimics the requirements of teres minor and infraspinatus during a bench press. Even better, you’re simultaneously training the rear delt and taking it to a fully shortened position. The arm path you take also lines up the fibers of the rear delt optimally to produce force, meaning you get a greater training effect. Hold at the top, where the muscle is maximally shortened and the lever arm is longest. This will place high levels of tension through the muscle and develop the strength required for you to stabilize big weights when benching. Since you’re looking to develop stability to boost your bench press, using higher reps to train strength-endurance is a good choice with this lift. I suggest sets of 12-20 reps with a 2-second peak contraction on every rep. This will develop great isometric strength in the rotator cuff and pack size onto your rear delts. The rear delts have a high proportion of slow-twitch fibers and respond really well to higher reps and long time under tension
Origin: Tip: The Missing Exercise for a Stronger Bench
Tip: The Secret to Stronger Glutes
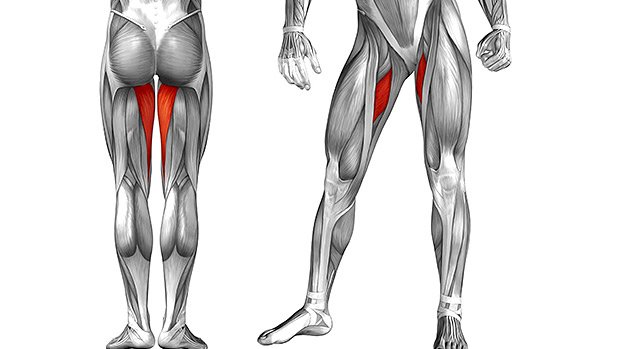 In my early days of training, something that really bugged me was coaches talking about the importance of “torque” and “tension” and “bracing.” To be honest, I had no idea what they meant. As far as I could see, they were just going up and down. It looked the same as what I was doing. Skip forward a few years and I started to pick up what bracing meant: keeping air in the belly to keep the spine safe. It’s a pretty simple concept, but not for someone whose athletic background involved computer games. Skip forward a few more years and I’m coaching. I’m noticing a high number of people, especially those who play sports, commonly getting groin injuries from squatting heavy. What’s going on? I realized that the usual fix for groin issues was to make the glutes stronger. The main exercises prescribed involved a resistance band and abduction. Yes, you will feel your glutes doing those, and they’re great exercises for a burn. But you may have left out an important part of the puzzle: if you constantly leave out the adductors they’ll never be able to compete with the overriding strength of the glutes. The actual issue – an imbalance between two opposing muscles – will never be resolved. This is the idea of torque and tension: opposing muscles having a good relationship with each other so that they work well together to create balanced strength. Throughout all your banded glute rehab exercises, the band is simply playing the role of the adductors. For the glutes to be able to pull outwards during a squat, the adductors have to be strong enough to pull inwards to give the glutes something to work against. If they’re weak, the knees will collapse and you’ll either have a horrendous looking squat or strain your adductors because your glutes overpowered them. Making the glutes even stronger will only make the issue worse. Yes, you may temporarily feel better, but it will be more because you rested your adductor and it healed, not because your glute drills worked. Luckily, there’s an easy fix. Literally all you have to do is take off a few reps of your glute exercises and add in an exercise that involves the adductors, such as a Copenhagen plank or, my current favorite, the adductor bridge (which I’m hoping I invented, but probably didn’t) which we demonstrate in the video. If you teach your adductors to fire with the glutes, they’ll work together more efficiently and you can spend more time getting stronger, rather than having to do rehab drills every couple of months. How to Do the Adductor Bridge Set up in a 90/90 position. (See minute 2:15 in the video.) Place one hand on the floor beside the externally-rotated hip. Press your knee on the internally-rotated leg into the ground. Lift yourself up by pressing through the hand and knee at the same time. Repeat for 10 reps and add pauses at the top for extra fun. Repeat on the other side. Go and lift some weights!
Origin: Tip: The Secret to Stronger Glutes
Tip: 4 Unique Exercises for a Stronger Grip
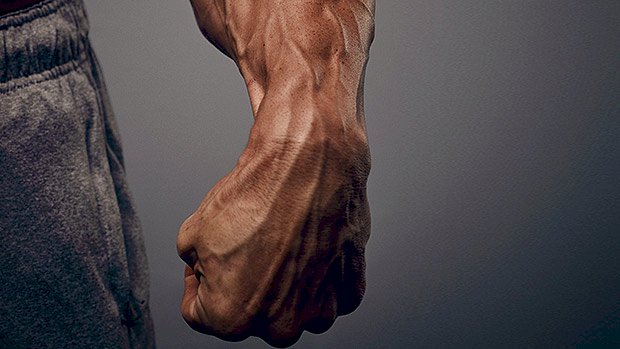 The strength of your grip is crucial to your athletic and training performance. Whether it’s locking out a PR deadlift, choking out your partner in jiu jitsu practice, or giving a firm handshake upon first meeting someone, a strong grip is the ultimate sign of a strong dude. As an added bonus, training your grip also increases recruitment of the muscles of your rotator cuff, so you get an added benefit of healthier shoulders as well as a vice-like grip. Carries and deadlifts are the obvious (and best) choices for developing a crushing grip, big traps, and girthy forearms. But these heavily loaded exercises are quite taxing on the CNS, so while they should be staples in your program, you can only do them a few times per week with any substantial load. Using a battle rope for these common exercises below will give you a big return on your training investment by: Increasing the frequency with which you can train your grip. Improving your joint positions due to irradiation – when you grip harder, you reflexively contract your rotator cuff, glutes, and abs harder. Better joint positions lead to better muscle recruitment, which means more force development and less wear and tear. There’s nothing wrong with doing these exercises with their traditional tools, but if you want to get bigger forearms, a stronger grip, and healthier shoulders, they’re worth subbing in. 1. Battle Rope Curl Set a battle rope up over a chin-up bar or power rack. Using a neutral grip, keep your upper arms perpendicular to your torso and curl your thumbs to your hairline. Keep your abs braced while contracting your glutes and quads to eliminate cheating. Use these in place of your last biceps exercise of the day or at the end of a pull-focused day for 2-3 sets of 10-12 reps. 2. Battle Rope Triceps Extension This will smoke your abs, triceps, and forearms. Set yourself up with a battle rope over a rack or chin-up bar. Keeping your upper arms perpendicular to your body, bend at the elbows until they pass by your face, but not so far as to lose tension on the triceps, before extending them back out. Brace hard so there’s no lower back extension at any time. The lower the angle, the more of your weight you’ll have to handle. Start conservatively and work your way down closer to parallel to increase the difficulty. Perform 2-3 sets of 10-12 at the end of an upper body or arm day. 3. Battle Rope Face Pull Face pulls are key no matter who you are, but especially if you have shoulder impingement issues. These will give you more activation in your rotator cuff and increase the subacromion space, which will better position the glenohumeral joint, yielding better muscle activation in the rear delts and upper back. Set up as if you were going to do an inverted row, heels in the ground and upper arms perpendicular to your torso. With your elbows wide, drive them back while pulling your thumbs towards your ears. Do 2-4 sets of 10-12 before, between, or after heavy press sets, or at the end of a pull-focused day. 4. Inverted Row Instead of traditional inverted rows using suspension straps, try this variation instead. Drive your elbows back and pull your shoulder blades down into your back pockets, without extending through your lower back. Around 2-4 sets of 10-12 reps is a perfect finishing touch on any pulling-focused training
Origin: Tip: 4 Unique Exercises for a Stronger Grip
6 Ways to Keep Getting Stronger
 Here’s what you need to know… All progression models have their limits. These advanced strategies will allow you to keep getting stronger. End every single workout with a few sets of your worst lift. Use contrast series lifting. Do a series of 3 sets of an exercise using different speed dynamics with moderate weight, light weight, and then heavy weight. Perform isometric holds. Pick up the barbell, bring it to the weakest position, and hold it there for 12 seconds. Use next-day isolation work. Do isolation work for the weakest muscle involved in your main lift from the preceding day. Do the lift you want to improve the most twice in your workout. Doing 4 sets of an exercise twice during a session will lead to greater strength gains than doing 8 sets in a row. The Double Progression Model The stronger you get on the big, basic barbell lifts, the more muscle you’ll grow. Period. And one of the best ways to do that is to use the double progression model. First you select a rep range. Let’s say 5 reps per set. Then you select a number of sets to perform, 5 for example. You want to do all 5 work sets using the same weight and your goal is to complete all 5 sets using your target rep range. When you can complete all your sets with the same weight at the targeted number of reps, you’re allowed to increase the weight at your next session. Not being able to get all your sets done with the upper limit of the range – for example getting 5, 5, 5, 4, 3 reps – is fine, but it means you don’t get to increase the weight at your next session. However, double progression has its limits, just like any other progression model. At some point you’ll need to use advanced strategies to keep getting stronger. Here are six of my favorite. 1 – End Every Workout With Your Worst Lift If your bench press is your worst lift and the one you want to improve the most, add 3-4 sets at the end of every workout you do (on top of your regular bench press work). The reason for this is that the neural adaptations tend to be greater for the last thing you do in a workout. That’s why I like to end the session with a few high quality sets of a key lift or physical quality. When your goal is to bring up one specific lift, especially if it’s been stuck for a while, this should be your go-to strategy. The minimal load to stimulate rapid strength gains is 80%, so that’s the weight you should be using for your daily, end-of-the-workout sets. Use this strategy for at least four weeks. Pick one lift you want to focus on and perform 3 to 4 sets at 80% of your maximum. The number of reps will vary depending on what you did during the rest of the session. If you did a heavy pressing session, you might only get 2 or 3 good reps with 80%. If you did squats or deads, your upper body will be fresh enough to allow you to get 5 or 6 reps. The key thing is staying at 80% for all of your work sets. Ideally you would not reach failure on any of the sets. This technique works by improving neural efficiency for the target lift. You’ll improve intra- and inter-muscular coordination, which will allow you to rapidly gain strength in that movement. Rapid strength gains should be sustainable for 4-6 weeks. By the way, since you’ll hit the focus lift every day, you’re bound to have some residual fatigue and you might not feel stronger right away. The gains in strength on the target lift will show up about 10-14 days after you stop doing this strategy. You’ll get a big performance gain seemingly out of nowhere! Note that this also works well for improved muscle growth. One of my figure girls made very rapid gains in glute and leg muscularity by finishing every workout with four sets of front squats for four weeks. 2 – Contrast Series Lifting I adapted this method from a technique used in track and field, both with sprints and throws. It consists of doing a series of 3 sets (with a normal rest interval between sets) of a movement using different speed dynamics. For example, when working with a bobsleigh Olympian, we did one 60m resisted sprint (speed parachute), one overspeed 60m sprint (towed sprint with overspeed device), and one normal 60m sprint. We did the same thing with shot putters – throwing an overweight implement, followed by an underweight implement, and finally a normal one. In both instances you would have a slower movement, a faster than normal movement, and a normal one. This leads to greater gains in power. You can use this the same approach with basic strength lifts: Set 1: Moderate weight (70-80%) using a very slow eccentric tempo (about 5 seconds on the negative) and a 2-3 second pause at the bottom of the eccentric while still under load (e.g., not completely in the hole in a squat, not touching the chest on a bench, or the floor on a deadlift). The concentric or lifting part is then performed normally. Do 2-3 reps. Rest 2 minutes Set 2: Light weight (60-70%) done explosively. Control the lowering portion but explode from the bottom, trying
Origin: 6 Ways to Keep Getting Stronger
