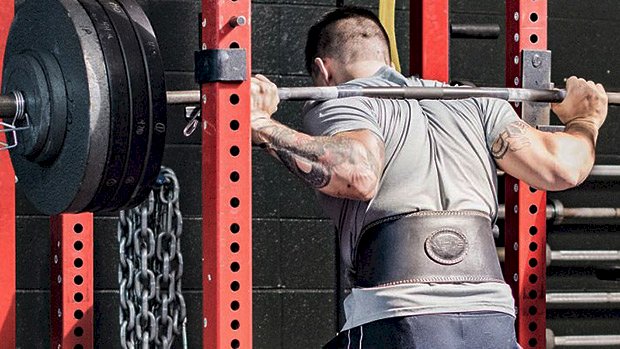
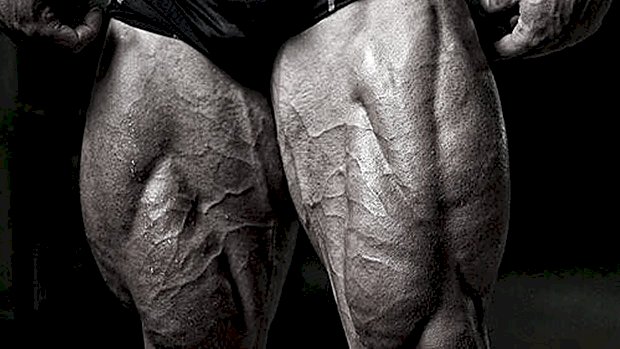
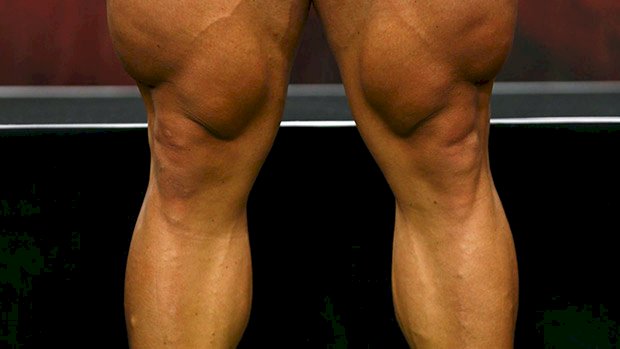
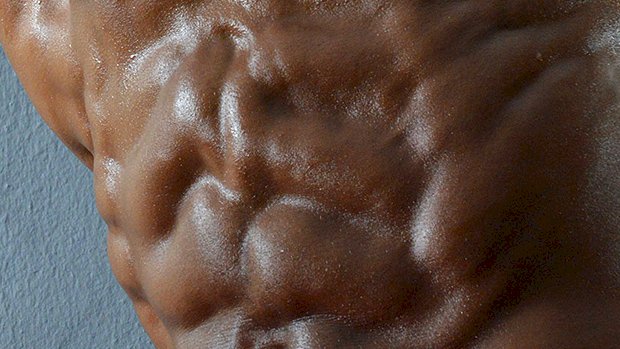
 No movement on earth builds more muscle and improves athletic performance better than the squat. But there’s something else that makes the squat king. When you push the human limits of the squat, you enter a realm that only a select few will ever know. It’s a realm where the lift may actually kill you. I remember my first 900 pound single-ply equipped squat. It was the first lift where I thought I could possibly die. That moment was a turning point for me as an athlete. I could have racked the weight and not risked my life. However, I embraced that feeling of life and death and crushed the lift. I was never the same. What are the best ways to build a life-changing squat? Other than simply squatting more often, the best way to strengthen the squat is to pinpoint your weak links and attack them. Pinpointing Your Weak Links There are three major joints required for squatting: the intervertebral joints of the back (lumping all of these joints into one), hips, and knees. So think about the muscles surrounding these joints. Collectively, they’re the spinal extensors, knee extensors, and hip extensors. So the question becomes which group do you need to target and how? We’ll go over a few simple ways of determining the strengths and weaknesses of each, and I’ll give you a few exercises for strengthening them. Once you know your weak links, you can work on the movements that’ll improve them. How? With strategic hypertrophy. Gain muscle size in those areas. Yes, hypertrophy of your weak links can help you build your squat. You can increase the size of your muscles with solid programming and hard work, and you can get more efficient moving heavy weight while squatting. Back – How To Tell If It’s Your Weak Link You’ll never see a great squatter with a weak back. You can get away with weak thoracic spinal extensors in the deadlift, but that simply won’t work in the back squat. If the back flexes, the movement is dead. A bit of thoracic spine flexion has been shown to help the deadlift by lessening the demands on the back. So the easiest way to determine if your back is the weak link is by comparing your deadlift to your squat. If you can deadlift 10% more than your squat, your back probably limits your squat. In a perfect world, the two should be about the same, but I’ll give you 10% to account for leverage advantages that might give you a slight edge in the deadlift (like having long arms). Otherwise, when you look at the mechanical advantages and disadvantages of each movement, they’re pretty equal. For example, the deadlift is a shorter range of motion, and a deadlift can be locked out even after a great deal of spinal flexion (back rounding). But with the squat, an athlete has momentum to drive through the typical sticking point, which occurs a few inches above the typical starting position of a deadlift. Plus the knees are free to move in the squat, allowing the body to call on the knee extensors or hip extensors depending on which is stronger. The deadlift doesn’t have that luxury. Here’s what to do: Front Squat Because the bar is in front of your body, the demands on the spinal extensors are the highest for this squat variation than any other (high bar or low bar). Therefore, the front squat builds a massive back while strengthening the quads. Front Squat Carry With carries, you take the quads out of the equation and you focus on strengthening the back extensors. Good Morning When you incline the torso, you increase the horizontal distance (perpendicular to gravity) between the bar and any intervertebral joint in the spine. You put a lot of stress on the back extensors, causing them to get stronger and bigger. A lot of these movements will double to strengthen other joints. For example, good mornings are great for hip extension… especially as it relates to squatting. The quickest way to stabilize the torso is by learning to brace. You would be surprised at the number of lifters that don’t understand how to brace. Don’t be one of them. How to keep tightness around the spine: Use the Valsalva maneuver. You just breathe as much air as possible into the belly, pressing out against your belt in the front, sides, and even in the back while keeping the mouth shut and not letting any air escape. This technique causes massive amounts of tension around the lumbar spine. Any great strength athlete will tell you that a stable spine is a stronger spine. Get your hands as close as mobility will allow. This will create maximal stiffness in the upper back around the thoracic spine, which is where most of us fail during a squat. Tuck your elbows under the bar. Too many people let their elbows flare out, which also allows the scapula to flare out. When the scapula flares, the back – especially in the thoracic spine area – starts to flex or round. Quads – How To Tell If They’re Your Weak Link If you squat like a stripper (butt flying up out of the hole), there’s a good chance you have weak quads. The
Origin: Build a Monster Squat
Tag: Squat:
Tip: The High-Bar Squat for Big Quads
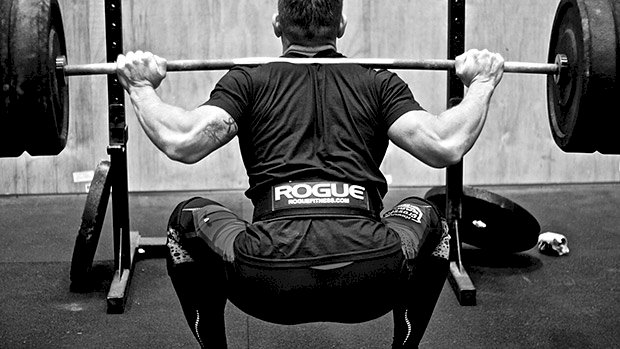
 High-bar squats are your big-ticket move for leg size, but you have to get them right to really emphasize the quads. The Setup Place a barbell on your upper traps while squeezing your upper back muscles together to form a shelf. If you aren’t used to a bar on your upper traps it can feel uncomfortable at first. Get used to it. Just make sure the bar isn’t sitting on the bony ridges of your spine or your neck. Find your best foot position, allowing maximum hip mobility at the bottom of the squat and preventing rounding of your spine or knee discomfort. Start with heels around hip width and toes angled outward. Then adjust and use what feels best. We’re often taught to use a narrow stance for better quad recruitment. This may produce more quad tension but isn’t essential. If you can’t set up narrow you’ll still get excellent quad recruitment with good range of motion, loading, and reps. Form a strong arch by squeezing the ball of your foot toward your heel. Externally rotate your hips to get your knees vertically stacked with your toes. The stress and tension of the load should be directed through stacked bones, joints, and muscles. Protect your lower back by flexing the abs and locking your sternum down into your pelvis. Though the high-bar position keeps your torso more upright than the mechanics of low-bar squatting, this doesn’t mean your torso must be perpendicular to the ground. Too often, lifters create a vertical position by aggressively arching their lower backs. This can lead to potential injury. The Movement Maintain a neutral lumbar spine (natural arch) to protect your lower back. With abs locked down, elevate your chest and extend at the thoracic spine to maintain a slight but not excessive upright posture. If you’re tall with long femurs, no amount of exaggerated arch will allow you to sit vertically in a squat. Exaggerating a vertical torso also pushes the knees forward to maintain center of gravity – producing even more stress in the knee and possibly causing patella-femoral pain. This usually restricts the ability to squat deeper, which can lead to overloading a shorter range of motion squat and further aggravating joint stress. Most lifters subsequently abandon squats and knee-wrap their leg press because “they hurt my knees.” High-bar squats are more upright and quad dominant than low-bar squats. More emphasis on quads, and therefore knees, doesn’t mean your knees can’t handle the stress. Our joints aren’t fragile structures ready to explode if loaded. Creating strong muscles around your knees by using correct form will encase the knee with muscle to protect and stabilize it, while applying controlled stress to strengthen your connective tissue and bones over time. Just don’t be careless. Loading through the ball of the foot can cause knee pain. This may happen when your knees dive too far forward past your toes at the bottom of the squat. Your knees can and should go past your toes on a good squat. Often lifters let their heels rise at the bottom of a squat as the focus is in the front of the foot. Maintain your weight evenly through the entire foot and push firmly through your heel as you squat. If you can’t squat deeply without your heels rising, this means you have poor ankle mobility. So restrict your depth while working to improve your ankle dorsiflexion. Healthy, mobile ankles are crucial for good squatting. Sets and Reps Warm up with an empty bar or bodyweight set to mobilize hips, knees, and ankles and to sense any major joint discomfort early. Do 2-3 warm-up sets of 10-12 reps before moving up to working weight. Then, use 3-4 working sets of 8-12 reps. Adjust the weight so that you get within two reps of failure to optimize muscle growth. This will produce enough mechanical tension and metabolic stress to trigger a growth response. Occasionally jumping to 15-20 reps to near failure is an unpleasant yet effective way to break plateaus. High-bar squats are tough. Even sets of 8-12 will leave you winded while taxing your central nervous system. The goal is to do enough training volume to grow. Focus on developing the stamina to do more reps, sets, and weight. Hitting absolute failure is fine for curls and cable rows, but it increases the chance of getting hurt on heavy compounds and accumulates fatigue more rapidly than training effect. Excess fatigue cuts into training volume of subsequent sets and later exercises. As you progress through weeks of training, apply progressive overload with added weight, reps, and carefully timed sets. Rest as long as needed to recover to start the next set with excellent form for the 8-12 reps. Taking only 60 seconds of rest means you aren’t lifting heavy enough or giving yourself enough time to recover. Working quickly doesn’t burn more body fat. Instead it cuts into training volume and overall results. Taking 2-3 minutes of rest between your working sets should be
Origin: Tip: The High-Bar Squat for Big Quads
7 Variations of the Hip Belt Squat
 Training legs with heavy barbells and plate-loaded machines can take a toll. Those who suffer with back pain can struggle with repeated compression and shear forces through the spine. And those who lack upper-body mobility can struggle with a bar on their back. That’s usually where hip belt squats come in, but they feel awkward for a lot of lifters. Don’t worry though, the right variation can help you build bigger and stronger legs while unloading your spine. I’ve worked with pro rugby teams that have solely used hip belt squats as their main lower-body lift. The purpose was to manage unnecessary back stress outside their daily spine-crunching tackles. The traditional way to perform hip belt squats is with a purpose-built machine or a low cable. No access to that equipment? No problem. Here are six unconventional ways to hip belt squat: 1. The Olympic Plate Variation Let’s start with some more obvious alternatives. You’ll need a couple benches or boxes and a standard dip belt. The key is to have the box as low as possible so it’s not too awkward to get on. It’s also useful to have the belt chain as long as you can get it. This will keep the weight as far from your fun parts as possible, while allowing the weight to stay close to the floor as you hit full depth. That way if you bail out in the bottom of your squat, it’ll please the gym safety police. Because of how the plates are hanging, you can afford to use a narrower stance. However, these are arguably the hardest to get in and out of because the plates can’t rest on the floor like the other options. 2. The Kettlebell Variation Kettlebells are easy to sit upright on the floor, so just link your chain through and get going. The downside will be the amount of kettlebell weight available to you. For beginners though, kettlebells are a great place to starting. There’s also a nice feel to them. They allow good depth, making them a valuable booty-building exercise. 3. The T-Bell Variation A loadable kettlebell, also known as a T-bell, can be a good solution if you need to stack the weight up. It will often allow you to use 225 pounds or more. A higher step will be needed to compensate for the height of the handle, and you’ll also want to use a longer chain so the plates don’t hit your inner thighs. However, if you like belt squatting with more of a sumo stance and need to go heavy, these are a great option. This variation and the previous ones all cause a little swinging to occur. For some, it can be hard to manage. On the upside though, the potential swing forces you to control the eccentric or negative even more. The following variations are a little more stable (less swinging) since there’s some form of attachment to the floor. 4. The Banded Variation These are possibly the easiest to get in and out of, and for a higher-rep quad burner they’re hard to beat. In the video I start with the standard band version. Once fatigue sets in I grab a dowel and keep going. It becomes a drop-set since the dowel gives me a little help on the way up, allowing me to do some extra reps. A banded hip belt squat can also be useful as a power complex. You’d do some heavy-ish squats (say, 85% of your 1RM for 3-5 reps), wait a few minutes, then do 5-7 banded belt squats as fast as you can. You should feel a slight potentiation effect from the heavy pre-load. The band will also teach you to speed through it, while accelerating you on the way down. This has a powerful effect on the neuromuscular system that most sports strength coaches will appreciate. The advantage with bands is that you don’t need much of a setup. You can use either a dipping belt or loop through a lifting belt. This is something Westside Barbell has done for years, so I can’t claim to have come up with the banded method. Albeit the drop-set is an extra nasty take on it. 5. The Landmine Back-Facing (Without Deficit) Variation If you have a landmine-style attachment, this should be on the top of your list of must-try exercises. Now, here’s the deal: It’s not actually essential that you stand on some boxes. Boxes simply raise you up and allow you to hit depth. If having a shorter chain is comfortable enough, then give it a try. You can also use smaller Olympic plates and stack more of them on the bar. That way you’ll be closer to the floor, and might find you won’t need the elevation. Using a landmine in the back-facing position will cause you to feel it more in your quads in the bottom position. Because of the leverage factors, the landmine is loading you more at the bottom, while also driving your knees forward away from the device. If you have cranky knees, you might want to skip this. If you don’t, this one will blast your quads into oblivion. 6. The Landmine Back-Facing (With Deficit) Variation If you need to use larger plates, or feel you’ll benefit from the extra range of motion, then use a deficit. The feel of this is exactly the same as the previous version, in that the
Origin: 7 Variations of the Hip Belt Squat
Tip: Squat Day? Do This First
 Squats Feel a Little Clunky? Here’s a quick and easy fix to try: Pump up your hamstrings BEFORE you start squatting. Yes, you read that right. Isolate your hamstrings and chase a pump before you start your first set of heavy squats. Banded hamstring curls work great: Grab a band and loop it around something solid. The band should be around ankle to mid-shin height. Hook your feet into the band the way I’m doing in the video. If you don’t you’ll end up rolling over and the band will slip off. Move far enough away so there’s no slack in the band, but also the resistance is appropriate as you flex your knees. Of course, choosing the right band is key here too. Laying on a foam pad is optional. You can also roll up a towel. This helps with back and pelvic positioning and prevents unwanted movement coming from your lumbar region. Once you’re in place it’s pretty simple. Just pull your heels into your butt, flexing your hamstrings hard. Your goal is to get as much blood in there as you can. Do 2-3 sets of 20-25 reps. Here’s What Happens Any squatting pattern will instantly feel smoother. You’ll hit depth easier, meaning more efficiency and less wasted energy. Any clunky hips or knees you might’ve had before will feel significantly better. And because of all this, you’ll build more muscle and have better longevity in your lifts. Now, I’m not saying this works for everyone. If you’re an elite-level squatter and grooving that pattern regularly, it’ll likely not make much of a difference. It also doesn’t have as much of an effect on low-bar versus high-bar squats. If you’re a more hip-dominant squatter then the hamstring fatigue will likely negate all other benefits. Just remember, this is more of a hypertrophy and longevity technique. If you’re not barbell squatting, these still work great for most heavy knee-dominant
Origin: Tip: Squat Day? Do This First
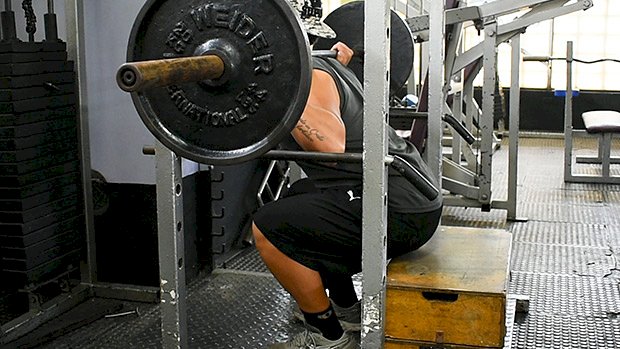
The Best Squat You Haven’t Tried
 Get Lumberjacked! If you struggle with squat depth, if your wrists, elbows, or shoulders hurt, or if you feel like you’re falling apart before leg day even started, try the lumberjack squat. Though similar to the goblet squat, it offers the benefit of being able to go heavier. Here’s what it looks like: If you’re familiar with landmine squats you may be confused about why I use a bench for these. The bench minimizes the risk of getting hurt while picking up and putting down a heavier load. And it prevents you from tiring out getting into position. You don’t want picking up the bar to be the hardest part of the work set. You might think the bench setup isn’t worth it. Well, you’d be wrong. Try it and you’ll quickly figure out how comfortable the starting position feels. It’s safer too. Setting up in this way also helps standardize squat depth, and it makes for an easy way to bail out if you need to. It’s not necessary to train to complete failure, but if you’re going to then the lumberjack squat makes it easy to do so. The Setup Get a landmine attachment ready. Whether it’s fixed to the floor or a rack attachment doesn’t matter. One thing not to do, though, is to use the corner of your gym. With the loads you might get up to, it’ll likely drill a hole through the wall. It’s also less secure. Use a standard length 7-foot Olympic bar. Even most beginners can handle the load of a 45-pound bar quite comfortably. And because of the fulcrum, you’re not truly handling the full weight of the bar anyway. Get the bar up into place. You CAN just whip the bar up into position, but a smarter approach would be to use a bench (or box) like it’s shown in the video. That way there’s no twisting or jerking of your back and no awkwardness getting into position. Mind the starting height. If you’re tall, you can use a plyometric box or even stack a few plates on the bench to get the perfect height. A standard gym bench could be suitable. As a 5’11” lifter, the bench height works well without any adjustments. If you’re shorter, you can use a step with risers to get the correct height. You can also use smaller plates on the landmine. It’s up to you to figure out what’s best according to your frame and squatting anatomy. The Execution Like conventional squats, your foot position can vary depending on your own anatomy or what you’re looking to emphasize (more on this later). At the bottom, try to drive your knees out with your elbows and keep your feet flat on the floor. Get set, get tight, and start your first rep by overcoming the inertia of the weight in the bottom position. As you fire out of the hole, you’ll move slightly forwards. The landmine will determine the angle, just make sure you keep the bar close to your chest throughout (cupped) and don’t let it inch down. You’ll probably find you need to stand further behind the bar than what you initially thought. There’s a sweet spot, but don’t worry, you’ll know when you’ve got it. Make sure you’re staying tight throughout and take a deep breath on every rep – breathing out on the upward effort. Once you’ve nailed the setup, add some load. Providing you don’t have tiny hands and a horrible grip, you’ll be able to handle some respectable weight, typically more than a goblet squat would allow. Here are a few ways you could use this variation: For Athletic Strength, Add a Band As you approach the top of the rep, the tension drops a little. This means that while it’s harder in the bottom position, as you reach full extension it gets easier. To accommodate for this and even out the strength curve a little, use a resistance band. A band will encourage you to fire through it, while also accelerating you on the way down. Because of the slightly more horizontal nature of this squat, it’s a great option for athletes looking to develop more horizontal force. Pick the load according to your goals, although this can be a good option to improve strength-speed (high-load power output and rate of force development). For Intensity, Do a Drop Set To add intensity to your lower body session, drop sets work well here. The lumberjack squat setup makes it easy to strip plates as you go. In the video you’ll see a single drop-set, but feel free to add multiple drops for some extra nastiness. Only someone with a sadistic side will enjoy these. You’re welcome! To Emphasize the Quads, Wedge the Heels Lumberjack squats work well when combined with a heel wedge. This might take a few tries to get right. For most, the heel wedge would be level with the end of the bar when stationed on the floor. Adjust accordingly though. The heel wedge will increase quadriceps’ activity and allow an even greater depth over a variety of foot placements. You can go super narrow to hit the outer quads a bit more (vastus lateralis) or take a wider toes-out stance to hit more of that teardrop (VMO). Programming Lumberjack squats could be used as an alternative to conventional squats if you’re
Origin: The Best Squat You Haven’t Tried
Tip: Tall? Squat Like This
 For building mass, squats are king. However, when long-limbed hardgainers try to back squat, it often looks like an ugly good morning. Switching to a safety squat bar (holding the squat rack) is a game changer. The Benefits The padded yoke takes stress off your shoulders. The bar design moves the weight forward like a front squat. This means less stress on your spine and more on your quads. Holding the rack helps you keep a more upright torso. This makes your squat look more like the pretty squats of someone with a good squat structure. It also adds some extra stability to the lift, which lets you lift more weight for more reps. Performance Tips For big legs, don’t sit back like a powerlifter. Instead, spread your knees and sit down. Drive your traps into the bar pad as you come out of the hole. If you start leaning forward to recruit more low back and hips, use your hands to push the weight back over your feet and make your quads do the work. Don’t cheat with your arms. You’re trying to build your legs, not your ego. Good alternatives: Machine squat, leg press, Zercher squat, hip belt
Origin: Tip: Tall? Squat Like This
Tip: Do This Before a Squat PR Attempt
 Ready to attempt a new squat PR? Or maybe the plan is to just work up to heavy sets of 3 reps? Well, the worst thing you can do is knock out a few warm-ups sets then go for the big one. To pull off a great back squat, you need to have a tightly squeezed back, a well braced core, and fully firing glutes. Do these three exercises first to make sure your body is primed and ready. Exercise 1: Wide-Grip Lat Pulldown The back squat requires a ton of upper back tightness to distribute force into the bar effectively. And you need a decent amount of shoulder mobility to put you into a position where you can get tight. To squat effectively, you should be squeezing your lats and pulling the bar down into the upper back to keep your torso as tight as possible. Performing some light reps with a wide-grip lat pulldown will not only activate your lats, it’ll also prep your shoulders for the motion needed to pull the bar into your back. You don’t need to go super heavy on these. Just do few sets of 8-12 reps. Exercise 2: Dead Bug The dead bug helps you practice bracing your core. This movement, much like the squat, requires that your core stabilize your lower back while your limbs move. Doing this before your first set of squats teaches you to activate your deep core stabilizers that keep your body from crumpling while under a heavy load. When you do this movement, contract intensely. Do NOT be lackadaisical. Imagine that a motorcycle is about to run over your midsection and you have no choice but to brace. That is how hard you should be bearing down on each rep. Fewer reps are better than a lot of reps as long as they’re done with intensity. Exercise 3: Banded Squats Few people use bands when doing their warm-up sets, but they should try it. Placing a “Slingshot” or hip circle just above the knees is a great way to get extra glute activation before you go for your heavy lift. Having the band around your knees forces you to drive them outward and helps you figure out how to “spread the floor” to get your butt to work for you. Since your glutes are the most powerful muscle in your body, it’s essential you get them firing before going for your big
Origin: Tip: Do This Before a Squat PR Attempt
Tip: Got Angry Knees? Squat Like This
 Got achy knees? Give the box squat a try: Set up a box or bench allowing parallel squat depth. Go a little higher if you’re still feeling knee pain, but don’t let it become a way to use too much load through a miniscule, restricted range of motion. If you’re able to use a greater ROM pain-free, go for it. Parallel tends to be a safe starting point for most people. “Grip” the floor firmly with your feet. Torque and rotate your hips externally to pull the knees into alignment with your hips and toes, creating a strong arch. Foot stance varies by individual, so find one that allows comfortable movement and the best range of motion. Keep in mind that the feet don’t need to be placed symmetrically – not everyone has symmetrical hip joints. Aim for a placement that allows you to feel the leg muscles evenly. Maintain external rotation of your hips through the entire rep. This should prevent your knees and ankles from collapsing inward, which would place greater stress on the knee joint and ACL. Maintain vertical shins by sitting back into your hips onto the box. A common issue here is poor ankle dorsiflexion. This can be immediately addressed by elevating your heels with squat shoes or a wedge, but is better managed with ankle mobility work for long-term resolution. By sitting back farther than a regular squat, we reduce the shear force, potentially alleviating the pain. Take a big breath and flex your abs hard to lock in that air and maintain a neutral spine. Brace your core all the way around your spine. Sit in a controlled manner onto the box without disengaging your core or legs and avoid rocking backwards to create momentum for the positive, or lifting, part of the rep. Use a controlled touch or brief pause. For added challenge, sustain a longer pause before the positive rep. Keep the movement strict and avoid failure, which would increase the likelihood of further aggravating your angry
Origin: Tip: Got Angry Knees? Squat Like This
Tip: The Core Squat
 Take two groups of guys and have them do back squats. Both groups will use the same weight, bar position, foot position, and do the same number of reps. Now, how can you make one group get much greater activation in the core musculature? Answer: Change how the weight is loaded. This leads to drastically different training stimuli. Unstable loading is getting more popular. It’s usually accomplished by hanging weight on the bar with bands (see video below with Joel Seedman) or by using a specialized “wobbly” bar. Let’s take a look at a new study on unstable loading. The Study Fifteen resistance-trained men performed 3 sets of 10 back squats at 60% of their 1RM under two conditions: stable and unstable load. The stable load was a just a normal barbell load. The unstable load had the weights suspended by elastic bands from the barbell. Subjects were able to freely choose their stance. EMG of the biceps femoris, rectus abdominis, erector spinae, external oblique, rectus femoris, soleus, vastus lateralis, and vastus medialis were recorded. (EMG records the activity produced by muscles.) Peak ground reaction forces were also recorded. The Results EMG of the biceps femoris, erector spinae, rectus femoris, vastus lateralis, vastus medialis were not significantly different between stable and unstable loading. So your back and quads won’t see any activation differences. But the EMG of the rectus abdominis, external oblique, and soleus were significantly greater in the unstable group. The peak ground reaction forces generated were significantly lower in the unstable load compared to the stable load. What This Means Unstable loading produced far greater core activation at the same level of submaximal loading. An increase of 85.7% in the rectus abdominis and 13.1% in the external oblique was seen. Also, a 72.2% increase in muscle activation in the soleus (the calf muscle used for balance and stability along with plantarflexion) was observed in the unstable loading trial. If you want to increase core activation, try loading the weights on the bar with bands, but be very conservative when choosing a starting weight. The unstable loading adds a significant level of difficulty. Note: Because of the mild decrease in peak ground reaction force, unstable loading shouldn’t be used for explosive work because it decreases peak force generated. On top of that, common sense tells us that rapid movements of heavy weights swinging from elastic bands is an injury waiting to
Origin: Tip: The Core Squat
Tip: 3 Squat and Deadlift Challenges
 Bodyweight Barbell Squat x 50 The fifty-rep set is mental and physical warfare. Performed once or twice per month, this test crushes training plateaus and builds serious mass on your legs. How to Do It: After a warm-up, load up a barbell with your approximate body weight, throw on some music, and start squatting for as many reps as you can. A good goal is 50 reps. This test is brutal. Use safety racks, a spotter, and plan extra recovery afterwards. How to Get Better: This test is easier for smaller guys. That’s just physics. But, regardless of size, the best way to improve endurance and relative strength is to get brutally strong. Focus on improving your one-rep max, then add one or two high-rep drop sets with your bodyweight every other week to finish off your legs. Front Squat Your 5RM Back Squat The front squat builds a steel-clad physique and incredible lower body strength just as well as the back squat. The front squat reinforces posture and adds mass to your upper back since your elbows stay elevated and your thoracic extensors work double time to hold position. Now, in the back squat we’ve all seen what happens when someone rounds their back, yelps like a kicked puppy, and jacks up their spine. No such issue on the front squat. If you round, the bar drops forward, and the lift ends without harm to your lower back. The trouble is, we’re all naturally stronger in the back squat, but most lifters are embarrassingly weak in the front squat due to poor strength in the anterior core and thoracic extensors. A good goal is to do a single front squat using the same amount of weight as you can back squat for 5 reps. Here’s the simple math: Take your back squat max and multiply it times .85. That will give you your back squat 5RM or close to it. For example, if your back squat max is 405 pounds, multiply that by .85 to come up with 345 pounds. Your goal is to front squat 345 pounds for one rep, or work your way up to it. Deadlift Sadiv Sets Sadiv sets are an advanced training method designed to boost your deadlift, test mental grit, and add tons of muscle to your posterior chain. Sadiv sets are a high volume, high-intensity monster of a deadlift workout. Beginners or the weak-minded need not apply. (Don’t even attempt this unless you’re deadlifting 1.5 to 2 times your bodyweight.) Here’s what to do: Set a timer for 12 minutes and load the bar with 60% of your 1RM. Perform as many reps as possible during the 12-minute span, shooting for at least 20 reps. If you don’t get 20 good reps, decrease the weight. Perform each rep as a single, resetting between each rep and pulling with perfect form. This means taking the slack out of the bar, keeping your hips back, your back flat, your chin down, and driving your heels into the earth. Perform each rep with max speed from the floor – leg drive is key. Once fatigue sets in, it’s vital to set up each lift like it’s a max attempt, brace the core, and drive the bar. Can you beat 20 reps with solid
Origin: Tip: 3 Squat and Deadlift Challenges
