 When focusing on upper-body size and strength, lifters usually gravitate toward two moves: the bench press and the shoulder press. But over time, shoulder issues – from annoying niggles to major injuries – can cause lifters to move away from the barbell shoulder press and focus more on bench work. But it’s not difficult to keep track of your shoulder training and avoid problems that may set you back. Check out this diagram: Looking at this, we can easily see that if the muscles at the front of our shoulder (such as pecs, responsible for shoulder protraction) are overdeveloped from benching, your shoulder will end up in a compromised forward position. This concept is often referred to as “joint centration” and is pertinent with the ball and socket joints of the shoulders and hips. If the humeral head isn’t centered in the socket as it moves through different angles, it will start to push and pinch in ways that cause pain and discomfort. Let’s break it down: Think of your shoulder as the centered dot in a circle. To keep it happy all you need to do is make sure you’re doing exercises which take your shoulder in all directions. This doesn’t have to become the basis of your entire workout program. Even a few banded retractions in your warm-ups and cooldowns could be enough to keep your shoulders centered. Some examples of exercises you can use for each direction are: Upwards (Push, Elevation, Traps/Delts): Overhead Press Shrugs Downwards (Pull, Depression, Lats): Pull-Ups Lat Pulldown Forward (Push, Protraction, Pecs): Push-Ups Bench Press Backward (Pull, Retraction, Rhomboids): Face-Pulls Rows Rotation: Banded/Stick Dislocates Dumbbell Shoulder Rotations Skin-the-Cats Frequently missing out on one or more of these directions (or overdoing a single direction) will gradually move the shoulders out of position. This leads to all those common things that lifters struggle with, like neck pain, elbow pain, tendonitis, shoulder pain etc. Rotation is the easiest to throw into your warm-ups, yet the most frequently neglected. Get a thin resistance band and do some dislocates every day! This keeps you on top of your “mobility” but via strength training. So rather than having to do a ton of boring rehab/prehab drills, you’re just using your regular training to keep your shoulders happy. It’s simple enough to remember. Even if you’re following a specialized program that’s heavy in bench pressing, you’ll be able to easily program your assistance exercises and warm-ups by using the diagram. Review your training for the past few weeks using the diagram and the exercise list above. See if you’ve missed anything. Keep it in mind for what you do in future. Provided you have all four directions and rotation in mind, the likelihood of you running into shoulder issues will be severely
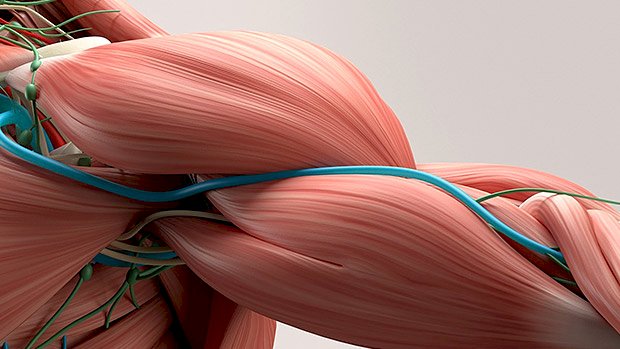
Origin: Tip: The End of Shoulder Pain
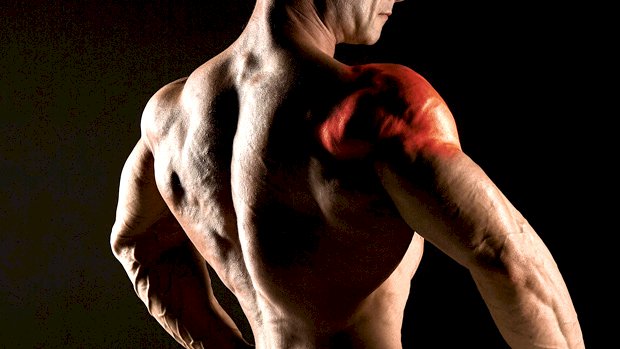
Tag: Shoulder
Tip: A New Angle on the Shoulder Press
 Heavy overhead presses are key for shoulder development. However, the anterior shoulder and triceps do most of the work. If you want your shoulder presses to be more posterior-delt dominant, give this angled shoulder press variation a shot. Set up on the lowest point on the cable machine and use no attachment. Using a staggered stance, position your body at an angle, keep your chest up, and brace your core. This setup will allow you to create enough tension for stability purposes. Position the handle in front of your shoulder. You should be feeling tension in your delt. Keep your elbow close to you. Press up along the same line of your body (at an angle), and reverse the movement to the starting position. This exercise is great if you have limited shoulder mobility or if you’re trying to target more of the posterior delt. It’s a great exercise for keeping constant tension on the muscle with moderate loads. Try this for 3-4 sets of 12-15 reps per
Origin: Tip: A New Angle on the Shoulder Press
Tip: Inside-Out Shoulder Strength and Mobility
 I coach CrossFit. I know, I know, I’m sorry. It was an accident. But I kinda have a problem: I like motivated people that enjoy lifting and high-skill bodyweight movements. And there’s something to be learned from this crazy “functional” stuff. Like, how can they do 20 muscle-ups followed by 30 clean encrypted-media” allowfullscreen> Let’s break each part down: Passive-Active Hang Think about pulling your shoulder blades down as much as you can to engage all your back muscles. You can either hold for 5 sets of 10 seconds or perform 5 to 10 reps with no pause. Try both and see if you fatigue easily. This is a basic shoulder movement and ideally you should feel like you could do it all day. Hanging Shoulder Rotation All the movement has to come from the shoulder and not the elbow… or weird bobbing movements from your neck. We’re looking for good shoulder mobility here, not head gestures that would accompany a naughty innuendo. Many people struggle with rotations and it can feel unnatural at first, but it really shouldn’t. If it helps, try lifting your arms overhead and rotating your shoulders without holding on to a bar. This way you’re not having to lift your bodyweight so you can get a better feeling for the movement. Then, try it on the bar with your toes on the floor for assistance and build up to fully hanging rotations. Think like a monkey in a tree. You have to be able to have that control to navigate from branch to branch; otherwise you’re just swinging and yanking your shoulder out of its socket every time. Yes, CrossFitters may look like a floppy fish when doing butterfly pull-ups, but there’s actually a lot of coordination, control, and strength that goes into them. Butterfly pull-ups without the prerequisite control are a quick way to a dislocated shoulder or torn rotator cuff. Even if you never have any intention of flopping about on a pull-up bar, this control and strength is important to your general shoulder health. Single-Arm Hang It’s incredibly important to be able to hold yourself from one arm and still be able to engage the lat, provided you’re not a heavyweight powerlifter. A great strength test is to see how each arm matches up to the other. If one arm has tremendous endurance and the other slips after a few seconds, which arm you will favor in pull-ups and presses? Working on this will even help bring balance to your shoulders. Single-Arm Rotation Last in the video, we show you a demonstration of a full rotation from a supinated grip to a pronated grip. When I demo this at workshops, it’s amusing how many people freak out. But this is nothing compared to what you’d see in a gymnastics training camp! Despite the common reaction, this is simply a normal range of motion for the shoulder. We demo it in the video because I want you think about how much range of motion you’re missing out on by not having a rotational element to your shoulder work. It’s kind of like only ever training squats without doing deadlifts – there’s a whole range of strength there that needs to be worked on. However, please don’t try a full rotation unless you’re confident in one-arm hanging and you’ve tried it with your feet on the ground first. If you’re new to it, an easier way to build rotation strength is dumbbell shoulder rotations. If you work to make all these movements easy, your shoulders will not only be smarter, but a hell of a lot more durable and able to cope with punishment from any training program. More stability, more strength, and fewer injuries – that’s hard to
Origin: Tip: Inside-Out Shoulder Strength and Mobility
Tip: Bench Like a Beast Without Shoulder Pain
 Shoulder discomfort when bench pressing is common among experienced bodybuilders and strength athletes. Most just fight through the pain because they’re afraid they’ll lose size and strength if they give it up. While benching isn’t the only way to grow your chest and triceps, it’s certainly a core upper-body exercise. Fortunately, there are ways you can bench press that help alleviate stress from the shoulder joint. Before we get into those, let’s quickly review why your shoulders might be aching: Benching is an internal rotator-dominant exercise. Many lifters are already very internally rotated since they sit for work at a computer and have weak upper-back muscles. Coupling those issues with the bench press further adds to the shoulder stress. Inefficient warm-up and poor mobility. You have to warm up if you’re going to bench, especially if you don’t want your shoulders to suffer from it. Before you even touch the bar, do some mobility drills to help open up your range of motion, and maybe perform some activation exercises with light bands for the shoulders, triceps, and upper back. 3 Shoulder-Friendly Bench Exercises You can tweak the bench press to greatly reduce the stress on the shoulders and keep the tension on the muscles you’re trying to train the first place. If you’re consistent with your warm-up and mobility drills, but still feel some unwanted tension in the shoulders when you bench, try these variations: 1 – Dumbbell Press with External Rotation This puts less stress on the shoulders as opposed to excessive internal rotation. At the top of the motion, your hands will be facing in toward each other with your shoulders externally rotated. You can turn the palms forward at the bottom or keep them neutral during the entire range of motion. 2 – Slight Decline Bench Slap a plate or two under one end of the bench. This will put you on a slight decline angle, allowing you to use the pecs more effectively while taking any unwanted stress off the shoulders. 3 – Floor Press When people are experiencing shoulder pain during the bench press, it’s usually because their mobility is limited and they’re trying to perform the press through a greater range of motion than their shoulders are ready for by bringing the dumbbells down too far. You can eliminate this completely by doing floor presses either with dumbbells or a bar. Pressing from the floor reduces the range of motion your shoulders have to go through and maintains tension on the
Origin: Tip: Bench Like a Beast Without Shoulder Pain
6 Exercises for Pain-Free Shoulder Training
 When dealing with a shoulder injury or shoulder dysfunction, you’ve got one task (other than diagnosing the injury or guessing the source of the pain): Pick the right exercises to optimize the results as best you can while avoiding pain or excessive inflammation. Here are some options. 1 – Rack Viking Press Assuming your gym doesn’t have a Viking press machine, the rack Viking press is a great alternative. It’s a pain in the ass to set up, but if you’re willing to go to the trouble, it can be an effective way to load the shoulders while still being relatively shoulder friendly. Many lifters find the Viking press to be an effective way to get strong overhead while avoiding existing shoulder issues. The advantage? It allows you to change your pressing angle to one that suits your anatomy by adjusting the height of the furthest safety pin (the one the bar is pivoting on). Pressing either overhead or horizontally with a neutral grip offers some shoulder-saving benefits too. It limits elbow flare and offers a more stable position for the shoulder to press from. More neutral-grip pressing like this could be the one simple change you make that gives immediate benefits to your shoulder health and performance. 2 – Landmine Single-Arm Press When experiencing shoulder pain, limit the amount of work you do above 90 degrees of shoulder flexion, especially if it’s a pain trigger. The angle of pressing here is effective for hitting the shoulders while the neutral grip adds to the shoulder-friendly nature too. It’s not often mentioned, but the landmine offers another benefit to cranky shoulders. The thickness of the end of the bar is like that of a fat-grip barbell. Many who experience shoulder pain claim to have less pain when using a thicker barbell. We’re not sure why, but it might similar to what we see with bottoms-up kettlebell pressing where there’s an irradiation effect with increased shoulder muscle activation. 3 – Elbow Gripped Lateral Raise Iso Overhead pressing can be a pain and inflammation trigger, but so can more isolated shoulder exercises like conventional lateral raises. Switch to performing lateral raises in the scapular plane of motion. Instead of lateral raises to the side (frontal plane), try shifting the angle 30 degrees forward. Not only do the deltoid and supraspinatus have a more direct line of pull in the scapular plane, there’s also increased activity of the external rotator muscles. If using the scapular plane isn’t enough to ameliorate pain, then you can try gripping some dumbbells in your elbows and doing iso holds instead (see video). This works great for clunky shoulders, but it’s also an excellent option for anyone who just wants to get their shoulder pump on. Bringing the dumbbells in simply shortens the moment arm and takes the wrists and elbows out of the equation. This makes it kinder on the shoulders while also helping those who have dodgy wrists or lateral elbow pain (golfers elbow). If you really want to blow up your delts, try this: A1 Lateral Raises (Scapular Plane):12-15 reps. Superset with… A2 Elbow-Gripped Lateral Raises, Max Iso:Hold for as long as possible using the same weight. Repeat for 2-3 sets, then struggle with the steering wheel to drive home. 4 – Pronating Dumbbell Press Swapping a barbell with dumbbells is an easy way to help prevent pain because the dumbbells offer freer motion and more natural shoulder movement. The space underneath the acromion process is already pretty tightly packed when you go overhead, and using a stiff barbell with an overhand grip doesn’t help. That’s not to say a barbell military press should be labeled as bad, but like most everything else, it has a time and a place. While you’re experiencing pain, though, switch to dumbbells, along with choosing a neutral or pronating grip. Adding a 1-second pause at the bottom of each rep is also a good way to minimize shoulder stress while forcing more muscle contractile components to do the lifting. 5 – Accentuated Eccentric Landmine Push Press The angle of pressing here is also relatively safe for most, providing you’re okay with the explosive nature of this move. If you’re not ready for this, just scale it back a bit by pressing with two hands and lowering with one. You’ll still get the eccentric overload, but it’ll be a little less “jerky” on the shoulder. 6 – Eccentric Lateral Raise Start doing your lateral raises in the scapular plane as explained earlier, but then combine it with some eccentric loading and you’ll get one heck of a shoulder-friendly isolator. Bending the elbows on the concentric (lifting) portion shortens the moment arm from the dumbbell to the shoulder, making the weight a little easier to handle. This also gives you the chance to focus on lifting with the elbows for pure isolation of the delts. On the way down, the moment arm lengthens to a more disadvantageous position, weight-wise, thus providing some eccentric (negative)
Origin: 6 Exercises for Pain-Free Shoulder Training
The Ultimate Shoulder Day
 Delts Turn Heads You’re already training your shoulders, so why not maximize your efforts, stretch out T-shirts, and force people to walk around you? This is the effect of 3D delts and it’ll catch attention like nothing else. But it’s not just for the guys. Ladies, defined shoulders scream athleticism and create an incredible contrast with your smaller waist. The Problem You won’t build shoulders that stand out with just a single heavy set of dumbbell presses. Not even if that one heavy set is at the top of a four-set pyramid. Not even if you crack off an array of isolation exercises afterwards. Why? Because big shoulders are built from big mechanical stress and big volume. The tension required for impressive delts has to come from big compound movements. And when it comes to shoulders, none are bigger than barbell pressing. That’s where the seated overhead press comes in. Why the Seated Overhead Press? It’s my go-to movement for serious shoulder overload and volume. And it should be yours too. So why seated versus standing? Sure, the standing overhead press is a time-tested strength and muscle building movement, but seated optimizes shoulder growth by removing leg drive. Think about it. If you’re standing with a barbell doing overhead presses and you start to fatigue, you’re going to want to dip at the knees a bit and pop that weight up with a little help from your lower body. This is great for explosive power and overall strength, and honestly, not a half-bad muscle builder. But for targeted shoulder tension, leg drive is a cheat to generate momentum and to allow you to use heavier weight than you’d be able to control without the drive. And with seated presses you’ll avoid fatiguing other structures first, allowing you to push delt fibers to near failure, a critical part of muscle-building stimulus. You’ll also reduce lower back fatigue which may limit your work during the training session, and potentially affect your ability to maximize other low back fatiguing movements elsewhere in the program. (Think deadlift and squat patterns.) You want to maximize overall training efforts, not just a single exercise. Now, the seated overhead press SEEMS simple enough, yet people still hurt themselves doing it… or they just get lackluster results. So let’s cover the important parts of maximizing this lift for muscle growth. How To Maximize the Seated Overhead Press 1 – Use a 75-80 degree bench angle. Skip the little 90 degree L-bench. Unless you have great mobility and strict form, you usually end up arched aggressively with shoulder blades sitting on top of the bench. Granted, plenty of guys do an incline bench press with poor lower back support, defeating the purpose of sitting versus standing. But a slight incline allows you to press at a shoulder-friendly angle. Try this: Raise your arms upward straight in front of you until they’re overhead. Are you able to raise them perfectly vertical without arching your lower back? If not you probably can’t do a strict standing press without arching your back beyond what’s natural. Many of us don’t possess the thoracic mobility to get into this position, so we’ll create the arch through our lumbar spine. Not good. Avoid stressing the lower back needlessly, or worse, explosively blasting the humerus into its shoulder socket repeatedly until the rotator cuff tendons shred into pulled pork. Avoid that scenario by building bulletproof shoulders and using a bit of an incline for your heavy overhead pressing. 2 – Use the maximum available range of motion safely available. That means get the barbell under your chin, down to your collarbones if you can. This is going to force you to use a load appropriate to the range of motion. You might be tempted to use a lot of weight, but resist that. Use what you’re capable of pressing with good form. Would you rather pretend to be strong to momentarily impress a couple random strangers at the gym, or train effectively and build actual strength that in time will dwarf the rep done with terrible form? Easy decision. Training through a full range of motion will better stimulate muscle fibers for growth, not only for your delts but also triceps. What’s better than big shoulders? Big arms capped with big shoulders. 3 – Get your grip a little outside shoulder width. Going excessively wide tends to create an excessive arch position with your head in the way. This ends up becoming more of an aggressively-inclined chest press. So to help keep the pecs from taking over, find a grip that feels right for you, allows the best range of motion, and helps you avoid discomfort. Your elbows will flare as you press upwards; this is normal. As you lower the bar, consciously pull your elbows back into their narrow forward-pointed position and repeat each rep. This will allow for comfortable full range of motion and minimal head movement. The bar should travel around your head and you won’t need to move your head out of the way, creating an
Origin: The Ultimate Shoulder Day
