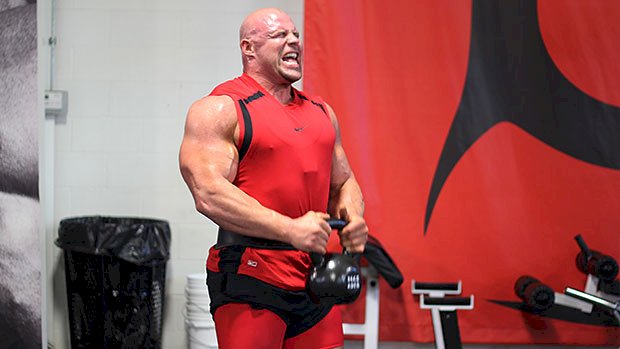
 If you have a decent training program, you’re likely doing some variation of the squat, deadlift, overhead press, and pull-up or row. What’s missing? The exercises that help you become more proficient at these lifts. Here are four exercise that’ll increase your mobility, improve your balance, and strengthen your underused muscles. 1 – The Dumbbell Sumo Plié Squat How To Do It Get in a wide stance with your toes pointed out and heels planted firmly into the ground. Hold a dumbbell at crotch height and squeeze your shoulder blades tightly together to establish a strong, flat back. As you squat down, drive your knees out and back. At no point should your knees roll forward, nor should there be any space between your crotch and the dumbbell. Come to a full pause at the bottom and focus on the stretch through the inner thigh. Maintain tightness as you straighten your knees and come back to a standing position. Why You Need It The sumo plié squat is an excellent way to gain mobility in your squat and train your glutes and adductors to fire simultaneously. The relationship between the adductors (inner thigh muscles) and glutes play a huge role in stabilizing the knee when squatting. Your adductors pull your leg in toward the body and your glutes are responsible for hip extension, abduction, and external rotation. When your adductors are overly tight or weak and your glutes aren’t firing properly, your knees will cave in under a heavy load. This generally happens when these muscle groups aren’t in sync and you have improper timing when recruiting the glutes or adductors. 2 – The One-Arm, One-Leg RDL How To Do It Start with both feet together and shoulder blades tightly squeezed. Hinge at the hips by bringing one leg back. This should be the leg on the same side as the arm that’s holding the weight. Maintain a neutral head position by keeping your chin tucked and focusing on a spot on the floor about a foot away from your grounded leg. Stop the movement when your hand is even with the knee of your grounded leg. Use your glutes to drive your hips forward and come back to a standing position. At no point should there be any rounding in your lower back. Why You Need It This will help prevent your hips from shifting during the deadlift, which is common. Most of us have one leg that’s stronger than the other, so compensation will naturally occur under a heavy load. If you’re not sure what this hip shifting this looks like, here it is: To avoid a hip shift, strengthen your hinge pattern unilaterally to reduce muscular imbalances. The one-arm, one-leg RDL not only strengthens your glutes, hamstrings, and spinal erectors, but also improves pelvic stability and balance. 3 – Pike Push-Up How To Do It Begin on all fours with your legs straight, hips elevated, and palms slightly turned in. Bend at the elbows and lower your head down toward the floor as you keep your hips high. Once the top of your head reaches the floor, “scrape” your nose along the ground and continue moving forward. Pause when you feel yourself about to fall forward. Drive back to the starting position by keeping your nose right next to the floor for as long as possible. The goal is to drive yourself directly backward creating upward rotation through your shoulder blades. For shoulder health, drive your elbows out when lowering and tuck them in towards the body as you become more parallel with the ground. Why You Need It It’ll help your overhead press. The overhead press requires lots of mobility through the thoracic spine to get the bar into a proper finishing position. You drive the bar up and backward, then fully lock out the elbows with the bar above the head. Many people can’t get into this position because they lack the mobility or kinesthetic awareness to create upward rotation and elevation of their shoulder blades. The pike push-up addresses a lack of mobility because you have to press yourself back toward your legs to complete a rep. This forces your shoulder blades to upwardly rotate and elevate when completing the press. 4 – The 45-Degree Inverted Row How To Do It Set a bar up a little above waist height. Hold it using an underhand grip and position your body at about a 45-degree angle in relation to the bar. Use a supinated grip (palms up) so that your elbows are forced into your sides when pulling. Pull yourself up towards the bar so that your upper abdomen/ribcage comes into contact with it. Lower yourself down slowly, focusing on maintaining tightness through your core. Why You Need It The mid-back is often neglected during pulling exercises. Too often, people overuse their upper traps when rowing or their biceps when doing chin-ups. This decreases the amount of strength they could actually get out of their lower traps, rhomboids, and lats. To get your back to grow, you need to make the line of pull easier and work your muscles from a different angle. The 45-degree inverted row allows you to focus on
Origin: Tip: 4 Exercises You Aren’t Doing (But Should)
Tag: Should
Tip: Which Type of Milk Should You Drink?
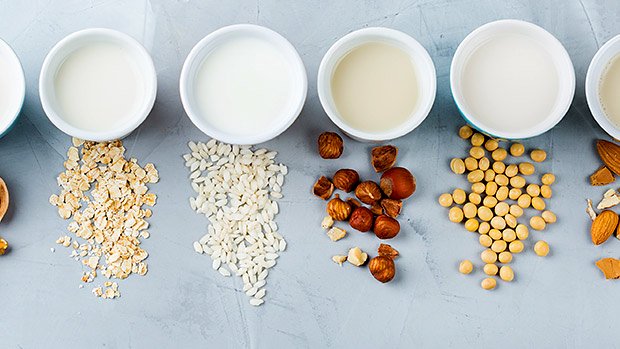 Let’s First Get One Thing Straight… Milk is what female mammals secrete to nourish their young, so calling the liquid you get by pulverizing any of various seeds, nuts, or fruits “milk” is hugely inaccurate. There are, after all, no soybeans, almonds, oats, or coconuts that lactate, even though the last one kind of looks like a hairy hooter. Regardless of what you call them, these plant-based juices are hugely popular. Just stand in line at your local Starbucks and see how many hamsters signal their nutritional virtue by ordering their lattes with one of these milk alternatives (as if replacing milk with a dollop of one of these sugar-saturated Frankenjuices is going to make a difference in their health). Any way you look at it, though, regular, whole-fat milk is nutritionally superior to all of the plant-based alternatives. There are, however, two completely valid reasons not to make milk your choice of liquid to pour on your cereal, mix in your protein drink, or whiten up your coffee – one, you’re vegan, which by definition rules out cow’s milk, or two, you’re lactose intolerant, in which case cow’s milk is your digestive enemy. I should also accept that many of you, because of pasteurization, the China Study, or maybe because it comes out of a cow’s lady parts, think that cow’s milk is what the devil dips his raspberry scones into and thus won’t touch it. Fine. Those delusions are, as they say, beyond the scope of this article. Regardless of your reasons, there’s one, possibly two, milk substitutes that make for a valid alternative to milk. They’re oat milk and cashew milk. A Bunch of Players But None of Them Starters The idea behind most plant-based milks sounds great. Sure, mash up some plant matter. Strain out the crap, add water, and fill up on pure plant nutrients, proteins, and fatty acids. Too bad it doesn’t really pan out that way. Take almond milk, for instance. It gives you none (or very little) of the benefits of almonds, which include proteins and good fats, and neither does it give you the benefits of regular milk since it lacks calcium. For one thing, each carton only contains a handful of almonds, and the handful in question is a wee, gnarled, arthritic thing that can only scoop up a couple of almonds without spilling them onto her orthopedic shoes. Not only that, but when you strain out the insoluble stuff from the “milk,” you lose most of the stuff you’d eat almonds for in the first place. Of course, manufacturers usually add calcium and vitamins A, D, and B-12 (along with a bunch of sugar, unless you get unsweetened variety), but you’re still getting very little protein – about 1 gram per cup, compared to about 8 grams for milk. It’s true, though, that almond milk is generally 50% lower in calories than cow’s milk since it lacks any significant amounts of fat and, since it’s not an animal product, it contains no saturated fat or cholesterol… if any of that matters to you. (Unsweetened almond milk is also virtually carb-free if that’s something you’re looking out for.) Few of the other milk substitutes fare much better as they each have their individual drawbacks. Pea protein milk is higher in protein than almost all of the others, but it’s not made with the whole pea and, as such, lacks the polyphenols that would make it a truly healthy drink. Plus, its second major ingredient is sunflower oil, which is rich in the omega 6 fatty acids that most of us already sop up too much of every day. Coconut milk tastes great as it’s just watered down coconut fat. It’s probably similar in nutritional value to some of the nut drinks, but it’s really calorie dense, especially if you choose a sweetened variety. Of course, if you want to cash in on MCT oils (of which all four varieties are present in coconut milk), drinking it is an okay strategy since approximately 60% of its fatty acid content is made up of MCTs. Soymilk, one of the pioneers of the genre, is higher in protein than some of the nut based milks, but it’s basically intolerable, taste-wise (unless you choose one that’s been sweetened up the wazoo), and it’s so pale and watery that I’m surprised they haven’t slapped a Coors label on it to expand their market. Another strike against soymilk is the possible presence of certain plant isoflavones that mimic estrogen and can, in the long run, create hormonal havoc in both men and women. That pretty much leaves us with oat milk and cashew nut milk. So Why Do Oat Milk and Cashew Nut Get a Pass? Most oat milks are made of nothing but oats, water (in the ratio of 1 cup of oats to three-fourths cup of water), sea salt, and a bit of rapeseed oil. Nutritionally, each cup has about 120 calories, 5 grams of fat, 16 grams of carbs (of which 7 are from naturally occurring sugars), 2 grams of fiber, and about 3 grams of protein. Compared to milk, that’s a little more sugar, a little less fat, and a lot less protein, but drinking milk alternatives for their protein is like eating rum
Origin: Tip: Which Type of Milk Should You Drink?
Tip: Should You Bench With Your Feet Up?
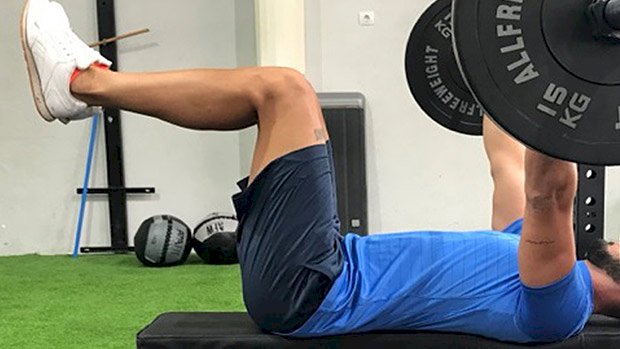 Charles Poliquin used to have a term for guys who bench-pressed with their legs off the floor and their knees bent at a 45-degree angle. He called them “future orthopedic patients.” He thought that benching that way was plain stupid and totally useless, unless maybe Ludmilla, the one-eyed Russian former Olympic shotputter who works in custodial services at the gym was mopping up around the bench press and you had to lift up your legs because you were afraid of getting a meaty backhand across the face for mucking up her clean floor. I’ve always thought it was a stupid way to bench, too, and I can’t help but shoot condescending stares at any moron I see doing it. That’s why it was particularly painful to read this new study. It seems, cough, hem, haw, that benching with your feet off the floor actually increases the involvement of the pecs, delts, triceps, and even the muscles in the forearms. But then I thought about it a bit and decided that their findings, while legitimate, weren’t applicable to anyone who wants to add muscle or get stronger. What They Did Spanish scientists recruited 20 young men and carefully established their 1 RMs (the most weight they could lift for one rep). They then wired them up with enough electrodes to make them look like the dudes in a Marvel Comics origin story, just before something went horribly wrong and turned them into super heroes or super villains that spat lighting bolts out of their wazoo. After thoroughly warming up, the subjects performed 8 reps of bench press with 60% of their 1 RM with either their feet on the ground or their feet elevated. They did a set of 8 reps using a 2:2 tempo (both lowering and raising the bar to a count of 2). After an appropriate rest period, the participants repeated the lifts, doing the opposite (feet up or feet down) of their first test. What They Found Doing bench presses with the legs up significantly increased the recruitment of the pectoralis major (clavicular portion, sternal portion, and costal portion), anterior deltoid, triceps brachii (medial head), forearms (flexor digitorum), rectus abdominis, external oblique, and rectus femoris muscles. This prompted the authors of the study to write, in Yoda-speak, the following: “To perform the bench press exercise with flexed hips could be recommended for training in sports where the upper limbs and hip flexor muscles are required.” How to Use This Info While I don’t doubt the findings of this study, I’m still not going to do or recommend the “legs up” bench press. I’ve got several reasons. For one, the slow tempo they used in the study doesn’t reflect how people normally bench and I’m pretty sure that lifting explosively, or at least quickly, would show a different recruitment pattern. Secondly, their study showed that there’s more activation of the rectus femoris in the legs-up bench than there is in the conventional bench. The trouble with that is, the bench, when it’s done with any amount of significant weight, is actually a whole-body lift with all kinds of involvement from the legs. Clearly, these guys were using a weight that was so light that it didn’t require any drive from their legs. If they had used a heavier weight, it would surely have shown a higher level of recruitment of the rectus femoris than just lifting up your legs so Ludmilla can mop under your feet. Third, other studies have shown the opposite – that the conventional bench recruits more muscle than the legs-up version. (Of course, those studies used a BOSU ball underneath the lumbar spine to introduce instability, and the weight of the lifter plus the weight on the bar just might have smushed the ball down so it was, in effect, close to being a flat or semi-flat surface.) Lastly, recruitment of motor units isn’t the end-all and be-all of hypertrophy or strength. What matters more is the mechanical loading the muscle fibers are subjected to. Look at it this way, if you were to put on a chicken costume, climb atop your house and jump off, you’d recruit a whole lot of pectoralis-muscle fibers as you frantically sought to achieve flight, but all the flapping in the world wouldn’t lead to additional strength or size. What you need is adequate load, but if you attempted legs-up benches with much more than the 60% of 1 RM used in the Spanish study, you’d eventually run into the same problem you do with any type of instability training – having to balance the bar lengthens the amount of time between the eccentric and concentric part of a movement, resulting in a much-impaired stretch-shortening cycle, which impedes strength gains. Also, the limiting factor in any kind of instability training becomes the strength of the stabilizer muscles involved in the lift. In other words, muscle fiber recruitment of the chest, delts, and triceps ultimately would suffer because the amount of weight you’d need to coax the muscle to grow would likely be more than you could balance and keep from ending up an orthopedic
Origin: Tip: Should You Bench With Your Feet Up?
Tip: Should Kids Specialize In Sports?
 Some parents want to get their kids devoted to one sport early on. They point to Tiger Woods as an example of how it works. But does it really? Let’s get into it. For the first 12 years of my career I trained athletes exclusively. I worked with pro athletes, Olympians, and also kids from ages 9-18 as the head strength coach of a sport-school program. I’ve also coached high school and college football (defensive coordinator and running back coach). For team sports where you have to interact, react, and play as a team, early specialization is one of the biggest mistakes parents can make with their kids. It will severely limit their potential and what we call “talent.” The best young athletes in team sports all played at least two sports as kids. For individual sports with a repetitive skill that needs to be done without having to adjust to an opponent’s play (like golf, gymnastics, figure skating, diving, swimming, cycling) it likely doesn’t have as much negative impact. That’s why you can’t use Tiger Woods as an example for sports like hockey, football, or basketball. Let’s first examine what makes a great athlete and where a lot of parents screw up. I divide it into two main categories: What we call “being gifted or naturally talented.” What we call “being a talented athlete.” In the first case we’re referring to someone who naturally picks up pretty much any skill easily and is good at most sports right away. He’s the 7 year old kid that kicks ass in soccer, then goes and plays flag football, basketball, or hockey. He’s also dominant without much practice or coaching. In the second case we’re talking about someone who excels at a specific sport, outplaying his competition. He shows a high level of technical mastery and a great knowledge of the game. What we call “natural talent” is in large part due to what you do during your early childhood, even very early, like a few months old. It comes from a combination of being great at moving and adapting to your surroundings. Good coordination, balance, and precision of movement are all part of it. This depends on the efficacy of three key systems: Visual system (eyes) Vestibular system (inner ear) Proprioceptive system (hands and feet mostly) The foundation of these systems is laid out during very early childhood. What you do with your baby can have an impact on how well these systems develop and represent the foundation on which talent is built. You must present your child with a lot of different stimuli. For the visual system: Show him different shapes, colors, and various objects. Have him play with many things to develop both eye-eye and hand-eye coordination. For the vestibular system: Put the baby in various positions and move him in the air (e.g. doing the airplane) so that he has to rapidly adjust muscle tone to changes in body position. For the proprioceptive system: Have him touch and handle many different objects and textures. Have the baby spend a lot of time barefoot, doing drills to have him assume a supported standing position. (My kid could stand up, grabbing only one of my fingers, at three and a half months.) Can You Compensate for Late Development? Sure. But a kid who develops very efficient visual, vestibular, and proprioceptive systems will always be a step ahead of someone who’s been parked in front of a TV all day. Have you noticed how most babies will stop crying when you put them in front of a TV? That’s in part due to the dopaminergic overstimulation from the blue light. The problem is that the baby’s brain isn’t equipped to deal with this intense signal, and in large doses it can lead to problems with the dopamine receptors. Parents who rely on TV as a substitute for parenthood are doing the worst things to help their kid develop optimally. When I see a hockey dad scream at his kid’s coach, telling him to play his kid more, I can’t help but think, “Shut up, you’re embarrassing your kid, and your kid doesn’t play because he’s not that good and has no real interest in it. And that’s most likely your fault because you preferred to drink beer and watch TV instead of spending time with your baby.” That’s the first part of talent and it comes from the parents… not only their genetics, but in large part how they interacted with their child. Athletic Creativity This is where early specialization becomes a problem. In team sports, where you have to instantly come up with solutions to rapidly developing problems during play, creativity is what separates the good players from the great ones. Hockey, soccer, football, basketball, and rugby all require an athlete to quickly analyze the situation in front of him and come up with a strategy to solve the problem. When you look at truly talented athletes rarely will you hear, “Wow, look at how he applied the system!” It’ll be more like, “Wow, how did he do that?” Or “Where does that come from?” Early specialization, and especially forcing young kids to play according to a rigid
Origin: Tip: Should Kids Specialize In Sports?
Tip: The Side Stretch You Should Be Doing
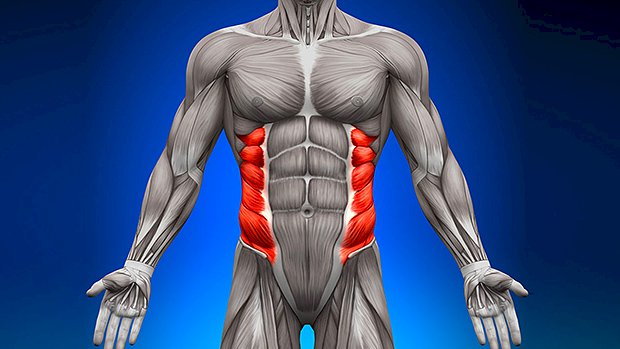 All About the Obliques The obliques are underrated. If they’re tight, everything else can be affected. Your obliques are responsible for both good hip function and shoulder function. If they’re not able to do their job correctly, you’ll experience a loss of strength, loss of performance and, in some cases, nagging pains that soon become injuries. The Anchored Side Stretch This stretch can help improve shoulder mobility, leg length discrepancies, and chronic lower back pain. Even if you have none of these issues, doing this stretch at the start and end of your workout will get you more mobile and help with recovery. How To Do It Stand close to a rig or doorframe. Place the inside hand on the rig/wall beside your hip, knuckles forward. Reach up and over with the outside hand and grab behind the pole/doorframe. Lean out away from the rig/wall into the area you wish to stretch. Breathe. Hold, sway, or change hand or foot positioning slightly to get the best out of it. Repeat on the other side.
Origin: Tip: The Side Stretch You Should Be Doing
