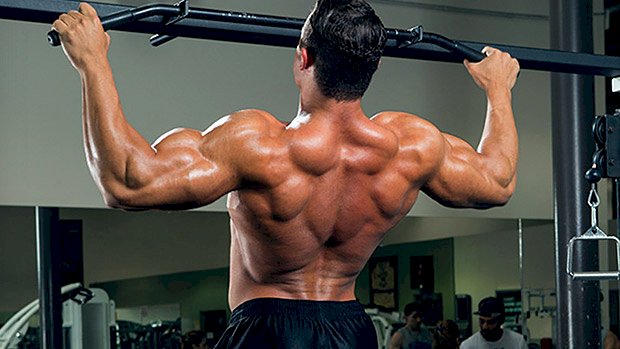
 The Problem Lifters often can’t engage their lats while doing pull-ups. As a result, they may experience elbow pain, tendonitis, and neck pain. To top it off, they’ll assume that the pull-up doesn’t add size to the back – because in their case, with their form – it won’t. What could be causing this problem? Well, the obvious answer is that the wrong muscles are getting used and the tension is getting placed on the shoulders and arms instead of the back. The not-so-obvious thing is, when pulling ourselves up, we rely heavily on our grip being at its strongest towards the index and middle fingers, but never really think about how that will impact our shoulder position. The Solution A great coaching cue is to tell people to lift up their index fingers as they perform a set of pull-ups. Not only does this put the shoulders into a better position, it’ll also make it infinitely harder for someone to power through with their biceps, which in turn will make them better at pull-ups and give them stronger, bigger lats. Most people that experience shoulder/arm/neck issues struggle to match their normal max set of pull-ups with the index fingers lifted, so this is a great way to check if you’ve been using the correct muscles. If you’re only one or two reps off that’s fine, but if you find your reps are cut in half or you really struggle to do one, then there’s room for improvement! Regardless of your level, I’d recommend always throwing it into your warm-ups for lat/upper body pulling days because it’s just a great activation tool. By putting focus on the right muscles, hopefully you’ll avoid running into any issues with your pull-ups in the long run. Longevity is the key to
Origin: Tip: A Quick Fix For Better Lats
Tag: Quick
Tip: 6 Quick Tips for Complete Pec Development
 Building a Complete Chest I naturally had great shoulder strength early on, and that translated over into virtually all of my pressing (flat, incline, overhead, etc). The drawback? Because I was delt-dominant, my chest lagged behind. There’s always going to be some muscle groups that will be subpar compared to others, no matter how much specialization you do for them. But I do believe in giving everything the ol’ college try. So let’s talk about some principles you should be adding to go from being bird-chested to pectacular. (Totally cheesy, but I’m rolling with it.) 1. Train chest early in the week or whenever you’re fresh. This shouldn’t be an issue with most gym bros. Monday is International Chest Day, after all. 2. Get the chest out in front. With all pressing and flye movements you need to set the scapula deep into retraction and depression. Think about getting the shoulders down into your back pockets, and keeping the sternum high. When you look at this from the side, you’ll see that the pecs get into a deeper stretch, which will increase their activation, and you’ll reduce the involvement of the anterior delts. A little “hack” here is to use a rolled up towel in the middle of your back to facilitate a deeper setting of retraction. The towel is a pretty strong reminder to hold it there as well. 3. Push to the centerline of the body. This can be an internal cue to help establish better mind-muscle connection for the pecs as well. In all of your pressing, think about moving the arms to the centerline of the body to maximize pec activation and shortening. For a lot of guys who press in order to “train the movement” for strength, they simply press straight up. But if you want to get the pecs to contract as hard as possible during a press – and you do for hypertrophy purposes – then think about driving the hands towards the center of your torso. The external cue for this, if you’re pressing with a bar, is to think about bending the bar in half so that it would end up in a “U” shape. Just make sure you hold that deep scapula retraction and depression to bias the pecs in the pressing. Don’t let the shoulders roll forward at any time. 4. Know that leanness matters. There’s no “inner pecs” really. That’d be the sternal area of the pecs. And here’s the real reason why a lot of guys think they need more mass in there: they carry too much body fat to see the separation between the pec muscles. If you want that bad-ass pectoral “split” that runs down the middle, then don’t be fat. 5. Understand arm angles for complete pec development. The pecs have three different areas: the clavicular pec or upper chest where the fibers are attached to the clavicle; the sternal or middle portion of the pecs that attach to the sternum; the abdominal head of the pectorals which originates from the external oblique, often called the lower chest. If you want to bias a certain area of the pecs, you need to be aware of the angle of the humerus to the pecs themselves. This, and not the angle of the bench, will dictate what area of the pecs is the most activated and doing the brunt of the work. Sternal Pecs You hit this area more when the arms drive from the side of the body to the centerline of the torso. Upper Pecs You hit this area more when the arms drive at a 45-degree angle upwards, towards the centerline, in relation to the torso. Lower Pecs You hit this area more when the arms drive towards the hips and the centerline in relation to the torso. Prioritize movements based on what area of the pecs you’re trying to bias over the others. 6. Stress the pecs at different lengths. Not all movements stress the pecs equally in the range of motion. An incline press or flat press stresses the pecs maximally at the mid-point in the range of motion. A dumbbell flye places the greatest amount of torque on them in the bottom position where they’re maximally lengthened. And a pec-deck or cable crossover tends to stress them more in the fully shortened position. It’s a good idea to stress the pecs through all of these different ranges so that no fiber is left behind. So how would this look in program design? Day 1 Hit the sternal pec area: Do the dumbbell bench press for two drop sets of 8/8/8. Take the first 8 reps to failure Reduce the weight Take another 8 reps to failure Reduce the weight Take another 8 reps to failure Repeat one more time Hit the upper and lower pecs: Superset the low-to-high cable crossover with dips. Do 8-10 reps on cable crossovers to failure Do as many reps as you can on dips with bodyweight Repeat one more time Day 2 Hit the upper pecs: Use an incline dumbbell press, barbell press, or Hammer Strength incline press (shown in video). Do 10-12 reps to failure Rest 60 seconds Then try to get half the number of reps you achieved on the first set Rest 3 minutes Repeat one more time (technically this ends up being 4 total sets) Hit the sternal and lower-pecs:
Origin: Tip: 6 Quick Tips for Complete Pec Development
Tip: Try This Quick & Dirty Calf Fix
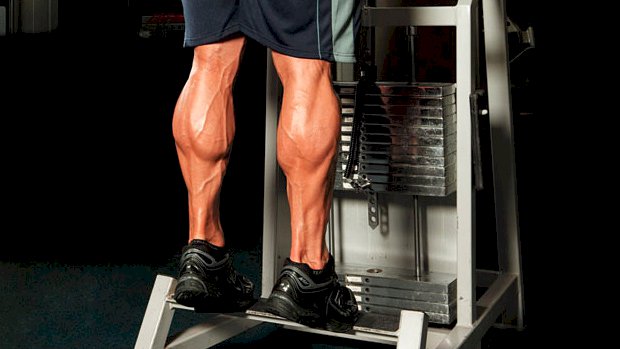 Talk to lifters and bodybuilders about calves and you’ll the hear the word “stubborn” come up often. The calves just don’t seem to want to grow, even if you persuade them with standard resistance training. That’s why many strength coaches employ shock techniques to force breakdown and subsequent muscle growth. Here’s one of those techniques from coach Charles Poliquin. Start at the standing calf-raise machine. Perform eight reps with a two-second pause at the bottom of each rep. Rest 10 seconds. Have a barbell sitting nearby loaded with about 25% of your body weight. Hold it in a squat position and, with minimal knee bend, jump up and down, bounding with the calves on each rep. Do this for 30 reps. “The eccentric damage caused by the landing will favor hypertrophy,” notes Poliquin. Repeat the superset four more times. “If that doesn’t make your calves grow, nothing will!” says
Origin: Tip: Try This Quick & Dirty Calf Fix
