 Here’s what you need to know… You need to be strong enough to do 20 pull-ups in order to master the one-arm pull-up. Also, don’t be too fat. Practice a one-arm hang after your regular workouts. Work up to dead hangs with each arm for 30 seconds. Progress to one-arm lat-ups. Elevate your body a few inches by depressing your shoulder blade down and retracting it toward the spine. To overcome sticking points at the top and bottom, use bands. The final step is to use a small kipping motion to cheat and overcome inertia. From there progress to the strict version. You Have to Want It The one-arm pull-up (OAPU) is the holy grail of bodyweight strength exercises. It’s a feat that very few accomplish in their lifetime, but that’s mostly because they don’t want it badly enough. Like all difficult things, you have to set your mind to it. It’s not going to be easy and it might take you a few months. How long it’ll take you to learn depends on the following factors: Strength: Your current level of relative upper body strength matters the most. If you can’t do 10 normal pull-ups, you’re going to have to work all that much harder to do OAPUs. Body fat: Simple physics. The more body fat you have, the harder it’ll be to one-arm your carcass to the bar. Drop at least below 13%. Body type: Upper-body bodyweight exercises are usually easier for people with lighter legs. A lot of people tell me that this factor applies to me since I’m a below-the-knee amputee, but before you jump to conclusions, keep in mind that my prosthetic leg weighs the same as a normal leg! The Basics: 20 Pull-Ups If your goal is to perform a one-arm pull-up, you should first be able to do 20 conventional pull-ups with perfect form. Two basic points to keep in mind when doing pull-ups: Bring the chin above the bar. A pull-up only counts when you touch your chest on the bar. Don’t let your head sink between your shoulders, either at the top or the bottom of the rep. Some people take this last bit of advice to extremes. There’s no need to over-retract and depress the hell out of your shoulder blades. Just avoid hanging passively on your ligaments. Here’s the right way and the wrong way: Once you can do 20 conventional pull-ups, move on to the following progressions. 1 – One Arm Dead Hang A lot of people tell you to start doing weighted pull-ups at this point. Wrong. Opt for specificity instead of intensity. How long can you hold a one-arm dead hang? It might sound easy, but most people are surprised when they find out how much they lack in one-arm dead-hang strength. One of the reasons that one-arm dead hangs are important is that your body tends to twist around your grip during a one-arm pull. You need to practice and attain stability with a hang to make the transition to doing OAPUs a lot easier. >Tip: For stability, extending your free arm away from the body and bracing your core helps control this involuntary twisting movement when you’re hanging from one arm. Sets and Duration Start by adding 3 sets of single-arm dead hangs to the end of your workout. Go easy on the frequency for the first two weeks, otherwise you’ll be flirting with elbow pain before you know it. Ideally, start by doing these twice per week. After three weeks, progress to three times a week. Your goal is to be able to do at least a 30-second dead hang with each arm. Don’t worry, improvement comes fast. Continue doing your regular pull-ups during the rest of the week. Do three sets, three times a week. 2 – One-Arm Lat-Ups From a one-arm relaxed passive dead hang, while keeping your elbow locked, elevate yourself by depressing your shoulder blade down and retracting it toward the spine. Your body should elevate a few inches as the scapular retractors and lats contract. “Put your shoulder blade in your back pocket” is the cue to remember. Your goal is to be able to do three sets of 5 reps with each arm. 3 – Assisted One-Arm Pull-Ups As you get closer to doing an OAPU, you’ll face two major challenges: Getting stuck at the bottom – moving from dead hang to elbow flexion. Getting stuck at the top – pulling yourself all the way up after your elbow passes 90 degrees flexion. Fix these sticking points by using an elastic band that applies a resistance that’s about 30-40% of your bodyweight. For example, I weigh 163 pounds and I use a 55-pound resistance band. Slip the band around your pull-up bar and grab the band with your free hand as close to the bar as possible. Once you can do 3 sets of 8 reps, grip the band 4 or 5 inches lower. Continue doing this until you can do 3 sets of 8 reps and gripping the band about 20-inches lower – or about the distance of you elbow to the tip of your index finger – from the top position. Cheat Your Way Through It Using momentum to get your first OAPU is essential in the beginning. I’m not a fan of kipping pull-ups, but it’s okay to kip as a beginner and when performing certain new bodyweight exercises, like the OAPU.
Origin: How To Do One-Arm Pull-Ups
Tag: Pull-Ups
Tip: Do Pull-Ups Anywhere Like This
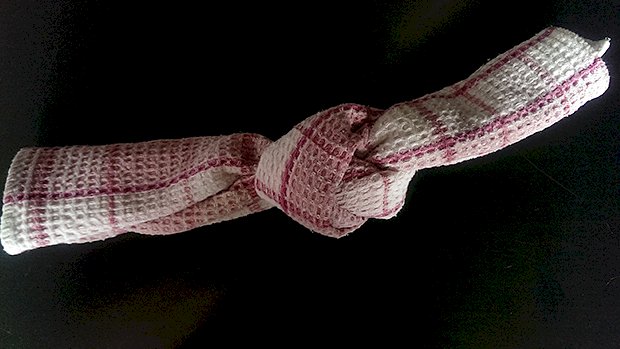 Push-ups, planks, bodyweight squats, and lunges can be done literally anywhere. But pull-ups require something to hang from, and that won’t always be available. If you travel a lot, you know that it isn’t easy to find a gym. If you’re lucky, the hotel you’re staying at has a gym, but you’ll have to be real lucky for that gym to be equipped with a pull-up bar. But there’s still a way you can do pull ups. All you need is a door and a couple of towels. Just follow these steps. Step 1: Tie a knot on one end of each towel. Make sure it’s tight. Step 2: Hang both towels over the door. The knot should be on the inside of the door when closed. Step 3: Close the door so it latches. Make sure the towels are laying flat enough on top of the door to get it to close. Step 4: Use the towels to do pull-ups. Your body will slide up and down the closed door. As a bonus, towel pull-ups really hit your grip and forearms hard. Find yourself a set of towels or rags made from a thin material and keep them in your suitcase. And never skip your
Origin: Tip: Do Pull-Ups Anywhere Like This
