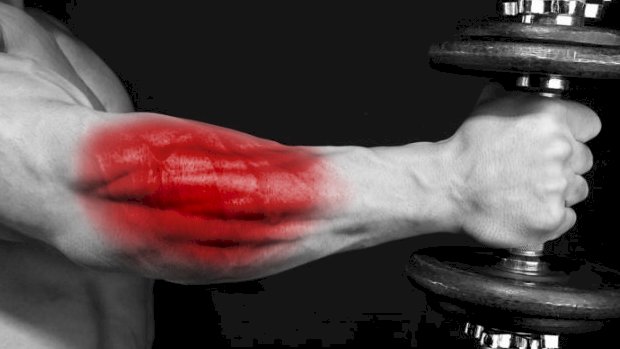
 Forearm pain from bench pressing is common… and it’s misunderstood. The culprit is generally the brachoradialis, a muscle normally associated with hammer curls. The reason it can get upset is because the fixed hand position on the bar forces your forearm through a pronation and supination cycle as the elbow bends and straightens. That means you’re effectively being forced to turn your hand over towards an end-range “palms down” position in the bottom of a bench press. Then, as you press up towards lockout, the forearm supinates into a more neutral position. This happens without us really thinking about it. However, while the forearm pronates and supinates, the brachoradialis is loaded to stabilize the movement occurring between the two long bones of the forearm. It’s a little complicated, because the muscle changes functions through the movement, doing different things at different points. Small stabilizer muscles under big loads often leads to overload and pain. Yes, you can back off bench pressing for a while, or you can rub or needle the muscle. All that might make it feel better in some way, but none of it will resolve the problem. Solving the issue requires you to condition the problem range of movement, making that range more easily available and stronger so it has the capacity to deal with the demands of benching. That means specifically conditioning loaded forearm pronation through a horizontal pressing cycle. Sounds complex, but the hammer press is the simple answer: Hold a hammer out at arm’s length and pronate the forearm until the hammer is parallel to the ground. Start with a very short lever. That means holding close to the top of the handle, near the head of the hammer. Holding the hammer parallel to the floor, try to mimic the bench press movement. You’ll feel the forearm fire up and work, and you’ll feel the problem muscle in the relevant way. Some discomfort, up to around 4-5 out of 10 on the pain scale, is acceptable and therapeutic throughout the movement. Do slow and controlled presses. If you need to make it more challenging, work your way down the hammer shaft to make the lever longer. Because the movement goes through the same range of motion as your bench press, it’s the only way to ensure you’re conditioning the relevant parts of the relevant muscles/tendons so they can adapt and actually solve your problem. Since this is a therapeutic exercise, it should be done daily and only to moderate discomfort. You’re actually adding work to tissues that are failing to cope with their current workload, so go steady. It may take a week or two to adapt and improve. It’s worth the time investment though. You’re really solving the problem, not just masking
Origin: Tip: No More Forearm Pain From Benching
Tag: Pain
Tip: Big Triceps, No Elbow Pain
 Smashing your triceps with repeated reps of poorly aligned exercises can result in inflammation and elbow pain. Instead, choose exercises that put you in good alignment to build bigger triceps without the unnecessary wear and tear. Think of your elbows like the hinges on your car door. If you repeatedly try forcing movement in a direction the hinges aren’t operational in, well, you’ll end up needing new hinges. That’s what happens with some triceps movements. Golfer’s elbow should be renamed “meathead’s elbow” since it’s more common in lifters than you might think. Let’s fix that. The Triceps Solution “X” cables (or cross cables) are simply where you cross over two cables creating an “X” in the middle. Usually, you just hold the end of the cable. X cables are a good way to align the force through your elbows. Torque and valgus stress on the elbows are more easily managed. X cables can put you in a good alignment to target the long head of your triceps, creating a more elbow-friendly alternative to exercises like skull crushers. Going overhead, you can efficiently target the long head in its lengthened position, loading in the direction of its fibers. (Credit to Coach Kassem Hanson for this one.) For a slight variation, if you have the range to go further overhead, stepping back into the cables will change the feel of the exercise. There’s a bigger stretch, and the point of maximal load is close to full elbow flexion. That means lots of mechanical tension. Guillotine extensions are a good option for overall triceps development and arguably one of the best-aligned triceps exercises to limit elbow stress. You’ll notice how close the cables are to your elbows with these. They somewhat resemble a Tate press, but performed with cables. Just keep your chin up and watch your neck! Using an X cable setup for kickbacks will also target the long head. Here you can place yourself in good alignment to work the long head in a more shortened position, focusing on a good squeeze. Using two ropes can have a similar effect since the direction of force and alignment are close to the X cables setup. It’s also an alternative if you only have use of a single cable (although it does require two ropes). Overhead extensions and kickbacks with a dual-rope setup are all brilliant elbow-friendly options. For a real triceps smoker using either the X cable setup or dual-ropes, here’s a triple-threat exercise to try. Aim for 6-8 reps in each position: Position 1:Step back, stand upright. Here the emphasis is on training the triceps long head in mid to shortened position. Position 2:Kneeling, upright. Emphasis on mid-range. Position 3:Kneeling, leaning forward. Emphasis on mid to lengthened position. If you care about building bigger triceps while keeping your elbows intact, these X cable and dual-rope exercises should give you plenty of ideas to work
Origin: Tip: Big Triceps, No Elbow Pain
Tip: The End of Shoulder Pain
 When focusing on upper-body size and strength, lifters usually gravitate toward two moves: the bench press and the shoulder press. But over time, shoulder issues – from annoying niggles to major injuries – can cause lifters to move away from the barbell shoulder press and focus more on bench work. But it’s not difficult to keep track of your shoulder training and avoid problems that may set you back. Check out this diagram: Looking at this, we can easily see that if the muscles at the front of our shoulder (such as pecs, responsible for shoulder protraction) are overdeveloped from benching, your shoulder will end up in a compromised forward position. This concept is often referred to as “joint centration” and is pertinent with the ball and socket joints of the shoulders and hips. If the humeral head isn’t centered in the socket as it moves through different angles, it will start to push and pinch in ways that cause pain and discomfort. Let’s break it down: Think of your shoulder as the centered dot in a circle. To keep it happy all you need to do is make sure you’re doing exercises which take your shoulder in all directions. This doesn’t have to become the basis of your entire workout program. Even a few banded retractions in your warm-ups and cooldowns could be enough to keep your shoulders centered. Some examples of exercises you can use for each direction are: Upwards (Push, Elevation, Traps/Delts): Overhead Press Shrugs Downwards (Pull, Depression, Lats): Pull-Ups Lat Pulldown Forward (Push, Protraction, Pecs): Push-Ups Bench Press Backward (Pull, Retraction, Rhomboids): Face-Pulls Rows Rotation: Banded/Stick Dislocates Dumbbell Shoulder Rotations Skin-the-Cats Frequently missing out on one or more of these directions (or overdoing a single direction) will gradually move the shoulders out of position. This leads to all those common things that lifters struggle with, like neck pain, elbow pain, tendonitis, shoulder pain etc. Rotation is the easiest to throw into your warm-ups, yet the most frequently neglected. Get a thin resistance band and do some dislocates every day! This keeps you on top of your “mobility” but via strength training. So rather than having to do a ton of boring rehab/prehab drills, you’re just using your regular training to keep your shoulders happy. It’s simple enough to remember. Even if you’re following a specialized program that’s heavy in bench pressing, you’ll be able to easily program your assistance exercises and warm-ups by using the diagram. Review your training for the past few weeks using the diagram and the exercise list above. See if you’ve missed anything. Keep it in mind for what you do in future. Provided you have all four directions and rotation in mind, the likelihood of you running into shoulder issues will be severely
Origin: Tip: The End of Shoulder Pain
Tip: 3 Steps to Preventing Wrist Pain
 The bench press and the overhead press cause a lot of compression on your wrists. This can lead to pain and reduced mobility if not addressed. Luckily, you can protect them with the proper grips, some between-set moves, and a little special attention at the end of your workouts. 1 – Check Your Grip When doing any barbell pressing exercise, you need bone support. Placing the bar too high on the palm will lead to excessive wrist extension. This will overstretch your wrist flexors, leading not only to pain, but to far less force exerted into the bar. Instead, grip the bar towards the base of the palm and squeeze it as hard as you can. This will allow you to drive your wrist bones directly into the bar leading to a much better transfer of force. Grip Setup for the Strict Press (False Grip) Proper False Grip, Overhead Strict Press Improper False Grip, Overhead Strict Press I’m a big fan of the false grip for the overhead press. It’s very comfortable and easy to set up for most people. Placing your thumbs on top of the bar lets the bar sit much more naturally on your wrists, which leads to much greater force exerted into the bar. It has the added benefit of putting your shoulders in a more neutral position which can help to save you from impingement. Grip Setup for the Barbell Bench Press Proper Bench Press Grip Improper Bench Press Grip Most lifters should be wrapping their thumbs around the bar. Unlike the overhead press, if the bar rolls forward in your hands during the bench, it has nowhere to go but right across your neck. Although some lifters can put up huge numbers with a false grip, the risks just outweigh the benefits unless you really know how to lock it in. To grip the bar properly, place it diagonally in the base of your palm. Think of externally rotating your shoulders so that your grip tightens and you get the feeling of “breaking the bar” in your palms. You should feel your wrist bones drive up into the bar and your triceps tighten as you squeeze. 2 – Do Some Pulling or Gripping Exercises Between Sets Doing some sort of pulling or gripping exercise after pressing is not only great for your shoulders, but your wrists too. Rows, pull-ups, weighted carries, or hanging from a bar will fire up your forearm flexors, get some blood flowing to your wrists, and allow for some slight distraction of the carpal bones. Even if you choose to go light to focus on your pressing, the extra forearm work will help keep your wrists prepped for your next set. 3 – Do Direct Forearm Exercises Give your wrists a little TLC at the end of a heavy pressing day by doing some direct forearm work. Train wrist flexors and extensors, and do some form of radial deviation and ulnar deviation for a balanced, well-developed forearm. Here are a few exercises that will help you target all of these components: Extensors Reverse curls are a great way to isometrically train the wrist extensors. Keeping your wrists locked out as you do curls will lead to a stronger grip and a more stable bar when you press. Flexors “Hand blades” are a great way to strengthen your forearm flexors and add mobility to your wrists. Keep your fingers straight and give yourself a little bit of assistance as you go onto your fingertips. Radial/Ulnar Deviation Doing rapid pulsing contractions with the forearm will increase blood flow and restore some movement to stiff wrists. Choose a light Body Bar or barbell and perform radial and ulnar deviations for approximately 30 seconds. Decompression Stretch Decompression feels amazing after loading your wrists with heavy presses. You can easily decompress the wrists by placing your feet on the break in your wrists and pulling up with your
Origin: Tip: 3 Steps to Preventing Wrist Pain
Tip: Bench Like a Beast Without Shoulder Pain
 Shoulder discomfort when bench pressing is common among experienced bodybuilders and strength athletes. Most just fight through the pain because they’re afraid they’ll lose size and strength if they give it up. While benching isn’t the only way to grow your chest and triceps, it’s certainly a core upper-body exercise. Fortunately, there are ways you can bench press that help alleviate stress from the shoulder joint. Before we get into those, let’s quickly review why your shoulders might be aching: Benching is an internal rotator-dominant exercise. Many lifters are already very internally rotated since they sit for work at a computer and have weak upper-back muscles. Coupling those issues with the bench press further adds to the shoulder stress. Inefficient warm-up and poor mobility. You have to warm up if you’re going to bench, especially if you don’t want your shoulders to suffer from it. Before you even touch the bar, do some mobility drills to help open up your range of motion, and maybe perform some activation exercises with light bands for the shoulders, triceps, and upper back. 3 Shoulder-Friendly Bench Exercises You can tweak the bench press to greatly reduce the stress on the shoulders and keep the tension on the muscles you’re trying to train the first place. If you’re consistent with your warm-up and mobility drills, but still feel some unwanted tension in the shoulders when you bench, try these variations: 1 – Dumbbell Press with External Rotation This puts less stress on the shoulders as opposed to excessive internal rotation. At the top of the motion, your hands will be facing in toward each other with your shoulders externally rotated. You can turn the palms forward at the bottom or keep them neutral during the entire range of motion. 2 – Slight Decline Bench Slap a plate or two under one end of the bench. This will put you on a slight decline angle, allowing you to use the pecs more effectively while taking any unwanted stress off the shoulders. 3 – Floor Press When people are experiencing shoulder pain during the bench press, it’s usually because their mobility is limited and they’re trying to perform the press through a greater range of motion than their shoulders are ready for by bringing the dumbbells down too far. You can eliminate this completely by doing floor presses either with dumbbells or a bar. Pressing from the floor reduces the range of motion your shoulders have to go through and maintains tension on the
Origin: Tip: Bench Like a Beast Without Shoulder Pain
