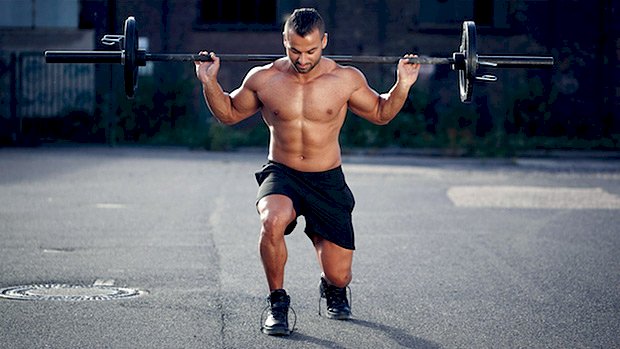
 Finished with your squats? Good. Now do some lunges… and use a barbell. Why? Lunges add total quad demolition and single-leg work. Grabbing a couple dumbbells will work, but barbell lunges avoid grip and posture fatigue while allowing greater loading. You don’t have to have an upright torso for these despite what many personal trainers still say. Instead, use a torso angle that best allows you to keep a neutral spine and engaged core while maximizing range of motion and avoiding knee discomfort. Too often, staying upright can only be done at the expense of an aggressive lumbar arch. Lunges can be done with a vertical shin for more glute emphasis or with a forward knee for more quad focus, though all forms of lunges hammer quads. Emphasize the quad-dominant version by allowing your knee to travel as far past the toe as your ankle mobility will allow and your knee will tolerate (free of discomfort). Maintain firm heel contact with the ground on each stride. Pissing off your knees will shut down your quad training, so use the form combining the best quad emphasis with knee happiness. Stop touching your back knee to the ground. The extra little range of motion isn’t worth the impact on your kneecap. Alternate forward strides across a room or lunge in place if you don’t have the space to lunge across a floor. Do 3-4 sets to failure at about 10-15 reps per leg. Take each stride forward instead of crossing your feet over as if walking a tightrope. This only makes balance harder with no training benefit. Don’t have the space to do these at your gym? Swap them for Bulgarian split
Origin: Tip: Nail the Walking Lunge
Tag: Nail
Tip: Nail the Back Lever. Here’s How
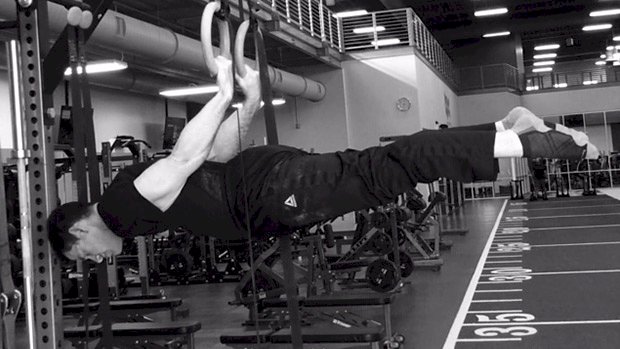 If you’re into calisthenics, at some point you’ll want to introduce yourself to levers. The back lever is one of the easier variations to start with. It’s not only a cool trick, but also a tremendous exercise to develop your isometric core strength. Learning how to isometrically brace your core and have all your muscles work together to achieve full-body tension will transfer to all of your main lifts. Whether you’re wanting to use this as a supplement to your big lifts, or you just want a fun trick to add to your arsenal of exercises, use these steps to nail the back lever. Step 1: Skin the Cat The back lever takes a considerable amount of shoulder strength and mobility. Before you start thinking about doing it, you’ll want to be able to skin the cat. This movement gets you used to going upside down, teaches you how to use your core, and preps your shoulders for the more advanced static holds. When you first try it, make sure to set up the rings so that your legs can touch the ground when you go through them. This will allow you to take pressure off your shoulders or stop the movement if needed. Step 2: Get Comfortable Hanging Upside Down Getting used to all the blood rushing to your head is another prerequisite before going for your holds. Holding yourself upside down with your legs straight and core braced will help you understand the initial positioning of the back lever and will build up your confidence. Step 3: Tucked Back Lever When it comes to levers, the longer you make your body, the harder the movement will become. Tucking your legs in will shorten your lever and give you more of a mechanical advantage. Make sure you can hold your tucked lever position at a dead stop for 3 to 5 seconds before moving to the next stage. Step 4: Bent-Knee Back Lever This movement is very similar to the tucked back lever, except it involves a little more extension at the hips, which increases the level of difficulty. Again, be able to hold your this position at a dead stop for 3 to 5 seconds before attempting to extend the knees. Step 5: Straddle Back Lever The next step is to move to a straddle stance. This gets you used to extending the hips and knees, and will get you stronger to progressively hold more of your bodyweight in a lengthened position. The beauty of the straddle-stance back lever is that you can make it more or less difficult by moving your legs further apart or closer together. Make sure you can hold your straddle position for 3 to 5 seconds before moving to the full version. Phone a Friend When you’re first learning this movement it will be difficult to tell when you’re parallel to the ground. Have a friend nearby to let you know or just video yourself. A friend can also help spot you, making the exercise considerably safer. Hand Positioning: Palms Up or Palms Down? Now, if you’re a gymnastics purist, you might say that a true back lever involves the palms facing the ground (supinated) when in the full lever. Although this is technically correct, it puts considerably more stress on the elbow and you can risk a biceps rupture. If you don’t have any formal gymnastics training, you’re going to want your palms facing the ceiling (pronated) to save yourself from an unnecessary
Origin: Tip: Nail the Back Lever. Here’s How
Tip: Nail Both Heads of the Biceps With This
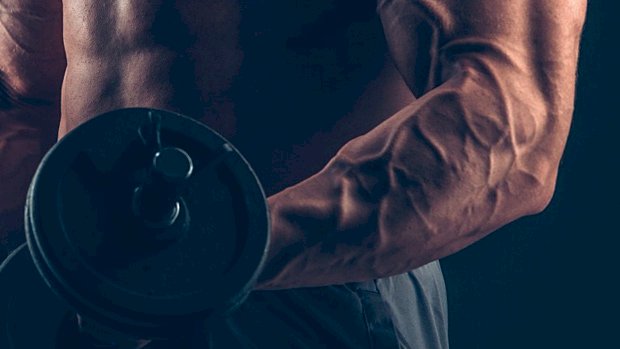 Rise Ups This is a very effective mechanical advantage drop set. You’ll start face down but spin around on the subsequent set, finally ending up standing, hitting both the long and short heads of the biceps hard in the process. Dumbbell Spider Curl:8-12 reps (to failure) Incline Dumbbell Curl:Max reps (same weight, same incline) Strict Standing Dumbbell Curl:Max reps (same weight) Standing Cheat Dumbbell Curl:Max reps (same weight) 90-Degree Isometric Hold:Max time (after last cheat rep) Do the first variation using a weight you can lift for 8-12 reps. Then go for maximum reps on the exercise variations that follow. Do this as a finisher for one or two sets after your heavier biceps
Origin: Tip: Nail Both Heads of the Biceps With This
