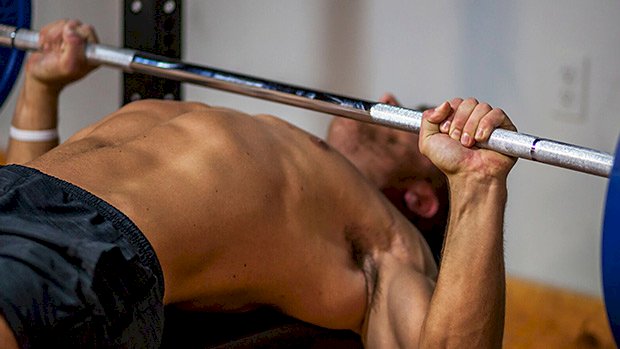
 You can’t fire cannons from a canoe and you can’t bench press big weights from unstable shoulders. The external rotators of the shoulders are important for shoulder health. But they also play a role in stabilizing the arms during bench presses and can contribute to a stronger bench. Some guys know all this and do their best ostrich impression. They stick their head in the sand, neglect training external rotation, and play ignorant when their shoulders hurt and their bench stalls. Other guys are more proactive. They do dedicated external rotation work and… still end up with a stalled bench press! Why? They forget one-third of the muscles involved and use exercises which ignore how these muscles actually function during a bench press. The rotator cuff muscles play an important role in shoulder stability. These muscles work like “active” ligaments to maintain proper alignment of the shoulder and reduce excess movement. Two of the four muscles work to externally rotate the upper arm. These are the teres minor and infraspinatus. These both get worked with your classic external rotation, rehab-style exercises. But there’s one other muscle that can contribute to externally rotating your humerus. The Forgotten Muscle By strengthening the posterior (rear) deltoid, you can increase your stability on pressing exercises AND build more impressive-looking shoulders. To make your rear-delt work maximally efficient, combine it with the function of the external rotators during a bench press: isometrically contract to hold the upper arm in position. Don’t go back and forth, externally rotating the shoulder as you do with the pink dumbbells in your typical rehab drills. One Exercise to Do It All Use the supinated-grip rear delt flye: This exercise places you into external rotation and requires you to work to maintain this position while the shoulder moves through flexion and extension. This mimics the requirements of teres minor and infraspinatus during a bench press. Even better, you’re simultaneously training the rear delt and taking it to a fully shortened position. The arm path you take also lines up the fibers of the rear delt optimally to produce force, meaning you get a greater training effect. Hold at the top, where the muscle is maximally shortened and the lever arm is longest. This will place high levels of tension through the muscle and develop the strength required for you to stabilize big weights when benching. Since you’re looking to develop stability to boost your bench press, using higher reps to train strength-endurance is a good choice with this lift. I suggest sets of 12-20 reps with a 2-second peak contraction on every rep. This will develop great isometric strength in the rotator cuff and pack size onto your rear delts. The rear delts have a high proportion of slow-twitch fibers and respond really well to higher reps and long time under tension
Origin: Tip: The Missing Exercise for a Stronger Bench
Tag: Missing
Tip: Two Back Muscles You’re Missing
 The Key to a Chiseled Upper Back The lats get a lot of attention, but what’s often missing in back training is hitting the mid-back musculature like the rhomboids and mid/lower traps. Training these muscles will beef up your upper back, making you look impressive with or without a shirt. Having strong mid-back muscles is also crucial for maximizing performance since they’re often a limiting factor when it comes to overhead presses, rows, and vertical pulling. Here are two exercises that’ll fire up your mid back: Wide-Grip Double Pulley Row Set two cables up high and about a foot outside of shoulder width. Ideally, it would line up with how wide your elbows are when flared. Pull the cables from high to low as you bring your elbows down and back. Keep your elbows flared out to engage the mid back. Squeeze your shoulder blades together in the shortened position. Think about pulling the handles back and apart simultaneously. Dumbbell Rhomboid Hold To set up, hold two moderately heavy dumbbells at your side and hinge forward about 30 degrees. Keep your shoulder blades depressed and retract them together. Hold this position and squeeze for as long as you can. Really focus on the mind-muscle connection with this one. Programming Do these at the end of an upper-body day as a superset for 3-4 sets each. You’ll get both static and dynamic contractions to trigger hypertrophy and strength gains. Your rhomboids and traps will get thicker and fuller as a
Origin: Tip: Two Back Muscles You’re Missing
The Missing Deadlift Variation
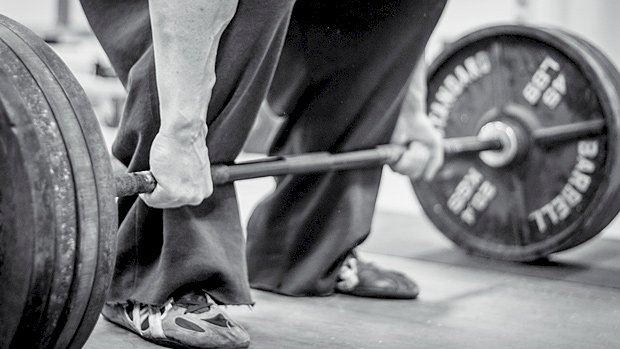
 The one-leg deadlift is an incredible exercise that can boost symmetry and build single-leg strength – all while minimizing loading. That means it’ll take good care of your low back, strengthen your core, and make you a sugar-footed ninja. Too bad that it’s so often a disaster. It’s time to lay down some guidelines for perfect execution and fix some common problems. 1 – The Problem of Balance Back in 2000, a major fitness magazine showcased a version of the one-legged Romanian deadlift (RDL) where the rear leg was lifted way off the ground, sort of like one of those old drinking-bird toys. The rest of the world just seemed to follow suit without really questioning why. Here’s the thing, though – the one-legged RDL wasn’t designed for balance training; it’s for building single-leg strength. The “rear leg lifted high” variation might be fine for warm-ups and general mobility, but when it comes to strength training, you’re better served by stripping the balance demands away and focusing on strength. The Fix Keep your rear foot on the ground using the kickstand method: Here are three effective alternatives: Drag it In this variation, you’ll keep your rear foot lightly touching the ground and slide it straight back. Your challenge is to slide the foot straight back without any weight transfer on it. Float it Here you have two options for keeping weight off of the passive leg – either by setting up a “kickstand” as shown in the first video or by using one of Ian King’s original variations. Get it out of the way Clear the passive leg without giving up balance by doing the corner-leg version. 2 – The Problem of Hip Rotation Even though the hips are supposed to remain level (indeed, countering the forces of rotation provides much of the value here), almost everyone will externally rotate the unloaded leg. This is usually due to a lack of awareness, but may also be the result of insufficient hip internal rotation. Most of the rear-foot-on-the-ground variations described above will deal with this but there’s some additional work to be done. The Fix Pause after the eccentric (lowering) portion of the lift to check your position. Are you able to tell whether you’re level? To check in on position, make sure the rear knee and foot are both pointed down toward the ground. Also, make sure that your thighs are touching or – to bastardize a deadlifting cue from the great Ed Coan – “seal up your taint.” 3 – The Problem of Initiating Lift-Off with the Back Initiating the lift with leg drive is something that should be happening with any deadlift variation. However, once the one-legged RDL became known as a functional training exercise, people stopped (or never started) caring about great fundamental mechanics, which is pretty ironic. It’s common to see people arch their backs to get the weight moving. This compensation is an easy trap to fall into – especially when you’re holding a teeny, tiny weight. The Fix Oscillate the first 2 inches of the lift. This surprisingly challenging drill requires you to flex and extend the knee with a tiny range of motion. You’ll practice initiating the movement and reversing it over and over again with only a 2-inch range of motion. If you’re doing this right, your low back will be silent and your quads will be screaming. 4 – The Problem of Lateral Shift and Rotation You might be able to execute very clean reps with a light load. However, you can do all sorts of things with a light load. Once you put some real weight in your hands – particularly with a barbell – you might notice that countering any extra movement becomes more difficult. The Fix Shift the load laterally. This is a subtle tweak that can make a big difference. When you’re on one leg, your center of mass has to be stacked. But it can’t be stacked on top of air. For proper alignment, you have to do two things: Shift your bodyweight laterally to stack your center of mass over the middle of your planted foot. Line up the middle of the bar with the middle of your shin (on the loaded leg). 5 – The Problem of Insufficient Demand Once your form is in place, don’t forget to load the movement. The Fix Add load and/or range of motion. If you’re going to push boundaries, your first step is to figure out where those boundaries are. While adding weight is an obvious choice, you may also want to add range of motion by growing this into a hybrid movement – somewhere between an RDL and a full-range of motion deadlift. You can do this simply by completing the RDL (hinge) portion of the movement and then adding some knee flexion. To make balance even less of a factor, you can perform this as you would a rack pull. This will allow you to load things up with a barbell and reset your balance and positioning at the bottom of every rep. Is the RDL Really Worth the Trouble? In spite of the huge value of the one-leg RDL (and variations), I actually spent a long time not programming it. The time involved in getting
Origin: The Missing Deadlift Variation
The Missing Half of Your Deadlift
 When JL first started powerlifting, he sucked at the deadlift, so he sought out the best. Chuck Vogelpohl became his training partner and his understanding of the deadlift changed forever. Sprinkle in a lot of coaching time with Louis Simmons, Dave Tate, Steve Goggins, and Eddie Coan, and JL turned into a professor of the deadlift. His best pull in a meet is 804 pounds and you don’t pull over 800 pounds without picking up a few tricks of the trade. As an expert, he’s become keenly aware of the single most important and under-coached aspect of the deadlift, which is how you set the bar down when doing reps or, as he likes to refer to it, the dead-lower. It’s the thing that almost all lifters are f*cking up and the reason their pull is stuck. So set yourself up for success by mastering the fundamental concepts that have been hiding from you in plain sight. Once you master the initial setup and the basic mechanics of the lift, you’ll quickly see that the greatest opportunity to improve comes from putting the bar down better. Mistakes Made When Lowering the Bar If you’re not methodical about the way you put the bar back down, you’re messing with your next rep. At best, you’re being inefficient. At worst, you’re putting unnecessary stresses on your joints and practicing sloppy mechanics. And that’s just not how people get strong and then stay strong. Here’s a list of the most common technical errors you’ll see when it comes to lowering the bar, or the steps that immediately precede it. Mistake 1 – Trying to be a gymnast When you’ve reached lockout, do you stop moving, or do you continue to extend through the spine? If you keep moving, be aware you get no extra credit for doing a back bend at the top of your deadlift. Just f*cking stop when the hips reach extension. The deadlift is a simple movement. Your hips move, your knees move, and even your ankles move. But nobody said anything about your lumbar spine. The truth is, many people fake hip extension by cranking on their lower back. Think of it this way: If your hips have stopped moving but you’re still driving forward, that’s how you know it’s your back moving. This nasty habit releases both lat and anterior core tension so that the big muscles that keep you safe are now relaxed. This increases your risks without any further improvement in performance. It’s not a great trade-off, especially since it’ll compromise your next dead-lower before it’s even started. Think of this as setting up the setup for your setup. Mistake 2 – Squatting the bar down from the top Quad-dominant people love to do this, but shooting your knees forward is a sign of a weak posterior chain and it’s a good way to hurt your back. If you’re intent on moving anything truly heavy, you need to keep it as close to your center of mass as possible. Shooting the knees forward and sliding the bar down the quads like they’re a ramp will launch you into shitty deadlift land. That makes things less efficient and compromises your ability to move some real weight around. What you want to do is hinge back and once the bar has cleared the knees, you squat down. The video contrasts “ramping the bar” with good form: Mistake 3 – Forgetting to squat in the bottom Telling people to squat at the bottom has helped us teach thousands of people to dead-lower correctly. A deadlift is nothing more than a Romanian deadlift (RDL) until the bar passes the knees, at which point you squat. As with any squat, the knees and butt must move down. People confuse this and forget the squat part, which causes major issues. Look at it this way: Assuming you’re not a contortionist, forgetting to squat down will exhaust your range of motion at the hips before the bar has touched down. With no more hip flexion to give, further movement has to come from somewhere. And if your hips and knees aren’t moving BUT the bar is still travelling down, that’s your spine doing the work, homie! You can’t lift massive loads safely if the movement comes from the sacroiliac (SI) or lumbar spine instead of the hips. You’ll also have to readjust everything to be in good position to pull your next rep off the floor; either that or crush your back picking it up in the same way you just set it down in. That’s more work, or more wear and tear, to get the same job done. The Rules on Dropping the Bar (Don’t be a Douchebag) You’re 40% stronger eccentrically than concentrically. This means if you’re not strong enough to lower the bar correctly, you shouldn’t be picking that weight up anyway. Now, if you’re in a meet or going for a max attempt, we’re cool with you letting all the tension out and doing a controlled drop before you celebrate a massive PR. This will happen at most four times per year. Generally speaking, though, don’t be a douchebag and drop the bar from the top. We don’t care if you have bumpers on the bar (which just means you aren’t very strong because you can’t go over 500 with bumpers), but don’t ever, ever, let go of
Origin: The Missing Half of Your Deadlift
