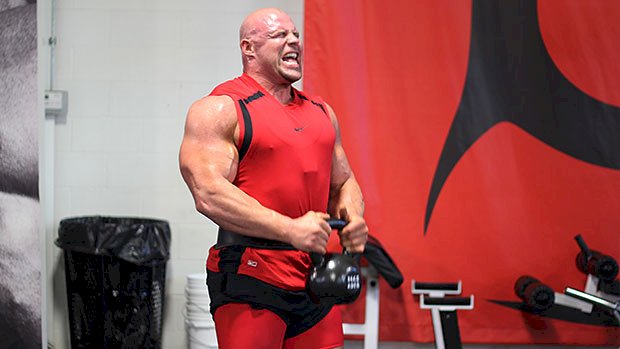
 If you have a decent training program, you’re likely doing some variation of the squat, deadlift, overhead press, and pull-up or row. What’s missing? The exercises that help you become more proficient at these lifts. Here are four exercise that’ll increase your mobility, improve your balance, and strengthen your underused muscles. 1 – The Dumbbell Sumo Plié Squat How To Do It Get in a wide stance with your toes pointed out and heels planted firmly into the ground. Hold a dumbbell at crotch height and squeeze your shoulder blades tightly together to establish a strong, flat back. As you squat down, drive your knees out and back. At no point should your knees roll forward, nor should there be any space between your crotch and the dumbbell. Come to a full pause at the bottom and focus on the stretch through the inner thigh. Maintain tightness as you straighten your knees and come back to a standing position. Why You Need It The sumo plié squat is an excellent way to gain mobility in your squat and train your glutes and adductors to fire simultaneously. The relationship between the adductors (inner thigh muscles) and glutes play a huge role in stabilizing the knee when squatting. Your adductors pull your leg in toward the body and your glutes are responsible for hip extension, abduction, and external rotation. When your adductors are overly tight or weak and your glutes aren’t firing properly, your knees will cave in under a heavy load. This generally happens when these muscle groups aren’t in sync and you have improper timing when recruiting the glutes or adductors. 2 – The One-Arm, One-Leg RDL How To Do It Start with both feet together and shoulder blades tightly squeezed. Hinge at the hips by bringing one leg back. This should be the leg on the same side as the arm that’s holding the weight. Maintain a neutral head position by keeping your chin tucked and focusing on a spot on the floor about a foot away from your grounded leg. Stop the movement when your hand is even with the knee of your grounded leg. Use your glutes to drive your hips forward and come back to a standing position. At no point should there be any rounding in your lower back. Why You Need It This will help prevent your hips from shifting during the deadlift, which is common. Most of us have one leg that’s stronger than the other, so compensation will naturally occur under a heavy load. If you’re not sure what this hip shifting this looks like, here it is: To avoid a hip shift, strengthen your hinge pattern unilaterally to reduce muscular imbalances. The one-arm, one-leg RDL not only strengthens your glutes, hamstrings, and spinal erectors, but also improves pelvic stability and balance. 3 – Pike Push-Up How To Do It Begin on all fours with your legs straight, hips elevated, and palms slightly turned in. Bend at the elbows and lower your head down toward the floor as you keep your hips high. Once the top of your head reaches the floor, “scrape” your nose along the ground and continue moving forward. Pause when you feel yourself about to fall forward. Drive back to the starting position by keeping your nose right next to the floor for as long as possible. The goal is to drive yourself directly backward creating upward rotation through your shoulder blades. For shoulder health, drive your elbows out when lowering and tuck them in towards the body as you become more parallel with the ground. Why You Need It It’ll help your overhead press. The overhead press requires lots of mobility through the thoracic spine to get the bar into a proper finishing position. You drive the bar up and backward, then fully lock out the elbows with the bar above the head. Many people can’t get into this position because they lack the mobility or kinesthetic awareness to create upward rotation and elevation of their shoulder blades. The pike push-up addresses a lack of mobility because you have to press yourself back toward your legs to complete a rep. This forces your shoulder blades to upwardly rotate and elevate when completing the press. 4 – The 45-Degree Inverted Row How To Do It Set a bar up a little above waist height. Hold it using an underhand grip and position your body at about a 45-degree angle in relation to the bar. Use a supinated grip (palms up) so that your elbows are forced into your sides when pulling. Pull yourself up towards the bar so that your upper abdomen/ribcage comes into contact with it. Lower yourself down slowly, focusing on maintaining tightness through your core. Why You Need It The mid-back is often neglected during pulling exercises. Too often, people overuse their upper traps when rowing or their biceps when doing chin-ups. This decreases the amount of strength they could actually get out of their lower traps, rhomboids, and lats. To get your back to grow, you need to make the line of pull easier and work your muscles from a different angle. The 45-degree inverted row allows you to focus on
Origin: Tip: 4 Exercises You Aren’t Doing (But Should)
Tag: Doing
5 Things to Stop Doing in the Gym
 1 – Setting the Shoulders and Leaving Them There When it comes to pulldowns, chin-ups, rows, or any other upper back dominant movement, you first engage your back muscles by drawing the shoulders away from the load. That’s like, rudimentary. The mistake is in the details: So, holding a set shoulder position places the rhomboids and lower traps in a long isometric hold that’s sure to fade as the set progresses. Give your muscles the chance to reset in-between reps to allow them to relax, get circulation, and re-contract, which will sustain your efforts. Resetting in-between reps will also help you to develop some much needed scapular mobility. 2 – Freaking Out About Spinal Flexion The idea that all hell breaks loose the second your spine bears load in anything but mild extension is ridiculous. There are entire competition events (think about tire flips in CrossFit or the Atlas stones in strongman) that hinge on a lifter’s strength while in spine flexion. We talk so much about a neutral or slightly extended spine that it can actually cause a bit of harm to a well-intended lifter. To lift the most possible weight, many powerlifters actually find a stronger pulling position when setting up with a rounded thoracic spine. It reduces the amount of horizontal space needed for a lockout and finishing strength, which can prove advantageous in competition under the heaviest loads. None of this is to say that missing deadlifts by using unfavorable form is something I endorse to the general public. Sure, keep a neutral spine when possible, but the phobic resistance to any exercise that may involve spinal flexion – like sit-ups or crunches – needs to die as soon as a lifter has reached a decent level of competency and athleticism. You won’t crash and burn the second you do a trunk flexion. It may even do fairly well in strengthening your anterior chain. Just don’t be stupid about it. The same thing applies to squats. Take a good, deep squat as an example. We may be so concerned with our spine staying flat when doing a bodyweight squat that we contort our body through bottom end ranges to respect this “rule.” The result is a high butt and a torso that’s pitched way too far forward. Forget about the hips and back for a minute; this flat-spine obsession ignores the fact that the knee joint literally never gets exposure to the deep flexion necessary to get a full ROM. The result is extreme weakness in squats, other loaded movements, and even in day-to-day life. No one wants that. 3 – Adding Weight to Pull-Ups We strength coaches and experienced lifters all shake our heads when we see a poor quality squat or deadlift, but we never even flinch when we see rotten pull-ups. If I had a Bitcoin for every time I saw a pull-up with excessive body English, thoracic spine flexion, shoulder glide, and knee tuck, I’d be a very rich man. The kicker is that these same people progress this movement by adding significant loads. Who are they kidding? Chances are your bodyweight, especially if you weigh over 200 pounds, is more than enough to create an ample challenge for pull-ups and chins, provided you’re doing them with good form: You’re hardly training your back anymore if your shoulders aren’t able to depress during the movement, your chin “reaches” for the bar, and your range of motion is compromised. I can’t say this enough: Check your ego at the door and stop doing weighted pull-ups. They’re hardly a progression if you can’t make them look like their bodyweight counterparts. 4 – Playing Mr. Natural, Ignoring Proper Footwear/Gear The idea that you’ll always be able to create the perfect tripod position with your feet (where the foot creates an arch and the heel, ball of the foot, and toes are firmly planted on the ground) when squatting or deadlifting with load is something that’s more applicable in theory than it is in practice. There just aren’t many coaches who have the stones to say it. Anyone can assume the right foot position when unloaded, and that mistakenly gives many coaches the idea that clients can do their whole workout in socks. Things change when you’re trying to move hundreds of pounds, though. Under challenging loads, the body will start succumbing to its habits and predispositions. If you’re someone with foot pronation or fallen arches, that probably means they’ll show up to torment you at some point in your ramp toward a heavy squat or pull. So we can stupidly try to cling to the idea that a shoeless squat is exactly the training tool you need to get better, or we can give our feet the support they need for more stability. We have to decide whether the goal of our workout is to have the best performance by the numbers, or to have a performance that actually addresses our weak links. Decide and adjust accordingly. The same rings true when discussing the use of belts. First, they’re not an accessory. They create a surface for the trunk muscles to brace against, thus helping protect the spine. Wearing a
Origin: 5 Things to Stop Doing in the Gym
Tip: The Side Stretch You Should Be Doing
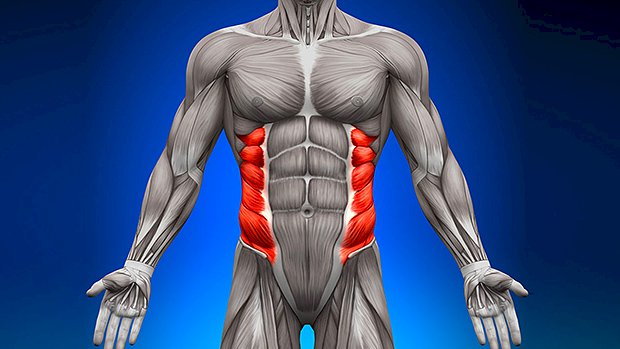 All About the Obliques The obliques are underrated. If they’re tight, everything else can be affected. Your obliques are responsible for both good hip function and shoulder function. If they’re not able to do their job correctly, you’ll experience a loss of strength, loss of performance and, in some cases, nagging pains that soon become injuries. The Anchored Side Stretch This stretch can help improve shoulder mobility, leg length discrepancies, and chronic lower back pain. Even if you have none of these issues, doing this stretch at the start and end of your workout will get you more mobile and help with recovery. How To Do It Stand close to a rig or doorframe. Place the inside hand on the rig/wall beside your hip, knuckles forward. Reach up and over with the outside hand and grab behind the pole/doorframe. Lean out away from the rig/wall into the area you wish to stretch. Breathe. Hold, sway, or change hand or foot positioning slightly to get the best out of it. Repeat on the other side.
Origin: Tip: The Side Stretch You Should Be Doing
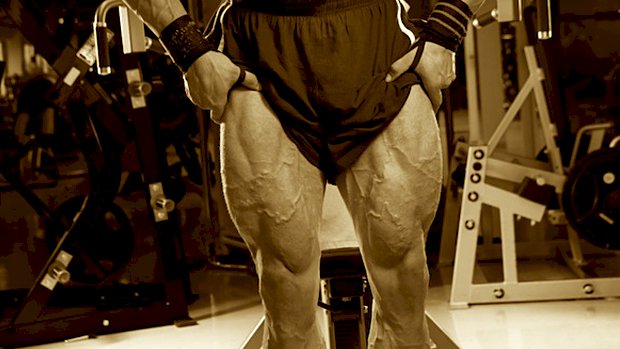
The Best Squat You’re Not Doing
 Here’s what you need to know… Landmine squats are the solution for lifters who can’t squat correctly because of joint pain or mobility problems. For novice lifters, landmine squats teach proper squat form. For veteran lifters, they’re gentler on joints so you can augment your heavy back squats with landmine squats without repercussion. The arc of the bar travels back as you squat down, so you have no choice but to sit back and stay upright. Doing so builds and strengthens the quads. The Problem With Squats Squats are hyped-up as the king of leg exercises, but that only applies to a very small percentage of lifters: ones who actually squat well and ones who aren’t injured. Most lifters actually suck at back squats, at least initially. Mobility restrictions or their own anthropometry makes it tough to squat with an upright torso. As a result, the movement ends up looking like an ugly good-morning-squat hybrid. Even those with good form find back squats to be problematic when they have lower back, knee, or shoulder issues. Front squats are an option, but many find it tough to hold the bar, and it takes a lot of practice to get the hang of it. Learning to squat correctly is worth the effort, but trying to add heavy loads to an exercise you can’t do well is asking for trouble. The Landmine Squat Solution Landmine squats teach the squat pattern, so they’re an excellent way to work towards being able to do back squats and front squats. They’re also a great alternative for those who can’t perform regular squats because of injury. Start with one end of the bar in a landmine unit, or if you don’t have a landmine, just put one end of the bar in a corner using a towel to pad the bar so you don’t scratch the wall. If your gym has 45-pound plates with holes in them, you can also put a plate flat against a wall and put one end of the bar in one of the holes. From there, hold the other end of the bar against your chest and squat down and try to touch your elbows to the tops of your thighs or just inside your knees, depending on the width of your stance. It’s important to set up with the bar against your chest instead of away from your body so that you maintain an upright torso and don’t have to rely solely on your arms to hold the weight. The Goblet Squat Comparison Compare the landmine squat to the goblet squat. They’re similar to goblet squats in that they’re anteriorly loaded, but they’re better for teaching a good squatting pattern because the bar moves in a slight arc. Take advantage of that arc to help reinforce the pattern of sitting back into the squat and maintaining an upright torso – two things people struggle with most when it comes to squatting well. Since the arc of the bar travels back as you come down, you have no choice but to sit back, and you’re also forced to stay upright lest the bar jam into your sternum. Notice that the landmine squat allows the lifter to stay much more upright with far less forward knee travel, making it more joint-friendly for the knees and lower back while still crushing the quads. The landmine squat also allows for far greater loading than goblet squats, meaning it’s not just a teaching tool but a viable way to build strength and muscle if you load it up. Landmine Box Squats Here’s what a landmine box squat looks like as demonstrated by UFC athlete Brendan Schaub. It can also be helpful to perform landmine squats to a box or low bench that serves as a depth gauge. A box or bench will also act as a reminder to sit back into the squat, which is especially useful for folks who tend to come too far forward rather than just sitting back and engaging the hips. Just make sure to set up close to the box so that your calves are just in front of it or even lightly touching it. When and How to Use Them Combined with a heavy dose of mobility work, they’re a perfect gateway to regular squats and front squats to groove the pattern. For lifters looking to increase the volume of their lower body training, try landmine squats as an adjunct to regular squats since they’re a lot easier on the joints. Most people can’t tolerate doing heavy squats more than 1-2 times a week, but you could augment traditional squats with 1-2 days of landmine squats to train the squat pattern and work the quads without beating up the lower back and knees. For lifters who can’t do traditional squats because of injuries, landmine squats are a good alternative. Before you scoff at the idea, try doing them heavy and see what I mean. Landmine squats are a great option for taller guys who struggle to stay upright and have trouble targeting the quads with traditional squats. Doing 10-20 after you’ve completed your heavier leg work will blast your quads into
Origin: The Best Squat You’re Not Doing
