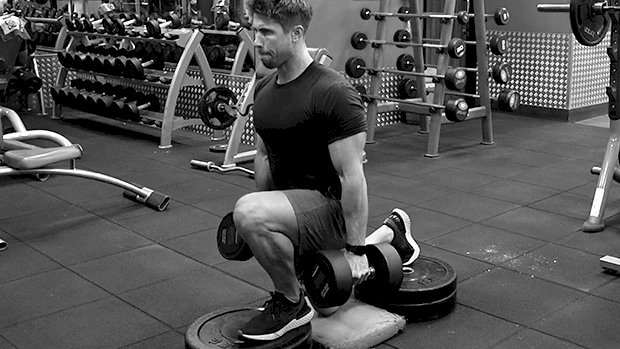
 Single-leg strength is important. Unfortunately, when your goals are more about aesthetics than athleticism, single-leg work doesn’t get much love. But split squats are one of the all-time greats. Many would even argue their superiority over heavy back squats for athleticism. Here are two ways that’ll help you improve single-leg strength, while also packing on some muscle. Split Squats for Quads During standard split squats, at least 70 percent of your weight should be through your front leg. While it’s true that the quads of the back leg would get some loading through knee extension (the back leg somewhat resembles a sissy squat), for most, purposefully loading the back leg isn’t a good idea. Rear-foot elevated split squats take the back leg out of the equation while also shifting weight forward – more weight over the lead leg. Here you can safely and effectively load your quads. Using a squat rack for these is perfectly acceptable (cue the gym police). The rack setup is the most efficient way to do these. Alternatively, a split squat stand, or even some leg extension machines, will allow you to hook your back foot on the support. The advantage of the rack, though, is the additional support it provides. By placing one hand on the dumbbell and the other on the rack you’ll be more stable. More stability means more output, and more load you can put through your quads without worrying about toppling over. Stability is something many meatheads struggle with when attempting split squats. You could also set up behind a bench set on an incline, using the back rest for support. I’ve tried a broomstick with this one too, albeit this has a little less support. All you need is something to hold on to. In addition, having something to grab will allow you to get in a few extra reps. As you fatigue you can grind out more reps with help from the supported arm on both the lifting and lowering phase. You can also use assistance on the lifting portion only (lift with help, lower without), meaning more of an eccentric overload. If you try this approach, good luck standing the next day! The height of the back foot is up to you. Begin with a very low elevation and work up. Going too high can cause knee pain in some, as well as poor pelvic alignment. Keep your abs tight, ribcage down, and try to contract your glute on the backside leg. Start and finish at the bottom of each rep, where you can either drop the dumbbell and switch sides, or place the dumbbell in the other hand and get going again. Split Squats for Glutes Deficit split squats work because they take you further into hip flexion. While it’s true they’re also a horrendous quad-burner, going further into hip flexion will take your glutes into a deeper stretch position. When you stand on the box, either you or the weight should be going below the height of the step. That’s why it’s called a deficit! Specifically, it’ll be the lower fibers of your glute max that’ll get hit hardest – yes, they’re a thing. A study by McAndrew et al. showed that the glutes are comprised of upper (cranial), middle, and lower (caudal) sections, each of which activate differently. While hip thrusts, glute bridges, and cable kickbacks tend to bias more of the upper fibers, “stretcher” type exercises such as split squats, high step-ups, and forward lunges tend to target more of the lower portion of your glutes. If you’re capable of going deep, you’ll stretch and load these fibers even more. You don’t need to have a massive deficit either. Just work within your own range of motion and progress to larger deficits over time. To achieve a slight deficit in split squats, a few heavy plates on the floor work just fine. A foam pad in the middle helps with comfort, while also adding a depth target. Just a gentle tap-and-go on a pad will limit cheating and help you hit the deficit every time. Start and finish in the bottom position where you can get set and grab your dumbbells. Feel free to add some pauses at the bottom portion of each rep too. That’ll really emphasize the stretched position. Your ass will be on fire for
Origin: Tip: Better Butts and Bigger Legs
Tag: Bigger
Get Bigger, Feel Better: 7 Smart Exercises
 What’s the point of being big and strong if you’re always hurting? Nobody cares about your deadlift numbers if you throw out your back every time you sneeze. And your barrel chest isn’t very impressive if you can’t lift your arms high enough to put on deodorant. Sure, various bumps and bruises are inevitable, but training should enhance your quality of life, not detract from it. Most of us begin lifting because we want to feel better, look better, and get strong. But why do so many of us forget about the “feel better” part? It doesn’t mean you need to stop training hard. Strength and muscle are the cornerstones of resilience and longevity, and the best prehab and rehab method is smart training. Choose exercises that build strength and muscle while simultaneously improving overall function. Here are seven of the best muscle-building, joint-sparing exercises that all lifters should be doing. 1 – Dumbbell Squeeze Press The barbell bench press is the king of all upper-body exercises, but it has a couple of drawbacks. For starters, it’s not that great for pec development. Since the bar inevitably hits the chest on each rep, it restricts a full range of motion. So the pecs offer little to no help after the first third of the movement. It’s also notorious for wrecking many lifters’ shoulders. While the dumbbell bench press is a worthy alternative, the squeeze press has shoulder-saving, hypertrophy-inducing benefits too. It involves squeezing two dumbbells together as hard as possible throughout the duration of each rep. The squeeze press has three advantages: It creates maximum tension. As opposed to relying on gravity alone, the squeeze press adds “inward” tension that amplifies the involvement of the chest, reinforces a strong mind-muscle connection, and lengthens time under tension to a skin-splitting degree. It helps with bench press mastery. It’s a good teaching tool for the barbell bench press. For most lifters who aren’t strength coaches, the classic cues that accompany the barbell bench press are gibberish. The squeeze press is arguably the best non-verbal tool for reinforcing factors like elbow positioning, full-body tension, lat involvement, and “bending” the bar. It’s shoulder and wrist-friendly. The neutral grip and constant inward tension allow for more “wiggle room” in terms of external rotation and promote optimal shoulder packing/centration of the glenohumeral joint. Plus, the squeeze press doesn’t require heavy loading to produce a meaningful training effect, which makes it a good option for lifters training around shoulder pain. 2 – Barbell Overhead Shrug There’s no denying that upper traps – the type that resemble two softballs on each side of the neck – puts the finishing touch on the power look. Problem is, most lifters train the upper traps solely via scapular elevation, or “shrugging,” despite the fact that their most vital function is upward rotation. Since upward rotation is one of three movements that the shoulder blades need to go through to lift the arms overhead, it’s pretty important. Most go-to trap exercises – namely, the barbell shrug and its derivatives – can do more harm than good for those who struggle with bad posture and overly depressed scapulae. In particular, there are three red flags that occur upon the descent of a shrug: 1. The bar/dumbbells pull the shoulder blades down into scapular depression. 2. The upper traps are lengthened, which makes them less effective upward rotators. 3. The downward rotators of the scapulae become overactive. Combine that with how they’re most often performed – through a small ROM and with unnecessarily heavy loads – and the result is internally rotated shoulders, an inability to lift the arms overhead, and, consequently, a laundry list of postural problems, mobility limitations, and shoulder pain. Overhead shrugs are a better way to train the traps. Here’s why: They work the traps in alignment with their most vital function: upward rotation. Since the upper arms are abducted above 90 degrees, the overhead shrug puts the scapulae in an upwardly rotated position while still allowing for the same “shrugging” motion to occur. They’re an exceptional trap builder. One of the best ways to hypertrophy a muscle is to isolate it while doing its true function. The overhead shrug fits the bill perfectly since it minimizes levator scapulae activity, a “shrug” muscle commonly associated with shoulder dysfunction, and isolates the upper traps more effectively. They’re a game changer for shoulder health and performance. Overhead shrugs can be a godsend for individuals who can’t lift their arms overhead since they strengthen all of the muscles that work on the scapulae (the upper, middle, and lower traps, as well as the serratus anterior) while promoting optimal overhead mechanics. 3 – Two-Arm Landmine (or Viking) Press Most lifters have no business pressing a barbell overhead. Due to mobility limitations, a weak anterior core, poor
Origin: Get Bigger, Feel Better: 7 Smart Exercises
21 Days to a Bigger Back
 Here’s what you need to know… At a certain point you need specialization. The big basics are the foundation of physique development, but if your back is a weak point, you’ll need more than that. Hit it every training day. All you need is a couple of key exercises and a little patience. Use intensity techniques. Just don’t use the same ones all the time. No More Wimpy Backs To beef up a wimpy back, the first thing you have to do is get serious about fixing it. A machine-based routine won’t do, nor will any of the standard “chin-ups and rows once a week” programs. What you need is a plan that builds strength in both rowing and pull-up variations while gradually increasing the total volume through multiple training exposures per week. Start with a 3-week specialization block. It will deliver marked improvements in size and strength, provided you back off in week 4 and allow supercompensation to occur. The 3 Principles of Back Specialization 1 – Focus on big and basic. This isn’t the time to work on corrective drills to restore function – that should’ve already been taken care of. Instead, focus on big compound movements and weight-bearing rows. 2 – Share the load. Instead of having one day devoted to doing every row variation under the sun, try rotating horizontal and vertical pulls and rows throughout the week. Use a heavy weight for every variation rather than going balls-out for the first two exercises and then having to settle for less load during the subsequent exercises. So if you lift four times a week with two upper-body emphasis days and two lower-body, you could divide the variations over all four days to ensure that heavier loads can be used. Here’s an example: Workout Back Emphasis Exercise Suggestions Workout Back Emphasis Exercise Suggestions Day 1 Lower-Body Horizontal Weighted Inverted Horizontal Row Day 2 Upper-Body Vertical Horizontal Pull Down Heavy Face-Pull Day 3 Lower-Body Horizontal Bent-Over Dumbbell Row Day 4 Upper-Body Vertical Weighted Chin-Up Note: While the weight should always be challenging, the overall difficulty of the exercise for both vertical and horizontal movements can be rotated in a given week to prevent burn out. 3 – Don’t go through the motions. Get stronger. Get stronger in rowing and pull-up movements. Too many lifters use the same weight and rep/set scheme every week for their assistance exercises just to get a pump in their muscles without ever trying to get stronger. Then they wonder why they’re not building muscle. It’s a good idea when specializing to record the weights you’re using on all your back exercises to ensure you’re actually getting stronger. Back-Building Methods Weighted and Inverted Row with Back-Off Sets Inverted rows are a great horizontal pull variation for building a thicker back. Work up to a really heavy set of 5 reps and then take 85-90% of that weight and do 3-5 more sets of 5 reps. For example, say you hit 5 reps with 110 pounds of additional weight – two 45-pound plates and one 20-pound chain – for your heaviest set. For the next set, drop the weight down to 90-95 pounds and continue doing sets of 5 reps. If that gets too hard too soon, take 85% of that and get in more volume. This ensures that you don’t take off too much weight and cheat yourself of getting the most tension. The 5-Rep Max Chin-Up Workout First do 5 reps with bodyweight and then progressively add weight every set until you reach the heaviest load you can do for 5 reps. The goal is to get 5 or more quality sets in, so don’t load too much weight too soon. Rest 45-60 seconds between each set and try not to cheat much on your heaviest set, but still really challenge yourself. Max weight pull-up workouts are usually reserved for testing scenarios, but they’re also a great workout on their own that can be repeated for at least 3 weeks, usually resulting in phenomenal gains in both back strength and size. 6 Minutes of Rowing These are great to use on heavy squat day because they’re a little more low-back friendly than conventional bent-over barbell rows. Better still, if done correctly, there’s no need to perform any other row variation on the day they’re used. Pick two dumbbells that you feel like you could do 7 reps with and do a set of 5 reps. Then rest 30 seconds and do another set. Keep doing a set every 30 seconds for 6 straight minutes. As you go through the sets, you’ll inevitably have to drop the reps down to maintain the pace without dropping weight. By the end, you may only be doing 1 or 2 reps per set. The load and total volume is your priority, not the number of reps per set. A little cheating is permissible by the end but don’t get carried away. Your 3-Week Back Specialization Plan Day 1 – Lower Body: Strength Emphasis Exercise Sets Reps Load A Front Squat 6 3 85-90% 1RM B Reverse Lunge 3 6-8 C Split-Stance Romanian Deadlift 3 6-10 D1 Weighted Inverted Row 1 5 Max D2 Weighted Inverted Row (back-off sets) 3-5
Origin: 21 Days to a Bigger Back
