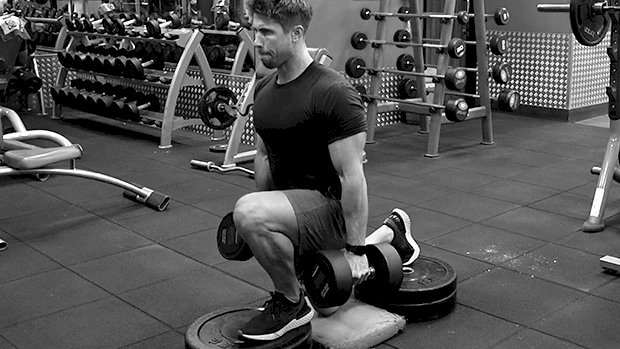
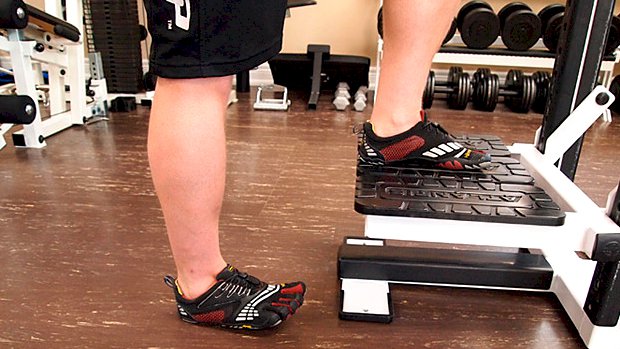
 Single-leg strength is important. Unfortunately, when your goals are more about aesthetics than athleticism, single-leg work doesn’t get much love. But split squats are one of the all-time greats. Many would even argue their superiority over heavy back squats for athleticism. Here are two ways that’ll help you improve single-leg strength, while also packing on some muscle. Split Squats for Quads During standard split squats, at least 70 percent of your weight should be through your front leg. While it’s true that the quads of the back leg would get some loading through knee extension (the back leg somewhat resembles a sissy squat), for most, purposefully loading the back leg isn’t a good idea. Rear-foot elevated split squats take the back leg out of the equation while also shifting weight forward – more weight over the lead leg. Here you can safely and effectively load your quads. Using a squat rack for these is perfectly acceptable (cue the gym police). The rack setup is the most efficient way to do these. Alternatively, a split squat stand, or even some leg extension machines, will allow you to hook your back foot on the support. The advantage of the rack, though, is the additional support it provides. By placing one hand on the dumbbell and the other on the rack you’ll be more stable. More stability means more output, and more load you can put through your quads without worrying about toppling over. Stability is something many meatheads struggle with when attempting split squats. You could also set up behind a bench set on an incline, using the back rest for support. I’ve tried a broomstick with this one too, albeit this has a little less support. All you need is something to hold on to. In addition, having something to grab will allow you to get in a few extra reps. As you fatigue you can grind out more reps with help from the supported arm on both the lifting and lowering phase. You can also use assistance on the lifting portion only (lift with help, lower without), meaning more of an eccentric overload. If you try this approach, good luck standing the next day! The height of the back foot is up to you. Begin with a very low elevation and work up. Going too high can cause knee pain in some, as well as poor pelvic alignment. Keep your abs tight, ribcage down, and try to contract your glute on the backside leg. Start and finish at the bottom of each rep, where you can either drop the dumbbell and switch sides, or place the dumbbell in the other hand and get going again. Split Squats for Glutes Deficit split squats work because they take you further into hip flexion. While it’s true they’re also a horrendous quad-burner, going further into hip flexion will take your glutes into a deeper stretch position. When you stand on the box, either you or the weight should be going below the height of the step. That’s why it’s called a deficit! Specifically, it’ll be the lower fibers of your glute max that’ll get hit hardest – yes, they’re a thing. A study by McAndrew et al. showed that the glutes are comprised of upper (cranial), middle, and lower (caudal) sections, each of which activate differently. While hip thrusts, glute bridges, and cable kickbacks tend to bias more of the upper fibers, “stretcher” type exercises such as split squats, high step-ups, and forward lunges tend to target more of the lower portion of your glutes. If you’re capable of going deep, you’ll stretch and load these fibers even more. You don’t need to have a massive deficit either. Just work within your own range of motion and progress to larger deficits over time. To achieve a slight deficit in split squats, a few heavy plates on the floor work just fine. A foam pad in the middle helps with comfort, while also adding a depth target. Just a gentle tap-and-go on a pad will limit cheating and help you hit the deficit every time. Start and finish in the bottom position where you can get set and grab your dumbbells. Feel free to add some pauses at the bottom portion of each rep too. That’ll really emphasize the stretched position. Your ass will be on fire for
Origin: Tip: Better Butts and Bigger Legs
Tag: Better
Get Bigger, Feel Better: 7 Smart Exercises
 What’s the point of being big and strong if you’re always hurting? Nobody cares about your deadlift numbers if you throw out your back every time you sneeze. And your barrel chest isn’t very impressive if you can’t lift your arms high enough to put on deodorant. Sure, various bumps and bruises are inevitable, but training should enhance your quality of life, not detract from it. Most of us begin lifting because we want to feel better, look better, and get strong. But why do so many of us forget about the “feel better” part? It doesn’t mean you need to stop training hard. Strength and muscle are the cornerstones of resilience and longevity, and the best prehab and rehab method is smart training. Choose exercises that build strength and muscle while simultaneously improving overall function. Here are seven of the best muscle-building, joint-sparing exercises that all lifters should be doing. 1 – Dumbbell Squeeze Press The barbell bench press is the king of all upper-body exercises, but it has a couple of drawbacks. For starters, it’s not that great for pec development. Since the bar inevitably hits the chest on each rep, it restricts a full range of motion. So the pecs offer little to no help after the first third of the movement. It’s also notorious for wrecking many lifters’ shoulders. While the dumbbell bench press is a worthy alternative, the squeeze press has shoulder-saving, hypertrophy-inducing benefits too. It involves squeezing two dumbbells together as hard as possible throughout the duration of each rep. The squeeze press has three advantages: It creates maximum tension. As opposed to relying on gravity alone, the squeeze press adds “inward” tension that amplifies the involvement of the chest, reinforces a strong mind-muscle connection, and lengthens time under tension to a skin-splitting degree. It helps with bench press mastery. It’s a good teaching tool for the barbell bench press. For most lifters who aren’t strength coaches, the classic cues that accompany the barbell bench press are gibberish. The squeeze press is arguably the best non-verbal tool for reinforcing factors like elbow positioning, full-body tension, lat involvement, and “bending” the bar. It’s shoulder and wrist-friendly. The neutral grip and constant inward tension allow for more “wiggle room” in terms of external rotation and promote optimal shoulder packing/centration of the glenohumeral joint. Plus, the squeeze press doesn’t require heavy loading to produce a meaningful training effect, which makes it a good option for lifters training around shoulder pain. 2 – Barbell Overhead Shrug There’s no denying that upper traps – the type that resemble two softballs on each side of the neck – puts the finishing touch on the power look. Problem is, most lifters train the upper traps solely via scapular elevation, or “shrugging,” despite the fact that their most vital function is upward rotation. Since upward rotation is one of three movements that the shoulder blades need to go through to lift the arms overhead, it’s pretty important. Most go-to trap exercises – namely, the barbell shrug and its derivatives – can do more harm than good for those who struggle with bad posture and overly depressed scapulae. In particular, there are three red flags that occur upon the descent of a shrug: 1. The bar/dumbbells pull the shoulder blades down into scapular depression. 2. The upper traps are lengthened, which makes them less effective upward rotators. 3. The downward rotators of the scapulae become overactive. Combine that with how they’re most often performed – through a small ROM and with unnecessarily heavy loads – and the result is internally rotated shoulders, an inability to lift the arms overhead, and, consequently, a laundry list of postural problems, mobility limitations, and shoulder pain. Overhead shrugs are a better way to train the traps. Here’s why: They work the traps in alignment with their most vital function: upward rotation. Since the upper arms are abducted above 90 degrees, the overhead shrug puts the scapulae in an upwardly rotated position while still allowing for the same “shrugging” motion to occur. They’re an exceptional trap builder. One of the best ways to hypertrophy a muscle is to isolate it while doing its true function. The overhead shrug fits the bill perfectly since it minimizes levator scapulae activity, a “shrug” muscle commonly associated with shoulder dysfunction, and isolates the upper traps more effectively. They’re a game changer for shoulder health and performance. Overhead shrugs can be a godsend for individuals who can’t lift their arms overhead since they strengthen all of the muscles that work on the scapulae (the upper, middle, and lower traps, as well as the serratus anterior) while promoting optimal overhead mechanics. 3 – Two-Arm Landmine (or Viking) Press Most lifters have no business pressing a barbell overhead. Due to mobility limitations, a weak anterior core, poor
Origin: Get Bigger, Feel Better: 7 Smart Exercises
Tip: A Better Leg Extension
 Need to isolate your quads? Love hitting them with leg extensions? Great! But you’re probably shortchanging yourself on them. The rectus femoris extends the knee and flexes the hip. So to get a truly full contraction, the hip must also flex instead of staying idle in a traditional leg extension. To do this, add a hip hinge (bend forward) as you extend the knee. Once the concentric or lifting phase is completed, slowly lean back into the seat as you lower your legs to get back into a stretched position. This subtle change allows you to get more degrees of motion via hip flexion. Note: I know it looks like I’m rounding my back instead of hip hinging in the video. That’s because the tank top I wore was quite long on me. (5’4″ problems. Anyone relate?) Silly or Useful? Think about it: Lifters often manipulate hamstring exercises by leaning forward on seated leg curls or elevating their toes on RDLs. I know this exercise looks a little weird – maybe really weird – but try it before you knock it. Once you give it a shot, you’ll feel a deeper contraction than you’re used to on standard leg extensions. You’ll also notice that the added hip hinge forces you to control the movement instead of kicking with momentum. How to Program It You could either replace your regular leg extensions with this or do it on a separate day. My recommendation? Do it with high reps toward the end of a workout. Go to failure or very close. Let me know how flaming hot that burn in your quads
Origin: Tip: A Better Leg Extension
Tip: Forget Yogurt – This Stuff is Better and Badder
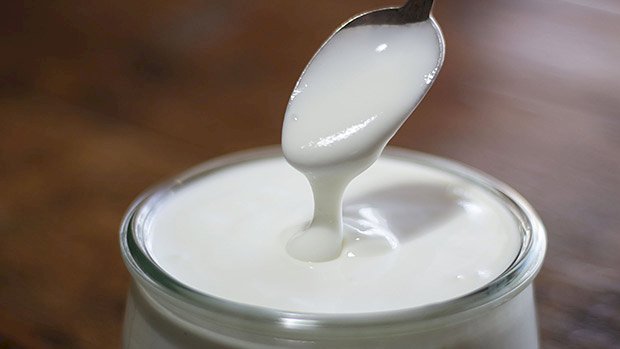 Yogurt’s been using me for years. She seduced me with her smooth, milky white body and delectably fruity bottom, whispering in my ear how good it’s gonna be, baby, when she fills me up with all her beneficial bacteria. I always end up letting her have her way with me and when I wake up in the morning, she’s gone. No note, nothing. I feel so cheap. And what’s worse, the bacteria she gave me are all gone too. That’s the thing with yogurt. Her supposedly beneficial bacteria are more or less transient. They hit our gut, hang around a bit, and then get bored. Then they take the next poop-Uber out of colon town. That’s why I’ve dumped yogurt’s fermented ass and found someone more faithful, someone who gives me a lot more beneficial bacteria than she ever did; bacteria that are faithful and are more likely to stick around. Her name is kefir, and I want to introduce her to both mom and you, in that order. What the Hell is Kefir? Kefir is a milk product made from starter grains of bacteria and yeast. The end product is a slightly sour, slightly fermented beverage that even most lactose intolerant people can drink. While it’s traditionally made from cow, goat, or sheep milk, you can make it from any type of plant-based milk (soy, rice). It can even be made from coconut milk or water to make coconut kefir, which should not be confused with the name of the stripper who lives below you in apartment 2B. The word itself comes from a Turkish word that means “feeling good,” and was traditionally made in skin bags and hung above doorways. Every time someone came through the doorway, they’d make like the bag was an annoying striker from an opposing soccer team and they’d throw a shoulder into it, thereby jostling the contents of the bag and ensuring efficient fermentation. What’s particularly cool about kefir is that it contains between 10 and 34 strains of probiotic, “good” bacteria, whereas yogurt contains only 2 to 7 strains. More importantly, as mentioned, some studies have shown that the kefir bacteria attach to the lining of the gut and form colonies instead of dying off or being excreted. That allows the kefir to change your microbiome for the better and affect all kinds of beneficial changes to your digestion and overall health. What Kefir Can Do For You While kefir doesn’t have a standardized nutritional profile, it’s safe to say that any kefir product is going to be high in calcium, magnesium, potassium, vitamin B12, vitamin A, biotin, folate, and lots of enzymes. Macronutrient-wise, a typical 8-ounce serving contains roughly the following: 160 calories 10 grams of protein 12 grams of carbs 8 grams of fat This is essentially the same as you’d find in an 8-ounce glass of whole milk, although kefir has a little bit more protein (about 2 grams). Aside from providing you with those nutrients and populating your gut with beneficial bacteria, kefir has the following superpowers: It builds a stronger immune system:Kefir contains an insoluble polysaccharide called kefiran that’s been shown to have antimicrobial properties, in addition to supposedly lowering cholesterol and blood pressure. It builds stronger bones:Okay, any milk product will do this as they all provide calcium and vitamin K2 (which aids in calcium absorption), but it’s worth noting nonetheless. It fights bowel problems and supports digestion in general:Kefir’s friendly and helpful bacteria have been shown to combat Crohn’s disease and irritable bowel syndrome (IBS). Likewise, taking it during and after antibiotic therapy can go a long way in preventing the gastrointestinal havoc the drugs often cause. It can fight cancer:Admittedly, it seems that nearly everything falls into one of two camps: Either something causes cancer or it fights cancer, so it probably becomes hard nowadays to accept something as a cancer fighter. Even so, kefir appears to have some special gifts in this area. A study conducted at the School of Dietetics and Human Nutrition at McGill University found that kefir reduced breast cancer cells by 56 percent as opposed to yogurt’s meager 14 percent. What’s It Taste Like? Kefir, like most anything else nowadays, comes in a variety of fruit flavors sweetened with a metric f-ton of cane sugar, but drinking anything else but the plain, unsweetened stuff is for kefir sissies. Besides, you can sweeten it up at home with artificial sweeteners, but the plain, unsweetened kind is by no means unappealing. It’s sour, I’ll give you that, but I think any adult palate can handle it, if not downright appreciate it. When you drink it, it gives the sensation of coating your entire stomach in a soothing embrace. It kind of reminds me of the time Homer Simpson drank melted candle wax to coat his mouth, esophagus, and stomach so that he could win a chili-pepper eating contest, but more nutritious and a lot less dangerous. How to Best Use Kefir I drink one 8-ounce glass of kefir a day, either divided into two servings or all at once. I sometimes
Origin: Tip: Forget Yogurt – This Stuff is Better and Badder
This Stuff is Better Than Whole Food
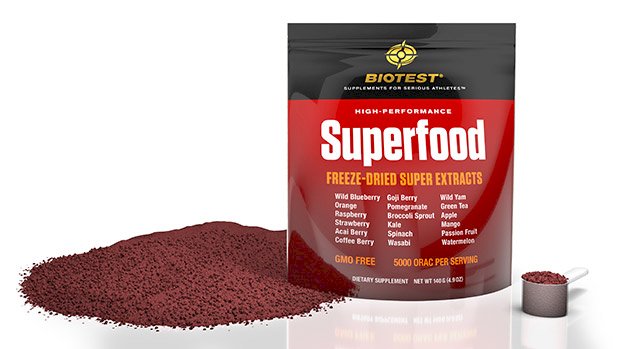 Nutritional Virtue Signaling You know what chafes me? It’s the mutts who are always tweeting about how they don’t need supplements and that we should instead get all our nutrition from “whole foods.” They think all “processed” things are bad. I’m guessing they also wear underpants made from the natural, un-dyed wool shorn of virgin yaks and their houses are constructed of organic hemp panels glued together with woodpecker spit. They’re paragons of wholesome naturalness. Yeah right. The “whole foods only” cliché is nutritional virtue signaling at its worst, a sad attempt to prove that the people who say it are more nutritionally pious than their peers, but let me smack them across the face with a cold, line-caught herring of truth: While there’s no shortage of crappy supplements and god-awful processed foods, some supplements are great and some processed foods are actually better than whole foods. Biotest’s Superfood is a great example. Granted, it’s only minimally processed – an array of 18 strategically chosen freeze-dried fruits and vegetables – but the whole-food absolutists still paint it with a horsehair brush as a processed food. Fine. Stick with your labels, but I’m here to tell you that Superfood is one food that every human being should be taking to improve their health, longevity, and, to those for who it matters, athletic ability. What’s In Superfood? Take a look at the ingredients: Berries Wild Blueberry (1.5% anthocyanin) Orange (40% vitamin C) Raspberry (20% ellagic acid, 0.7% anthocyanins) Strawberry Acai Berry (1.5% total phenolic acids, 1% anthocyanins) Coffee Berry (50% total phenolic acids) Goji Berry Pomegranate (40% ellagic acid) Vegetables Broccoli Sprout (5000 ppm sulforaphane) Kale Spinach (700 ppm lutein) Wasabi (20% glucosinolates) Wild Yam (20% diosgenin) Green Tea (95% total polyphenols, 65% total catechins, 40% EGCG) Other Fruits Apple Mango Passion fruit Watermelon (1000 ppm lycopene) What’s So Great About Superfood? One of the reasons I’m such a big fan of Superfood is because I’m high on the science of polyphenols, which are plant-derived, bioactive compounds that can repress inflammation by inhibiting damage from free radicals and interacting with the immune system, thereby conveying such health benefits as lowered blood pressure, lessened endothelial dysfunction, reduced cholesterol, lowered risk of type 2 diabetes, lowered risk of cancer, and even improved recovery from training. You know how nearly every other article you read says you should eat, I don’t know, yams or some other vegetable or fruit for this or that benefit? Despite what most novice nutritionists think, it’s not because they contain riboflavin or some other vitamin or mineral. Don’t get me wrong, those vitamins and minerals are super important, but the real magic of vegetables and fruits are in the polyphenols they contain and Superfood is possibly the richest, most diverse, and most condensed source of polyphenols on the planet. There are two really broad classes of these polyphenols – flavonoids and nonflavonoids. The flavonoid group can further be broken down into six dietary groups: Flavones:Found in abundance in citrus fruits, celery, and parsley. Flavonols:Rich sources include broccoli, blueberries, and kale. Flavanones:These are found in citrus fruit and mint, among other places. Isoflavones:Commonly found in vegetables and fruits in general. Flavanols:Apples, grapes, teas, and cocoa are rich sources. Anthocyanidins:Found in abundance in blueberries, blackberries, and eggplant. The non-flavonoid group can also be broken down into three different classes: Stilbenes:The well-known compound resveratrol is a stilbene. It and its cousins are commonly found in red wines, apples, pears, plums, peaches, and other foods. Phenolic Acids:These are found in coffee, teas, cherries, blueberries, and a bunch of other fruits. Lignans:Rich sources include kale, broccoli, berries, and whole grains. All of these classes of polyphenols are present in Superfood. The Biological Effects of Polyphenols Polyphenols are most famous for being general antioxidants. Got a free radical spillage on aisle 3? Send in the polyphenols to mop things up. We measure how potent an antioxidant is by something called the ORAC scale, which is a standardized test used by the USDA to measure the Total Antioxidant Potency of foods and nutritional supplements. The term stands for “Oxygen Radical Absorbance Capacity,” and the measurement is expressed as ORAC units per 100 grams of a given compound. For instance, the USDA determined an “average serving of fruits and vegetables” has an ORAC rating of between 400 and 500. But all fruits and vegetables aren’t created equal. Some, like coffee berry, acai berry, and goji berry (all of which are in Superfood) are off the chart on the ORAC scale. So just what is the ORAC rating of just one serving (two scoops) of Superfood? 5,315. That means just one teaspoon of Superfood has the
Origin: This Stuff is Better Than Whole Food
Tip: How to Get Better Results with Chin-Ups
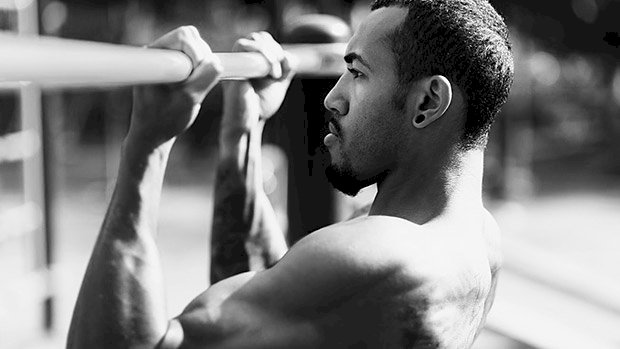 Chin-ups are a classic lat and biceps builder. Rings will amplify your benefits. Here’s Why The supinated grip draws your elbows in. This position is more joint friendly for your shoulders and hammers your lats as shoulder extensors. You get some serious mechanical tension on your biceps. Rings keeps you honest. If you start jerking and kipping, you’ll be swinging around the gym like Tarzan. Free moving handles reduce joint stress. This allows you to do more weight and more volume. Tips Take an underhand, supinated grip. Keep your chest up, shoulders down, and lean back a bit. Focus on driving your elbows down as you lift. Focus on squeezing your biceps as you come to the top. Extend your elbows as you come down, but don’t go limp. Good Alternatives Use the rotating handles that come with some high-end racks, or use the D-handles found at most gyms. All you need is a small chain and carabineer you can pick up from a hardware store. If you have to use a fixed bar, alternate every 1-2 months between supinated and neutral (palms facing each other) grips to reduce the risk of joint
Origin: Tip: How to Get Better Results with Chin-Ups
Tip: A Quick Fix For Better Lats
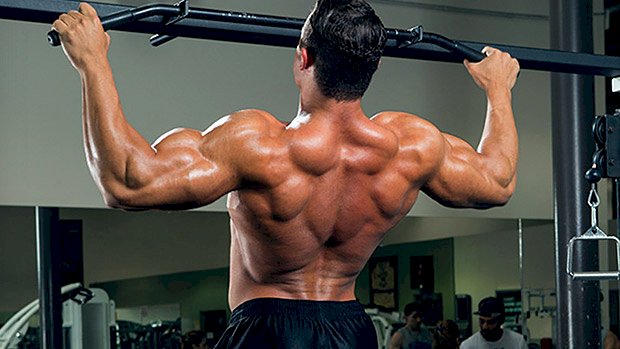 The Problem Lifters often can’t engage their lats while doing pull-ups. As a result, they may experience elbow pain, tendonitis, and neck pain. To top it off, they’ll assume that the pull-up doesn’t add size to the back – because in their case, with their form – it won’t. What could be causing this problem? Well, the obvious answer is that the wrong muscles are getting used and the tension is getting placed on the shoulders and arms instead of the back. The not-so-obvious thing is, when pulling ourselves up, we rely heavily on our grip being at its strongest towards the index and middle fingers, but never really think about how that will impact our shoulder position. The Solution A great coaching cue is to tell people to lift up their index fingers as they perform a set of pull-ups. Not only does this put the shoulders into a better position, it’ll also make it infinitely harder for someone to power through with their biceps, which in turn will make them better at pull-ups and give them stronger, bigger lats. Most people that experience shoulder/arm/neck issues struggle to match their normal max set of pull-ups with the index fingers lifted, so this is a great way to check if you’ve been using the correct muscles. If you’re only one or two reps off that’s fine, but if you find your reps are cut in half or you really struggle to do one, then there’s room for improvement! Regardless of your level, I’d recommend always throwing it into your warm-ups for lat/upper body pulling days because it’s just a great activation tool. By putting focus on the right muscles, hopefully you’ll avoid running into any issues with your pull-ups in the long run. Longevity is the key to
Origin: Tip: A Quick Fix For Better Lats
5 Foods For Better Erections & A Healthy Prostate
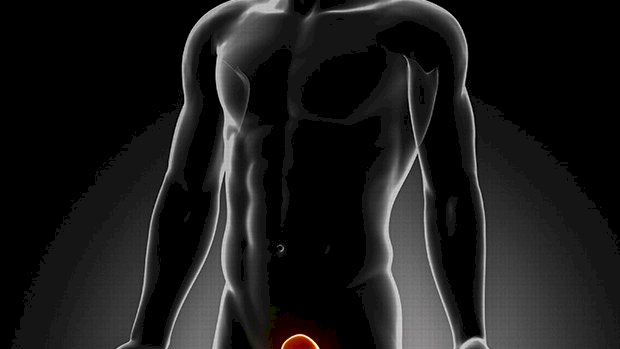 You may be at an age where thoughts about the health of your prostate enter your mind once every never, but like a schnauzer nuzzling your pant leg for a Milk Bone, it’ll eventually get your attention one way or another. It may start to swell up as early as your forties, at which point you’ll say goodbye to sleeping the whole night through without getting up to go to the bathroom. But regardless of whether it gives you any problems or not, your doctor will at some point start to nag you about adding a PSA test to your blood work so he or she can begin to monitor it, in case, you know, the big C. The problem with that is, as I explained in The Truth About Prostate Testing, is that the PSA test itself is problematical. One task force concluded that you’re 120-240 times more likely to be misdiagnosed as having prostate cancer from a positive PSA test and 40-80 times more likely to get unnecessary surgery or radiation than you are of having your life saved (1). Another study concluded that, “Harms associated with PSA-based screening and subsequent diagnostic evaluations are frequent, and moderate in severity… Common major harms include over-diagnosis and overtreatment, including infection, blood loss requiring transfusion, pneumonia, erectile dysfunction, and incontinence (2).” Even the guy who discovered PSA, pathologist Richard J. Ablin, called the PSA test a “profit-driven public health disaster” because it’s led to approximately 30 million American men being tested every year at a cost of at least 3 billion dollars. Of course, these false positives, if they occur, are much more likely to happen when you’re an old or semi-old coot. Even so, it’d be a good idea to at least start taking a little bit of preemptive care of the organ when you’re still young. And for those who have already reached coot or semi-coot status, it’s imperative that you start giving your prostate a little love now, and by that I mean some sensible, prostate-friendly dietary strategies. Besides, most of the following foods also strengthen erections, so if prostate health isn’t a concern of yours, let carnal self-interests guide you. Prostate (and Erection) Supporting Foods Here are five foods that you should be eating on a regular basis, all of which have been found to be helpful in freezing or lowering PSA levels: 1 – Tomatoes Tomatoes contain lycopene, a powerful polyphenol that has, like all polyphenols, powerful anti-oxidant properties, but lycopene almost surely has some other potent, yet undiscovered mechanisms through which it lowers prostate cancer risk. We know that lycopene is more absorbable through cooked tomatoes and tomato products like pastes and sauces. We also know that eating them with a little fat, like olive oil, further helps absorption. But even raw tomatoes seem to help, as does pedestrian ketchup, regardless of whether it’s green, purple, or red tomato ketchup, although the dark red variety has been shown to contain the most lycopene. Try adding some sort of tomato product to your diet at least 4 to 5 times a week. Other than using a lot of ketchup, the easiest way to do this might be to just cut up a raw tomato into bite-size pieces, douse them with salt and olive oil, and munch on them as a pre-dinner appetizer. 2 – Carrots Chinese epidemiologists, after scanning ten studies, found a stunning correlation between eating carrots and the rate of prostate cancer (3). They found that the more often men ate carrots, and the greater the amount of carrots eaten (to a point), the less likely they were to get prostate cancer. They even came up with some definitive numbers: For every 10 grams of carrots consumed each day, men reduced their risk of developing prostate cancer by 5%. That means that if men had at least 50 grams of carrots a day, their chances of developing prostate cancer could be cut in half. The researchers think it has something to do with the large amount of cancer-fighting carotenoids (including lycopene) found in carrots. Sadly, doubling the amount of carrots eaten only goes so far. Increasing your carrot intake to 100 grams doesn’t drop the chances of getting prostate cancer to zero, so don’t suddenly think you figured out a way to cheat death. Anyhow, the average carrot weighs about 72 grams, and a cup of chopped carrots weighs around 122 grams, so eating 50 grams a day is about as easy a dietary task as you’ll ever get. 3 – Pomegranate Juice While the people who make POM Wonderful pomegranate juice have made claims about its efficacy in treating prostate cancer that were a little too bold for the FDA, there is some evidence that shows it can slow the rise of PSA levels in men who’ve been diagnosed with prostate cancer. Pomegranate may also juice up erections, so there’s that, too. Drink about 6 ounces of juice a day with or without meals. 4 – Green Tea This drink, made from the steeped leaves of camellia sinensis, allegedly benefits almost every organ system in the body. It
Origin: 5 Foods For Better Erections & A Healthy Prostate
Tip: How to Make the Step-Up Work Better
 The Step-Up: You’re Doing It Wrong You don’t see a lot people doing the step-up. They probably tried it at one time but decided it just didn’t work. The problem is, most people don’t do it correctly. Most lifters unknowingly cheat on the step-up by leaning forward too much and pushing off the bottom leg. When you push off the floor leg, the leg on top of the box or bench isn’t doing much work. Make It Work: Curl Up Your Toes To keep from cheating on the step-up, curl up the toes of the foot that’s on the floor. Keep them curled up during the movement. This keeps you from being able to push off from the bottom leg so easily, because in order to push off you have to keep the toes down. As for bench or step height, you can go very high. The highest you can go is when the bench is so tall you’re up on your toes. It’s called the triple-jumper’s step-up and it involves the VMO and hamstrings more. It’s basically just a super high step-up. The key is that your knee shouldn’t buckle in as you step up. You can alternate legs or keep one foot statically on the bench until you do the desired number of reps. If you want more time under tension, use the static method where the foot up on the bench is kept in place. You can do step-ups using a barbell or dumbbells. They’re all good variations. Just keep your toes
Origin: Tip: How to Make the Step-Up Work Better
Tip: The Main Stretch You Need to Move Better
 Stretching the hip flexors (the front or anterior hips) will help you move better. It’ll also remove the “extensor block” which happens when tight hip flexors act as a brake for hip extension. This stretch makes it easier to activate and train the glutes as well. It’ll help you increase mind-muscle connection with your glutes, especially if you’ve been sitting for a long time before your workout. How to Do It Start in a half-kneeling position with your left leg in front of you. Push your hips forward and activate your right glute. The knee should be directly over your heel. Grab the left knee with your right hand and slightly rotate the upper body and hip toward the left. This will place the hip flexors on a great stretch. The twist will also reduce the typical compensation of “rotating away from the stretch” as you might automatically start to do. You’ll see in the photo that my hips are pushed forward. That’s intentional. Some recommend staying completely vertical with the spine while bracing the abs and glutes in this position. That’s fine. However, I prefer a deeper stretch (more in the direction of doing front splits). Do what feels
Origin: Tip: The Main Stretch You Need to Move Better
