 Not only with this finisher light up your back, it’ll help “wake up” your rhomboids, making it an excellent tool for improving posture. How To Do It Set up in a good stiff-legged deadlift position. Make sure you’re “aware” of your hamstrings and you’re not putting strain on your lower back. Use two moderately heavy dumbbells that you can hold at the top position of a dumbbell row at maximum range of motion. This is your isometric hold position. Maintaining the full height of one arm/dumbbell, reach the other slightly forward and down to get a nice lat stretch, then row up and back to the retracted position. Repeat on the other side. Keep alternating and perform 5 reps with each arm (10 total) while maintaining the full retraction of the “resting” arm. Once you’ve completed 5 reps per arm, do 10 reps with both arms moving together, making sure you fully pull your elbows and shoulders back at the top and add a slight pause between reps. If you find yourself using any momentum or losing range of motion, drop the weight. There’s really no point in cheating by doing “bro-rep” dumbbell rows. Focus on retraction and recruiting the right muscles – the burn will come quickly. The full set will be: 5 rounds: 10 Alternating Single-Arm Rows (holding iso retraction) 10 Double-Arm Rows (pause between reps in retraction) Write down the weight you use your first time and try to increase the weight over
Origin: Tip: The Back Burner
Tag: Back
Tip: Nail the Back Lever. Here’s How
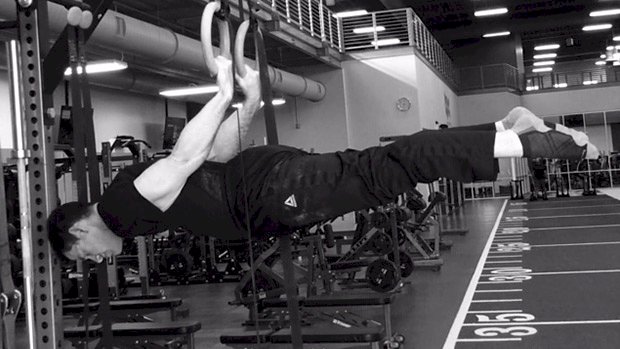 If you’re into calisthenics, at some point you’ll want to introduce yourself to levers. The back lever is one of the easier variations to start with. It’s not only a cool trick, but also a tremendous exercise to develop your isometric core strength. Learning how to isometrically brace your core and have all your muscles work together to achieve full-body tension will transfer to all of your main lifts. Whether you’re wanting to use this as a supplement to your big lifts, or you just want a fun trick to add to your arsenal of exercises, use these steps to nail the back lever. Step 1: Skin the Cat The back lever takes a considerable amount of shoulder strength and mobility. Before you start thinking about doing it, you’ll want to be able to skin the cat. This movement gets you used to going upside down, teaches you how to use your core, and preps your shoulders for the more advanced static holds. When you first try it, make sure to set up the rings so that your legs can touch the ground when you go through them. This will allow you to take pressure off your shoulders or stop the movement if needed. Step 2: Get Comfortable Hanging Upside Down Getting used to all the blood rushing to your head is another prerequisite before going for your holds. Holding yourself upside down with your legs straight and core braced will help you understand the initial positioning of the back lever and will build up your confidence. Step 3: Tucked Back Lever When it comes to levers, the longer you make your body, the harder the movement will become. Tucking your legs in will shorten your lever and give you more of a mechanical advantage. Make sure you can hold your tucked lever position at a dead stop for 3 to 5 seconds before moving to the next stage. Step 4: Bent-Knee Back Lever This movement is very similar to the tucked back lever, except it involves a little more extension at the hips, which increases the level of difficulty. Again, be able to hold your this position at a dead stop for 3 to 5 seconds before attempting to extend the knees. Step 5: Straddle Back Lever The next step is to move to a straddle stance. This gets you used to extending the hips and knees, and will get you stronger to progressively hold more of your bodyweight in a lengthened position. The beauty of the straddle-stance back lever is that you can make it more or less difficult by moving your legs further apart or closer together. Make sure you can hold your straddle position for 3 to 5 seconds before moving to the full version. Phone a Friend When you’re first learning this movement it will be difficult to tell when you’re parallel to the ground. Have a friend nearby to let you know or just video yourself. A friend can also help spot you, making the exercise considerably safer. Hand Positioning: Palms Up or Palms Down? Now, if you’re a gymnastics purist, you might say that a true back lever involves the palms facing the ground (supinated) when in the full lever. Although this is technically correct, it puts considerably more stress on the elbow and you can risk a biceps rupture. If you don’t have any formal gymnastics training, you’re going to want your palms facing the ceiling (pronated) to save yourself from an unnecessary
Origin: Tip: Nail the Back Lever. Here’s How
Tip: Best Deadlift For Leg Size & Back Health
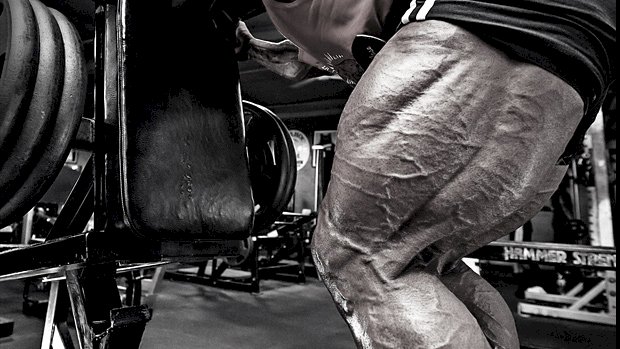 You’ll need a dual-adjustable cable machine like the one in the video. Something like a Cybex Functional Trainer or a Keiser Functional Trainer would work. You’ll also need a bar-style cable attachment. (If you don’t have one of these attachments, you’ll see a workaround below.) The attachment should be set just off the floor. Pick it up and step back a foot or two, which will change the angle of pull from the cable. Engage your lats, push your hips back, and allow the bar to travel in toward the cable machine. Once your hamstrings have gone as far as they can handle, return to the start position. Just think of it as a traditional RDL, but you’ll be forced into a slightly different movement to compensate for the direction of the cable. If you don’t have access to the type of cable attachment shown, here’s an effective way to do it using a barbell. Combo Hamstring RDL Here’s a closer look at how the cable is attached to the barbell using a common handle. (Ankle attachments will also work.) When using the combo (cable and barbell) version you’ll also need to account for the extra weight of the bar. This adds another element to the exercise, where on top of the more horizontal cable load you’ll also be adding to the vertical. You can add weight to the bar here, but keep in mind how this’ll affect the overall profile of the exercise. There are some merits to doing this, but for now let’s stick to the exercise in question where the majority of weight is coming via the cable stack (two cable stacks, technically). Why They Work Due to the cable angle, the exercise is designed so that your hamstrings are likely to give out well before your back does. Your hamstrings are taken into a fully lengthened position under load, while your low back will feel like it’s on vacation. Theoretically, there’s very little sheer or compressive force coming through your lumbar region, while there might even be a little traction of the spine as you reach into the bottom position (depending on the height of the cable). These Romanian deadlifts are anything but an ego lift. They prioritize tension through the targeted muscle. This is good news if size is your priority. When it comes to hypertrophy, your muscles don’t give a damn how much your ego is lifting. Tucked away by layers of connective tissue and skin, they’re blind to what goes on outside. They do recognize tension though – and you’ll get plenty of it with this exercise. You’ll also notice that as your toes get pulled into the floor (resisting dorsiflexion), your calves will become more active. This co-contraction of the gastrocnemius adds to the effect and will make things even harder for your hamstrings. Programming Try these in place of your regular deadlifts as a way to vary the training stimulus or work around a tricky back. They’re also a useful alternative to exercises such as 45-degree back extensions, reverse-hypers, pull-throughs and the like. Sets and reps should be
Origin: Tip: Best Deadlift For Leg Size & Back Health
6 Ways to Upgrade Your Back Workout
 There comes a time when you’ve done rows and pull-ups to oblivion and reach a plateau in strength, muscular development, or both. That’s when it’s time to think outside the box. These hidden tricks can help you do just that. 1 – Stop Moving Weight This may seem misleading. I’m not saying you shouldn’t resistance train. I’m saying you need to stop training with weight that you can actually lift. I just blew your mind, right? No, really, if you want to improve your strength and even your mobility, you’re going to get through your sticking points by using isometrics (trying to lift something that can’t be moved). The benefits: Isometrics allow you to apply maximum force without risking injury since the body isn’t changing positions under load (which is the most likely scenario for injuries). They strengthen a part of a typical force curve that traditional weight training would simply pass through. As an example, focus on shoulder flexion and extension isometrics to hit the rear deltoids and lower traps, thereby challenging the limits of your range. Watch me put Dani Shugart through the gears: Setting up a barbell with a heavy load on the pins in the rack is a great way to do both of these isometric exercises. Banking it against the back of the rack makes it even more sturdy. 2 – Pause for the Cause The above is all fine and good when it comes to the idea of trying to push something away from you (in this case, the loaded bar). When you pull something towards you and hold the end ranges, it typically exposes glaring issues of weakness that lifters have been overlooking for years. Adding a pause to a pulldown or row is a good first step in acknowledging that it’s a different ballgame. Beyond this, however, we can increase the octane by taking things back to fitness testing in 11th grade gym class. The flexed-arm hang was probably a piece of cake when you were 16 years old, weighed 150 pounds, and were unaware of good lifting technique. I remember being able to hold myself up there for close to a minute. Change the game and use proper pull-up mechanics, though, coupled with all of your added mass, and you have a whole new challenge that probably won’t allow you to do much more than a 20-second hold. If you’re not used to these, prepare for a world of intrinsic soreness for the next couple of days. 3 – Do Big Boy Rollouts Yep, they’re an ab exercise… until you use a barbell instead of an ab wheel and go out wide (think of your bench press grip). Then they become one of the greatest ways to torch your upper lats and teres muscles. They can be a game-changer for the constant tension they provide to the upper lats during both the eccentric and concentric halves of the lift. Bonus points: If you really want to torch the upper lats, then try supersetting barbell rollouts with snatch grip deadlfits. You can even use the same bar. Boom. 4 – Rock n’ Row If you want to engage as much of your back musculature as possible during your seated rows (or horizontal pulls in general), it’s imperative you add some movement from the hip joint. I call this “toprock.” By applying a little sway with a neutral spine, you’ll remain safe while keeping the emphasis away from the biceps and away from unwanted shoulder glide once the weight begins to get a little heavy. Think about it: The “intro to training” textbooks says the form police will arrest you if you keep anything other than a completely rigid torso when doing rows, but applying a bit of momentum is perfectly acceptable and isn’t “cheating.” This is me doing what I consider to be a standard set of heavier seated rows: As you can see, I’m maintaining good tension throughout the rep, and never is there any rounding of the lumbar (or thoracic) spine. And, as the video below shows, I believe this same principle should apply to all row variations, within reason: 5 – Isolate with Fisherman Rows Dumbbell rows are a staple in many programs for unilateral pulling strength and development of the lats. Unfortunately, there are plenty of people who might not have the right conditioning to use the classic single-arm dumbbell row without risk, and others who just plain struggle to get a handle on proper form and technique. For lifters with a history of lumbar issues, the last thing they need is a one-sided load combined with an uneven hip position, which is what happens when they place one leg up on a bench while the other stays grounded. Moreover, finding the right places to put your hands and feet to promote a level hip position to avoid the pitfalls can be frustrating. Even healthy lifters can have trouble finding a position that gives the proper amount of emphasis to the right areas. The major difference you’ll see right off the bat with the fisherman row is the fact that both legs are mounted on the bench, not just one. This immediately stabilizes the pelvis so you don’t have to spend time trying to finding the least objectionable hand, foot,
Origin: 6 Ways to Upgrade Your Back Workout
Thick and Wide: The Back Solution
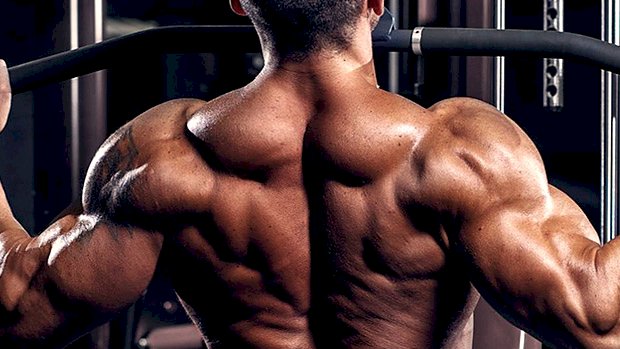
 Here’s something nobody’s ever told you before: Your technique is keeping your back small. Sure, we could talk about exercise selection, reps, sets, and frequency, but these factors are largely irrelevant if you don’t understand the back muscles and what adjustments to make to really hit them. If you want to actually gain some size on your back, there’s a hell of a lot more to it than deadlifts and pull-ups. Thick and Wide: The Muscles When people talk about building the back, they mean choosing exercises that build thickness or width. But what do those even mean? We need to differentiate between them and see which muscles create each effect. The characteristic you need more (thickness or width) will determine your best technique. Back Width The muscle responsible for creating width is the latissimus dorsi – the lats. It originates from the spine, where the fibers fan upwards and insert into the humerus. Back Thickness The muscles primarily responsible for creating thickness are the upper back muscles: teres major, rhomboids, traps (upper, middle, and lower), and the posterior delts count here too. Arm Path and Grip The path your arms take – flared versus tucked in – during pulling exercises will determine which back muscles get hit more. So if one area of your back is taking over (keeping you from building another area) you can change your arm path and focus in more on what you’re wanting to build. Grip Type The type of grip you’re using will play a role in arm path. It doesn’t wholly dictate it, but certain grips will make arm path more natural than others depending on what area of the back you’re trying to isolate. A supinated (underhand) grip will lend itself to keeping the arm path in close to the body, which will tend to bias the lats more. A neutral grip tends to do the same, but can also be used to hit the teres a bit more. A pronated (overhand) grip will be most commonly used to hit the muscles of the upper back because it’ll naturally lend itself to a more flared arm path. Grip Width A closer grip or shoulder-width grip is usually more ideal for targeting the lats. A wider grip can be a great option for the upper back, especially when doing chins or pulldowns. It can cause a bit more abduction of the humerus. That said, one reminder is to have elbow-to-wrist alignment when you’re in the fully contracted position of a pulling exercise. It’s a great overall position for the joints to be in to fully maximize the area of the back you’re trying to bias and can keep you from compensating with other muscle groups. Building a Wide Back Let’s talk about the lats. Since they attach to the spine, then fan upward to the humerus, it should make sense that to fully lengthen and shorten them, and work them in line with the fibers, the arms need to begin in front of the body (lengthening the lats). From that position, you want to take an arm path where you initiate the pull by driving the arms down and bringing the elbows in towards the hip (shortening). The Row When you focus on this execution principle, you’ll understand that a row, depending on how it’s performed, can actually be a dominant lat movement rather than an upper back movement. Various row machines can be used to bias the lats rather than the upper back if that’s what you’re wanting to do. The Pulldown The way you do a pulldown will also dictate which area of the back is working with the greatest amount of tension. Even though pulldowns are traditionally known to hit the lats, if you’re not doing them right, they’ll do more for the upper back. So keep the narrow or neutral grip in mind, and remember to keep the arm path in front of you. Cues Start with the arms in front of the body rather than out to the sides and use a narrow or shoulder-width grip. Lengthen the lats while maintaining tension. Don’t lose tension in the fully lengthened position. Drive the arms down to initiate the concentric without allowing the elbows to flare. Make your arm path come in close to the body and drive the elbow toward the hip. To Arch or Not to Arch? To hit the lats, brace with the abs rather than extending the lumbar spine (arching the lower back). You’ve probably read that to get a full lat contraction, you need to arch the lower back. You even see pictures of guys with huge backs using an arch when doing pulldowns. It’s not a bad technique, but it doesn’t preferentially build the lats. Why? Because it actually takes away from fully shortening the lats and will decrease output by them, creating more engagement in the upper back. So instead, brace with the abs to create more stability by maintaining a neutral spine. It’s in the neutral spinal position that the lats can produce the greatest amount of output and contract maximally. Building a Thick Back Hit the traps, rhomboids, and teres major. The Pulldown Let’s take a quick look at a pulldown variation that targets the upper back, also known as the “lat-less” pulldown. You’re
Origin: Thick and Wide: The Back Solution
Tip: Two Back Muscles You’re Missing
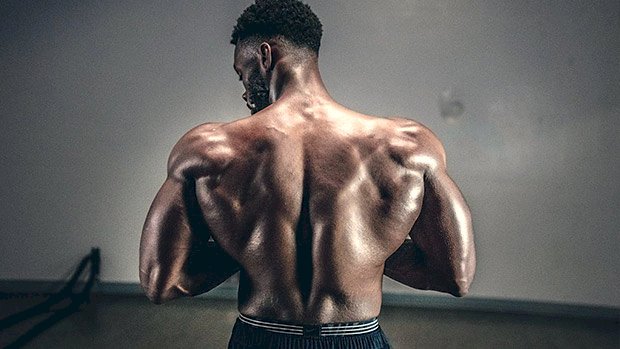
 The Key to a Chiseled Upper Back The lats get a lot of attention, but what’s often missing in back training is hitting the mid-back musculature like the rhomboids and mid/lower traps. Training these muscles will beef up your upper back, making you look impressive with or without a shirt. Having strong mid-back muscles is also crucial for maximizing performance since they’re often a limiting factor when it comes to overhead presses, rows, and vertical pulling. Here are two exercises that’ll fire up your mid back: Wide-Grip Double Pulley Row Set two cables up high and about a foot outside of shoulder width. Ideally, it would line up with how wide your elbows are when flared. Pull the cables from high to low as you bring your elbows down and back. Keep your elbows flared out to engage the mid back. Squeeze your shoulder blades together in the shortened position. Think about pulling the handles back and apart simultaneously. Dumbbell Rhomboid Hold To set up, hold two moderately heavy dumbbells at your side and hinge forward about 30 degrees. Keep your shoulder blades depressed and retract them together. Hold this position and squeeze for as long as you can. Really focus on the mind-muscle connection with this one. Programming Do these at the end of an upper-body day as a superset for 3-4 sets each. You’ll get both static and dynamic contractions to trigger hypertrophy and strength gains. Your rhomboids and traps will get thicker and fuller as a
Origin: Tip: Two Back Muscles You’re Missing
The 6 Mandatory Angles for a Big Back
 Building a big back takes a willingness to work hard, lift heavy, and train smart. Most lifters have the hard work and heavy lifting parts down. But to get full development – that chiseled topographical map of muscles – you need to train smarter. Simply hammering rows and pulldowns from the same angles every back workout isn’t going to cut it. You’ll see some positive changes, but you won’t maximize your potential. To do that, you’ll need to: Know what muscles you want to hit. Know what angles work what muscles. Know what exercises hit those angles. Know how to program those exercises. So first let’s cover the movement patterns and exercises (the fun stuff), then we’ll look at programming, and finally we’ll geek out and break down the anatomy. Movement Pattern 1: Low to High Pull By setting up the cable unit at your feet and pulling towards your chest as you’re hinged forward (and then pulling over your forehead as you stand up) you’ll create an upward motion that allows you to load up heavy. Use a wider neutral grip bar to maximize your retraction capability while also allowing for a great stretch of the lats after each eccentric (negative) rep. You’ll hit the lats, mid and lower traps, rhomboids, and posterior deltoids (and thus teres major). Check your form: Use a strong stance with feet driving into the ground. Use a proper hinge that loads the glutes and puts a small stretch on the hamstrings. Brace your core by engaging your midsection like you’re preparing to take a punch. Take a small step away from cable anchor to avoid slamming the weights back into the stack on each rep. This also allows you to go into a bit of an eccentric loaded stretch during each rep. Use a neutral grip with an emphasis on driving the elbows behind and “around” the back. Use a controlled eccentric/lowering phase with a small protraction reach at the end of each rep. Movement Pattern 2: High to High Pull This exercise is called an overhead banded face pull. The face pull doesn’t get as much love from hardcore lifters because you aren’t able to load it up like you can other back movements. This lift significantly limits the amount of weight you can handle at the end range. This will hit the external rotators, the posterior delts, the middle and upper traps, and a bit of your lats. Check your form: Use a strong stance with feet driving into the ground. Lean back slightly into your hips with a tall spine. Brace your core to resist the bands desire to pull you over. Pull your arms towards your eyes, elbows wide, until you reach ideal depth. Rotate your fists behind you as though you’re making a “field goal is good” hand motion. Hold this top squeeze for a two-second count and slowly release back to the start. Movement Pattern 3: Isometric Wide Grip Hold While it may seem sort of contradictory to have an isometric contraction on this list, our muscles don’t need to create movement in order to be worked, become exhausted, and require recovery that can lead to hypertrophy. In fact, isometrics done in the right way can actually help enhance our growth potential by targeting specific ranges of motion, and thus muscle fibers, that are weaker or underdeveloped. Anything like a farmer’s carry, a deadlift, or even an isometric row hold will do wonders hit the outer lats, the rhomboids, posterior delts, and traps. Technically you could accomplish this doing the snatch-grip trap bar deadlift, which was something I learned from Dr. Joel Seedman here. Or try my personal favorite carry variation – the cowboy carry: Your execution on both emphasizes the lat squeeze caused by actively depressing and downwardly rotating the scapula. As Tony Gentilcore has said, “imagine squeezing an orange in your armpits and making orange juice.” Movement Pattern 4: Horizontal Pull All rowing variations are horizontal in relation to your torso, and I like the one-arm row because it allows you to pull in a J-shape manner. While the one-arm row is a classic move in most programs, it can usually be done better by pulling with this J-shaped trajectory. One concept in muscular anatomy that’s often overlooked is the direction that fibers run. Muscles contract along the lines of fibers within them. So, muscles only contract in the direction those fibers run. In the case of the lats, the fibers run a bit diagonally from the shoulder joint down towards the lumbar spine. So it’s important to use those fibers that are high up in the back (and diving into the shoulder joint) by letting a weight travel in front of us during rows. This adjustment has been making a huge difference for my clients for years, and Lee Boyce has touched on it too. Check your form: Get one knee on a bench with the same-side arm directly underneath the shoulder joint. Your off-bench leg should shoot out wide to “get out of the way” and create a pocket for the elbow. Engage your core and brace to keep your spine level (tabletop back). Let the dumbbell begin
Origin: The 6 Mandatory Angles for a Big Back
Tip: Build Your Back With DUDS
 Try this lat-dominant drop set on back day after you’re done with your heavier, progressive-overload work. Pulling For The Pump Don’t let the “DUDS” acronym fool you: they’re far from a dud finisher. Pick literally any lat pulldown or pullover variation and do this: Do an all-out set to failure (5 to 8 reps). Cut the weight in half and double the number of reps (10 to 16). Immediately cut the weight in half again and double the number of reps (20-32). If you need to take mini 10-second breaks to finish, go ahead. I’d suggest doing it on a well-designed pullover machine. Think of it as metabolic-stress type work, which should come at the end of a workout and only be done for ONE set. Don’t abuse it! Maybe sprinkle it in every other
Origin: Tip: Build Your Back With DUDS
Tip: The Back Finisher You’ve Never Tried
 It’s always a good idea to start your back workouts with the big, basic exercises (rows, chin-ups, pull-ups, lat pulldowns, etc.) and chase rep and/or weight personal records. So, what could your back workouts be missing? Metabolic stress. There are lots of ways to get it in, so try leveling up your lat game with this finisher. All you’ll need is one set. 12 Reps, 3 Exercises, 1 Long Hold If you have access to a dual-adjustable pulley or freedom-type trainer, give this one a shot. You’re going to hold the reps constant from exercise to exercise while also adding a bit of weight at each transition. Do the following: Straight-Arm Pulldown:12 reps (use about a 15-rep estimated max weight) Split Stance High Row:12 reps (add a plate beyond what you used in the first exercise) Half-Kneeling Lat Pulldown:12-plus reps (add a plate beyond what you used in the second exercise) Half-Kneeling Lat Pulldown ISO Hold:max time Take about 10 seconds or so to transition between exercises, recover just a bit and change the weight, with the exception of the last exercise where you’ll take 20 seconds to recover from the previous movement. Try
Origin: Tip: The Back Finisher You’ve Never Tried
4 Ways to End Back Day With a Bang
 One of the things that separate the wolves from the sheep in the iron game is back development. It’s easy to train the stuff you can see in the mirror. It gives you the “warm and fuzzies” that come from immediate gratification. But some of the largest and most impressive muscular structures – with the biggest potential for growth – reside on the back side of the body. A guy who puts in years grinding away on his upper back and lats – embracing the aching stretches and the powerful pulls – will end up with a physique that ultimately blows away the one developed by the dude who’s just pressing, flying, and curling his way to mediocrity. So let’s get into the good stuff. Use these four lat-dominant finishers to level up your lat game and end your back day with a bang! 1 – The Rack Pull-Up Marathon Fellow T Nation contributor Paul Carter has sung the praises of rack pull-ups here before. If you’re after more width, this is a monster. This finisher uses the rack pull-up as the foundation and, from there, we’re just going to manipulate leverage and body position to create a nasty mechanical drop set. Set up a bar in a Smith machine or rack at upper-chest height. Set an incline bench out in front of you to prop up your straight legs. When you’re at the top of the pull-up, your thighs should be as close to parallel to the floor as possible. Then do the following: Rack Pull-Ups:max reps Modified Behind-The-Neck Rack Pull-Ups:max reps Modified Rack Pull-Ups:max reps Feet-Elevated Scap Depressions:max reps Use straps. Don’t take any rest between any of the above exercises, outside of what it takes to transition. On the second and third exercises, use as little lower-body assistance as necessary to complete the reps. 2 – Pulldown Lollapalooza This is an efficient mechanical drop set requiring only a high pulley and a rope attachment. You won’t even have to change the weight. Do the following: Straight-Arm Pulldowns:12-15 reps to failure (upright position) Straight-Arm Pulldowns:max reps (bent over position) Bent-Over “J” Pulldowns:max reps Hybrid Motorcycle Row/Face Pull:max reps Bent-Over Lat Pulldowns:max reps Take no rest between exercises. This protocol has a nice flow to it and you’ll appreciate the pump. 3 – Twelve Angry Reps If you have access to a dual-adjustable pulley or freedom-type trainer, give this one a shot. You’re going to hold the reps constant from exercise to exercise while also adding a bit of weight at each transition. Do the following: Straight-Arm Pulldowns:12 reps (use about a 15-rep estimated max weight) Split Stance High Rows:12 reps (add a plate beyond what you used in the first exercise) Half-Kneeling Lat Pulldowns:12-plus reps (add a plate beyond what you used in the second exercise) Half-Kneeling Lat Pulldown ISO Hold:for max time Take about 10 seconds or so to transition between exercises, recover just a bit and change the weight, with the exception of the last exercise where you’ll take 20 seconds to recover from the previous movement. 4 – DUDS (Double-Up Drop Sets) Don’t let the “DUDS” acronym fool you: they’re far from a dud finisher. Pick literally any lat pulldown variation and do this: Do an all-out set to failure (5 to 8 reps) Cut the weight in half and double the number of reps (10 to 16) Immediately cut the weight in half again and double the number of reps (20-32). If you need to take mini 10-second breaks to finish, go ahead. I’d suggest doing it on a well-designed pullover machine. When to Use These These are finishers. They’re not meant to replace heavier, progressive-overload back work. Start your back workouts with the big, basic exercises (rows, chin-ups, pull-ups, lat pulldowns, etc.) and chase rep and/or weight personal records. The four protocols above are metabolic-stress type work and should come at the end of a workout and only be done for ONE set. Don’t abuse these; maybe sprinkle them in every other week or
Origin: 4 Ways to End Back Day With a Bang
