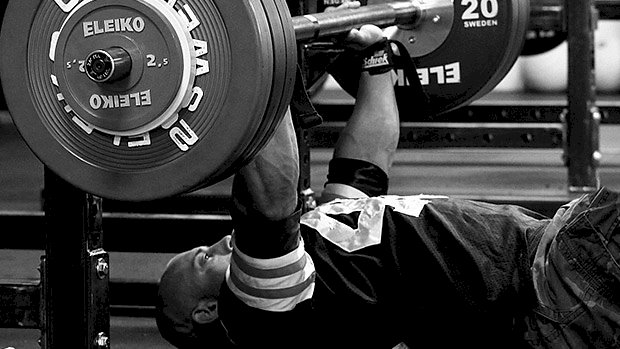
 The floor press is a classic bench-building, triceps-focused lift. It’s also a great alternative for people who suffer from low back pain, especially extension-based pain. But for my athletes, I’ve found that the standard floor press doesn’t have the greatest transfer when it comes to sports performance. The good news? One simple adjustment will not only make the exercise more athletic, it’ll make you stronger in this position! Check it out: Floor Press With Glute Bridge Simply perform a glute bridge before you unrack the weight. Really focus on staying tight in the core by using your abs to pin the ribcage down. Contract your glutes hard to hold your hips in position. You’ll notice a couple things: Your core is challenged hard, so you must focus on maintaining the bridge position throughout the lift. You’re actually stronger in this position than a regular floor press. Try a rep without the glute bridge and a rep with it. You can lift slightly more in the bridged position. This probably has to do with energy transfer. A regular floor press doesn’t utilize the lower body or core as much. This variation is much more athletic for a few reasons: Energy transfer from lower to upper body. Pretty much all athletic movements use ground force to initiate a movement. This creates a need to produce energy and transfer it from the ground, through the lower body, and then to the upper body. Challenging static hip stability while dynamically pressing with the upper body. Many sports require joint stability in one area while simultaneously performing a dynamic movement. Direct sport-specific transfer to ground athletes such as MMA fighters and wrestlers. Think of a wrestler pinned on the ground. You’re not just going to use your arms to get a guy off of you; you’re going to use your whole body. Bret Contreras thought of the hip thrust while watching MMA fighters. When they’re on the ground, they thrust to get someone off. This takes that to the next
Origin: Tip: The Athlete’s Floor Press
Tag: Athlete’s
Tip: The Landmine Exercise for Athletes
 The Athletic Landmine Mastering the regular landmine lifts instantly makes all other strength and performance training better. It requires the ability to create full body tension from a standing position, which is more “functional” for most athletes. The next progression is to create a more reactive and explosive environment. The ability to decelerate, stabilize, and re-accelerate is key for optimal performance. To do the athletic landmine, start with a regular landmine “full contact twist” before you create a forceful rotation and perform a side shuffle movement starting from the core and hips. The bar coming down to the side will load the hips and core muscles, much like a coil. The purpose is to quickly and precisely stop the barbell/weight, before re-accelerating it to the other side. Even though the exercise isn’t super advanced, safe execution requires a strong core and good timing. Start light and make sure you have the regular landmine move under control. You don’t want to go too heavy here. You won’t get max power output with the heaviest
Origin: Tip: The Landmine Exercise for Athletes
Tip: The Glute Exercise for Athletes
 The glute bridge is basically a hip thrust performed with your back on the floor instead of on a bench. By using a resistance band as shown in the video below, the exercise will incorporate more of the muscle fibers involved in gait by requiring the hamstrings to contract at both ends. Bilateral Band-Resisted Bridge This changes the exercise into more of a performance-oriented challenge for intermediate and advanced athletes. It does this by increasing the contribution of the body’s deep longitudinal system. This is the line of interdependent muscles from the lower leg to the hip responsible for healthy gait. This modification and its progressions make for a great activation or warm-up for all deadlift and hinge-patterned movements, as well as antero-posterior patterns with contralateral loads. (That’s a bloated way of saying sprints and single-arm dumbbell lunges or step-up variations.) They’re also great for helping to ingrain movement skills such as upper and lower body disassociation and multi-planar hip stability. Here are several ways to make it even tougher: Progressions Band-Resisted Sprinter’s Bridge When performing the exercises, stabilize the foot with a powerful arch by digging the tip of the big toe into the floor. This prepares the lower body for sport and training by exciting the intrinsic foot muscles and calling for greater neural drive into the
Origin: Tip: The Glute Exercise for Athletes
Tip: The Athlete’s Push-Up
 Most athletes need upper body explosive power. In the quest for improved performance, many athletes unfortunately end up injured because they choose high-risk methods and exercises. While exercises like plyometric push-ups (clapping push-ups, box push-ups, etc.) can be great, they can also be harmful. With a background of shoulder injury, doing plyometric push-ups will cause a lot of stress in the landing and deceleration phase. Many add to this stress by dropping from way-too-high boxes, increasing the stress even more. If you’re one of those athletes who has to be smarter about your exercise selection, but you still want to increase your explosive power, go for banded push-ups. To increase explosiveness, you need to do exercises with the intent of being as powerful as possible through the WHOLE range of motion. Ballistic training methods like med-ball throws are perfect for this, but in the world of push-ups, the resistance band does the trick. There are basically two ways to do this exercise: either with a pause in the bottom position, or repeatedly without pause. The former will train explosive starting strength; the latter will improve reactive
Origin: Tip: The Athlete’s Push-Up
Tip: The Strength Athlete’s Mistake
 Don’t Attack the Low Back There’s one very common mistake I see in a lot of strength athletes’ programs – extra low-back work. They have absolutely zero awareness of just how much work their erectors are already doing. If you’re squatting, deadlifting, and doing standing overhead presses, then your low back is getting a metric butt-ton of work; not even indirect work, but very direct work. The erectors recover more slowly than any other muscle group, yet guys will do all of the above and then decide to throw in a bunch of barbell rows, T-bar rows, hypers, and a whole slew of other movements where the erectors have to contribute mightily. I can’t tell you how many strength athletes had their squat and deadlift climb up once I removed all of the extra spinal-loading movements. The fact is, fatigue will mask fitness. The best thing you can do is choose exercises where you give the low back a break from loading while working the musculature around it so that it has a stronger support structure. That’s where the chest-supported row comes in. There are countless variations of this machine, but virtually any of them can be a strength athlete’s best friend. It allows you to really smash the entire upper back while giving you a break from more axial loading. Many times this is exactly what you need to get past a plateau. I like the seated machines rather than the ones where you’re lying at a 45-degree angle because the natural tendency on those is to arch very hard once the loading gets heavy, which defeats the whole purpose of choosing the chest-supported version. If you don’t have access to the seated machine, rig up your own with an incline bench and a low cable. The best bar to use in this situation is one with a curve in it so you aren’t banging it into the bench and can get your elbows behind you far enough to get a strong contraction in the upper back. Loading on chest-supported rows is secondary to achieving a strong mind-muscle connection. If you want to really get a smoke show going, do them after your deadlifts. You should feel an immensely strong contraction in the upper back due to the maximal loading and increased neural output that came from the deadlift. Don’t rip the weight on the initiation phase. Pull with a “roll on” rep fashion where you initiate with the upper back in a very deliberate manner and then pull aggressively into the strong peak contraction. Hold that puppy for a second before lowering. Two to three sets of 10-12 reps will do the
Origin: Tip: The Strength Athlete’s Mistake
