 But after this solid foundation has been built, the opportunities for growth and progress are mental, not physical. Sure, you’ll always benefit from getting refreshers on a proper form, nutrition, and programming. But the real source of making gains, changing your body, and evolving your fitness lies in your ability to prioritize, motivate, execute, and repeat. And repeat. And repeat! Those functions are psychological in nature. Mental Skills 101 Psychological or mental skills are intentional thinking strategies that enhance performance, increase enjoyment, and promote persistence in pursuit of goals. Athletes commonly use mental skills for sport performance, and fitness professionals and enthusiasts can use them just as easily and effectively. There are a variety of mental skills, but three of the most widely used and studied are: Imagery/visualization Arousal/activation regulation Self-talk Let’s go over each one with a suggestion or two on how to implement them into your current training habits: 1 – Imagery/Visualization Also known as “mental rehearsal,” imagery is a skill that researchers have studied extensively in sport psych settings, and which has repeatedly been shown to enhance performance and make sports and exercise more enjoyable (Weinberg, 1981 and 2008). When you mentally rehearse, you create or recreate an experience in your mind. This could be an optimal performance from a real memory, or an ideal performance you’ve created with your imagination. Using sounds, sights, sensations, and even smells, you draw on your senses to experience success and to practice execution of a skill in your mind. You can use imagery before a workout or just before a specific lift or movement. If you compete, you can mentally rehearse on rest days, during warm-ups on practice days, and pre-performance during competition days. How to Do It Working on one of “the big 3” lifts? Or your pull-up? Visualize yourself executing it perfectly just before you practice. Let’s take the deadlift as an example. See yourself approaching the bar… planting your feet… getting your air… getting your hands on the bar and pulling the slack out… driving your heels down… pushing off the floor… finishing with the hips… Bam! Visualizing your lift can build confidence, prime your thoughts and expectations for success, and increase the practice (or “reps”) you get with the exercise. 2 – Activation-Regulation All of us have an optimal level of energy that helps us perform our best. Think of a scale of 0-10. If zero is almost asleep, super relaxed, and chill, and 10 is about-to-explode, crazy amped and way-too-anxious, what number represents the ideal level of energy for strength training? Is this different than the ideal energy level for cardio? How about while you’re at work or reading and learning? The point is that there’s a specific point along this 0-10 scale at which you’d perform your best, and you can engage in anxiety-reduction and arousal-inducing techniques to slow yourself down (or pump yourself up) in order to do your best. When the pressure is too high and you’re overly activated (nervous, jittery, anxious, panicky) the risk for error is higher and enjoyment is lower. When there’s not enough pressure, you may feel flat, fatigued, or unmotivated, which can lead to underwhelming effort and performance. How to Do It The next time you’re competing, or even performing an exercise that you want to improve on, assess your energy/arousal level on a scale of 0-10. Then, ask yourself what the optimal energy level would be. If the number needs to be higher than it currently is, you can increase activation by increasing your rate of breathing, listening to music that’s energizing, or giving yourself a pep talk. If the number needs to go down, you can try progressive muscle relaxation (PMR), wearing a heart rate monitor and attempting, with your focus and breath, to slow your heart rate 5-10 beats per minute, or creating a relaxation response (Benson Thinking only in extremes (all-or-nothing) thinking. Arbitrary Inference:Generalizing one negative comment or experience to be representative of everything in your life. Mental Reading:Presuming you know what others are thinking. Catastrophizing:Thinking that the absolute worst thing that can happen, will happen. Emotional Reasoning:Presuming that feelings are facts. “Shoulds”:Focusing on how things “should” have gone down, as opposed to how they actually are. Any of these thought patterns sound familiar? Also known as cognitive distortions (Beck, 1963), these styles of thinking often lead to discouragement, frustration, anger, sadness, and a slew of other negative emotions. When you’re discouraged and thinking negatively, you’re less likely to take a risk, push yourself hard, or persist with a challenging goal. Recognizing your own tendencies to think negatively is the first step. Once you’ve identified some problematic thinking, consider the impact those thoughts
Origin: 3 Psych Skills for Strength Training
Author: ondriving
Tip: Nail the Walking Lunge
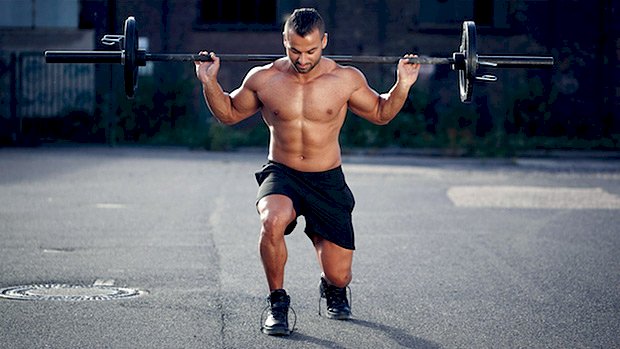 Finished with your squats? Good. Now do some lunges… and use a barbell. Why? Lunges add total quad demolition and single-leg work. Grabbing a couple dumbbells will work, but barbell lunges avoid grip and posture fatigue while allowing greater loading. You don’t have to have an upright torso for these despite what many personal trainers still say. Instead, use a torso angle that best allows you to keep a neutral spine and engaged core while maximizing range of motion and avoiding knee discomfort. Too often, staying upright can only be done at the expense of an aggressive lumbar arch. Lunges can be done with a vertical shin for more glute emphasis or with a forward knee for more quad focus, though all forms of lunges hammer quads. Emphasize the quad-dominant version by allowing your knee to travel as far past the toe as your ankle mobility will allow and your knee will tolerate (free of discomfort). Maintain firm heel contact with the ground on each stride. Pissing off your knees will shut down your quad training, so use the form combining the best quad emphasis with knee happiness. Stop touching your back knee to the ground. The extra little range of motion isn’t worth the impact on your kneecap. Alternate forward strides across a room or lunge in place if you don’t have the space to lunge across a floor. Do 3-4 sets to failure at about 10-15 reps per leg. Take each stride forward instead of crossing your feet over as if walking a tightrope. This only makes balance harder with no training benefit. Don’t have the space to do these at your gym? Swap them for Bulgarian split
Origin: Tip: Nail the Walking Lunge
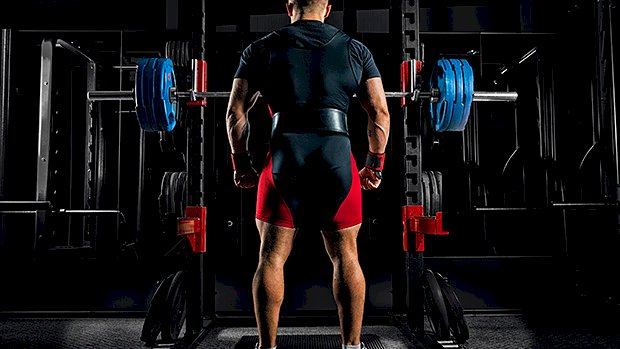
Build a Monster Squat
 No movement on earth builds more muscle and improves athletic performance better than the squat. But there’s something else that makes the squat king. When you push the human limits of the squat, you enter a realm that only a select few will ever know. It’s a realm where the lift may actually kill you. I remember my first 900 pound single-ply equipped squat. It was the first lift where I thought I could possibly die. That moment was a turning point for me as an athlete. I could have racked the weight and not risked my life. However, I embraced that feeling of life and death and crushed the lift. I was never the same. What are the best ways to build a life-changing squat? Other than simply squatting more often, the best way to strengthen the squat is to pinpoint your weak links and attack them. Pinpointing Your Weak Links There are three major joints required for squatting: the intervertebral joints of the back (lumping all of these joints into one), hips, and knees. So think about the muscles surrounding these joints. Collectively, they’re the spinal extensors, knee extensors, and hip extensors. So the question becomes which group do you need to target and how? We’ll go over a few simple ways of determining the strengths and weaknesses of each, and I’ll give you a few exercises for strengthening them. Once you know your weak links, you can work on the movements that’ll improve them. How? With strategic hypertrophy. Gain muscle size in those areas. Yes, hypertrophy of your weak links can help you build your squat. You can increase the size of your muscles with solid programming and hard work, and you can get more efficient moving heavy weight while squatting. Back – How To Tell If It’s Your Weak Link You’ll never see a great squatter with a weak back. You can get away with weak thoracic spinal extensors in the deadlift, but that simply won’t work in the back squat. If the back flexes, the movement is dead. A bit of thoracic spine flexion has been shown to help the deadlift by lessening the demands on the back. So the easiest way to determine if your back is the weak link is by comparing your deadlift to your squat. If you can deadlift 10% more than your squat, your back probably limits your squat. In a perfect world, the two should be about the same, but I’ll give you 10% to account for leverage advantages that might give you a slight edge in the deadlift (like having long arms). Otherwise, when you look at the mechanical advantages and disadvantages of each movement, they’re pretty equal. For example, the deadlift is a shorter range of motion, and a deadlift can be locked out even after a great deal of spinal flexion (back rounding). But with the squat, an athlete has momentum to drive through the typical sticking point, which occurs a few inches above the typical starting position of a deadlift. Plus the knees are free to move in the squat, allowing the body to call on the knee extensors or hip extensors depending on which is stronger. The deadlift doesn’t have that luxury. Here’s what to do: Front Squat Because the bar is in front of your body, the demands on the spinal extensors are the highest for this squat variation than any other (high bar or low bar). Therefore, the front squat builds a massive back while strengthening the quads. Front Squat Carry With carries, you take the quads out of the equation and you focus on strengthening the back extensors. Good Morning When you incline the torso, you increase the horizontal distance (perpendicular to gravity) between the bar and any intervertebral joint in the spine. You put a lot of stress on the back extensors, causing them to get stronger and bigger. A lot of these movements will double to strengthen other joints. For example, good mornings are great for hip extension… especially as it relates to squatting. The quickest way to stabilize the torso is by learning to brace. You would be surprised at the number of lifters that don’t understand how to brace. Don’t be one of them. How to keep tightness around the spine: Use the Valsalva maneuver. You just breathe as much air as possible into the belly, pressing out against your belt in the front, sides, and even in the back while keeping the mouth shut and not letting any air escape. This technique causes massive amounts of tension around the lumbar spine. Any great strength athlete will tell you that a stable spine is a stronger spine. Get your hands as close as mobility will allow. This will create maximal stiffness in the upper back around the thoracic spine, which is where most of us fail during a squat. Tuck your elbows under the bar. Too many people let their elbows flare out, which also allows the scapula to flare out. When the scapula flares, the back – especially in the thoracic spine area – starts to flex or round. Quads – How To Tell If They’re Your Weak Link If you squat like a stripper (butt flying up out of the hole), there’s a good chance you have weak quads. The
Origin: Build a Monster Squat
Tip: One. Heavy. Rep.
 Warming Up for a Big One Young athletes often ask me about the best way to warm-up for a 1RM test on the bench press and squat. I’ll answer that, but let me first address coaches who test the 1RM with their athletes. I’m not a big fan of this practice in a group setting. That’s just asking for an injury and bad form. Put 60 young, highly competitive men in room to compare strength and it can be a recipe for disaster. I much prefer testing for a 3-5RM. Attempt the biggest weight you can get for 3-5 reps. And use the number of reps to estimate your 1RM. This is much safer and just as accurate. Here are the percentages I use: 5 reps = 87% 4 reps = 90% 3 reps = 94% If you get 315 pounds for 5 reps you estimate your 1RM as such: 1RM = 315 x 100 / 87 1RM = 315 x 1.149 1RM = 362 pounds But I digress… Warming Up for a 1RM The progression essentially has three phases. Note that you need to have a pretty good idea of what your 1RM will be, within 10 pounds if possible. If you’ve done heavy singles it should be fairly easy to evaluate where it’ll be. If you haven’t, you can use your sets of 3-5 reps. The percentages above will give you an idea of where your 1RM will be. Normally you’ll have two or three attempts to hit your max lift during the testing. The first two phases of the preparation will take you to that first attempt. Important: Your first attempt should always be a sure thing. There’s nothing worse than failing at your first lift. In a powerlifting competition you have to use that same weight (or go up). In sports testing you can still go down. But missing the lift will kill your drive and confidence. You want a solid lift to start. We normally shoot for 94-95% of your estimated maximum for your first attempt. Although, if you have no experience with heavy singles you might want to use 90% of your estimated max for your first attempt. Here’s the first phase of the lift warm-up: (The first two sections are adapted from Charles Poliquin’s progression.) Set 1:Empty bar x 10 reps Set 2:4 reps using estimated 40%, rest 10 seconds Set 3:4 reps using estimated 40%, rest 30 seconds Set 4:3 reps using estimated 60%, rest 30 seconds That was the low-stress phase. On those 5 reps, your focus should be on exaggerating tightness and acceleration. Focus on patterning perfect technique. Do NOT do these easier sets nonchalantly; respect the bar and use these sets to get into the perfect groove. Then continue with… Set 5:2 reps using estimated 75%, rest 60 seconds Set 6:1 rep using estimated 80%, rest 120 seconds Set 7:1 rep using estimated 85%, rest 120 seconds Set 8:1 rep using estimated 90%, rest 180 seconds The goal is to get the feeling of heavier weights and amp up the nervous system, but also estimate your performance capacity at that moment. For instance, if 90% felt like a ton, you might need to be conservative with your attempts. If it felt like nothing, you might be able to adjust your starting attempt to 98% and then go for 103% or even 105%. Then move on to… Set 9:Un-rack 105-110% of your maximum, walk-it out (if it’s a squat) and hold for 6 seconds. Then rest 180 seconds (to potentiate the nervous system and give you a psychological boost). Set 10 (opening attempt):1 rep using estimated 95%, rest 240 seconds Set 11* (second attempt):1 rep using estimated 100%, rest 240 seconds Set 12* (third attempt, if you have one):1 rep using estimated 105% * Note that sets 11 and 12 can be adjusted depending on
Origin: Tip: One. Heavy. Rep.
10 Game-Changer Biceps Exercises
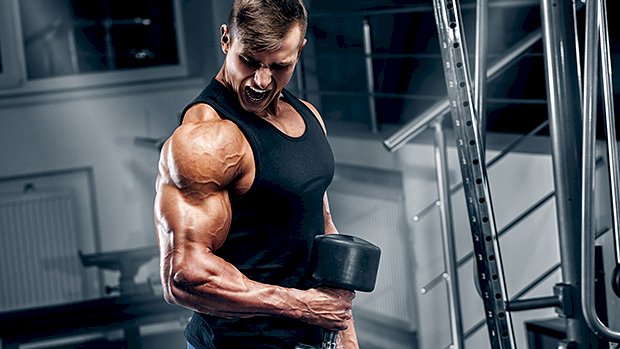 The best way to encourage your muscles to get bigger and stronger is through application of kaizen, which is Japanese for “continuous improvement.” You apply this principle by trying to increase the weight or number of reps at every opportunity, no matter how small the increase might be. While this principle definitely works, your progress will likely stall at a point. To bust through the plateau, you’ll need to change the stimulus in some way. That usually means switching the exercise, the angle, the resistance profile, or the technique. With that in mind, here are ten plateau–busting biceps exercises for when the basics stop working. 1 – Kneeling Landmine Reverse Curl Don’t knock this setup until you’ve tried it. It can be a useful way to train your biceps in their weakest position, along with being a real plateau buster. From a tall-kneeling position, grip the bar from a point directly in front of your junk, down the midline of your body. Keep your elbow tucked and wrist neutral as you curl. Your fist should travel slightly outside the line of your shoulder, allowing you to feel an intense biceps and forearm contraction at the top. Try to crush your forearm against your biceps. If a full length Olympic bar is too heavy, start with a 5-foot Olympic bar or shorter EZ-curl bar. The palms-down (pronated) grip emphasizes the brachialis and coracobrachialis portion of the upper arm. The fat grip of the bar benefits the movement too, requiring your forearms to do a lot more work. 2 – Hammer Curl 6/6/12s You’ll be doing a mechanical drop-set, transitioning from a seated hammer curl to a standing hammer curl, and then finishing with a higher-rep pump. There’s not much to dislike about this one. A1. Seated Hammer Curl, 6-8 reps (no rest) A2. Standing Hammer Curl, 6-8 reps (same weight, no rest) A3. Band Hammer Curl, 12-20 reps These also work well with an underhand grip. 3 – Rack Landmine Reverse Curl This one’s like the kneeling landmine reverse curl, but you set yourself up in a rack using the pins. I first remember seeing this being performed by John Meadows and it’s since become a personal favorite. When you compare it to the landmine setup described earlier, this version has a slightly different feel to it, though the benefits are the same. Try both and play around with angles and body position until you find the version that aligns your shoulders, elbows, and wrists the best. And yes, this does technically count as using the squat rack to curl, albeit you’re actually outside of it so you get a pass! 4 – One-Arm Supported Hercules Curl A Hercules curl typically has you set up between cables set to a high position and performing a curl that somewhat resembles a front double biceps pose. It’s a good one for training the long-head of the biceps in their shortened position. Enter the one-arm supported version where we use a bench for additional stability and support for the elbow and shoulder. The angle of the cable is key. The cable load is greatest when the angle of the cable is roughly 90 degrees to the forearm (due to leverage factors), so play with the cable height and bench angle to help you get the best feel. 5 – Back–Facing Preacher Hammer Curl Sit backwards on the preacher bench and keep your upper arms fixed against the pad. This eliminates cheating and keeps your humerus directly perpendicular to the floor, allowing you to really isolate the tension. You can also do this movement by sitting backwards in a lat pulldown machine, where you can adjust the height of the knee pads to fit the height of your upper arms. The surprising thing is how comfortable these two setups are! 6 – Dumbbell Curl Triple-Threat Triple-threat protocols add volume to your workouts, increase training variety, and give you insane pumps. Here’s one that Christian Thibaudeau has shared before. Each position has a purpose and applies load to the biceps at a different point. This is typically done with dumbbells, but works great with an EZ-bar too. Try 5–7 reps in each position: A1. Leaning Back Biceps Curl:The point of maximal loading (PML) is in the bottom portion of the curl. Same weight, no rest. A2. Standing Upright Biceps Curl:The PML is around the middle of the curl. Same weight, no rest. A3. Leaning Forward Biceps curl:The PML is closer to the top of the curl. Put them all together and you’ve got one killer biceps movement. 7 – Kettlebell Pistol Hammer Curl While some common biceps exercises fall short in maintaining tension throughout the movement, kettlebell curls are an exception. They also help to emphasize an elongated eccentric contraction, which causes lots of micro–trauma that’s essential for muscle growth. As a result of the high tension, kettlebells also produce an occlusion–type effect, whereupon the restricted blood flow acts as another kind of hypertrophy stimulus. This move specifically targets the brachialis and brachioradialis in the top portion of the movement.
Origin: 10 Game-Changer Biceps Exercises
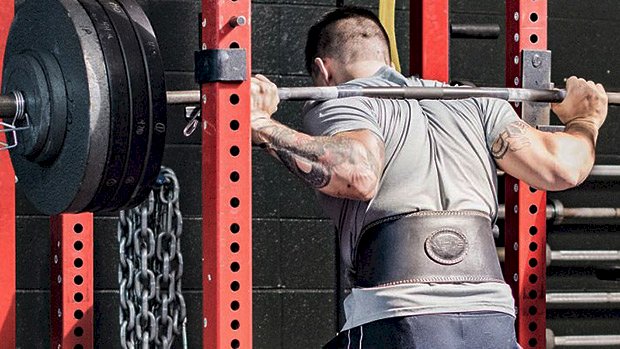
Tip: The High-Bar Squat for Big Quads
 High-bar squats are your big-ticket move for leg size, but you have to get them right to really emphasize the quads. The Setup Place a barbell on your upper traps while squeezing your upper back muscles together to form a shelf. If you aren’t used to a bar on your upper traps it can feel uncomfortable at first. Get used to it. Just make sure the bar isn’t sitting on the bony ridges of your spine or your neck. Find your best foot position, allowing maximum hip mobility at the bottom of the squat and preventing rounding of your spine or knee discomfort. Start with heels around hip width and toes angled outward. Then adjust and use what feels best. We’re often taught to use a narrow stance for better quad recruitment. This may produce more quad tension but isn’t essential. If you can’t set up narrow you’ll still get excellent quad recruitment with good range of motion, loading, and reps. Form a strong arch by squeezing the ball of your foot toward your heel. Externally rotate your hips to get your knees vertically stacked with your toes. The stress and tension of the load should be directed through stacked bones, joints, and muscles. Protect your lower back by flexing the abs and locking your sternum down into your pelvis. Though the high-bar position keeps your torso more upright than the mechanics of low-bar squatting, this doesn’t mean your torso must be perpendicular to the ground. Too often, lifters create a vertical position by aggressively arching their lower backs. This can lead to potential injury. The Movement Maintain a neutral lumbar spine (natural arch) to protect your lower back. With abs locked down, elevate your chest and extend at the thoracic spine to maintain a slight but not excessive upright posture. If you’re tall with long femurs, no amount of exaggerated arch will allow you to sit vertically in a squat. Exaggerating a vertical torso also pushes the knees forward to maintain center of gravity – producing even more stress in the knee and possibly causing patella-femoral pain. This usually restricts the ability to squat deeper, which can lead to overloading a shorter range of motion squat and further aggravating joint stress. Most lifters subsequently abandon squats and knee-wrap their leg press because “they hurt my knees.” High-bar squats are more upright and quad dominant than low-bar squats. More emphasis on quads, and therefore knees, doesn’t mean your knees can’t handle the stress. Our joints aren’t fragile structures ready to explode if loaded. Creating strong muscles around your knees by using correct form will encase the knee with muscle to protect and stabilize it, while applying controlled stress to strengthen your connective tissue and bones over time. Just don’t be careless. Loading through the ball of the foot can cause knee pain. This may happen when your knees dive too far forward past your toes at the bottom of the squat. Your knees can and should go past your toes on a good squat. Often lifters let their heels rise at the bottom of a squat as the focus is in the front of the foot. Maintain your weight evenly through the entire foot and push firmly through your heel as you squat. If you can’t squat deeply without your heels rising, this means you have poor ankle mobility. So restrict your depth while working to improve your ankle dorsiflexion. Healthy, mobile ankles are crucial for good squatting. Sets and Reps Warm up with an empty bar or bodyweight set to mobilize hips, knees, and ankles and to sense any major joint discomfort early. Do 2-3 warm-up sets of 10-12 reps before moving up to working weight. Then, use 3-4 working sets of 8-12 reps. Adjust the weight so that you get within two reps of failure to optimize muscle growth. This will produce enough mechanical tension and metabolic stress to trigger a growth response. Occasionally jumping to 15-20 reps to near failure is an unpleasant yet effective way to break plateaus. High-bar squats are tough. Even sets of 8-12 will leave you winded while taxing your central nervous system. The goal is to do enough training volume to grow. Focus on developing the stamina to do more reps, sets, and weight. Hitting absolute failure is fine for curls and cable rows, but it increases the chance of getting hurt on heavy compounds and accumulates fatigue more rapidly than training effect. Excess fatigue cuts into training volume of subsequent sets and later exercises. As you progress through weeks of training, apply progressive overload with added weight, reps, and carefully timed sets. Rest as long as needed to recover to start the next set with excellent form for the 8-12 reps. Taking only 60 seconds of rest means you aren’t lifting heavy enough or giving yourself enough time to recover. Working quickly doesn’t burn more body fat. Instead it cuts into training volume and overall results. Taking 2-3 minutes of rest between your working sets should be
Origin: Tip: The High-Bar Squat for Big Quads
Protein Powder Crimes and Misdemeanors
 Let me throw this hypothetical at you: How would you know if the protein powder you’re using is any good? It’s not like poor quality stuff would make you feel any worse, and if you didn’t add any muscle during the time you were using it, you’d likely blame it on your diet, your training program, or even your mom and pop for passing on some rotten genes. Your protein powder is probably the last thing you’d blame, but unfortunately, that’s exactly what some scurrilous protein manufacturers are counting on. Your Honor, Let Me Present My Case I’ve been involved at some level in the design, manufacture, or marketing of various high-quality protein powders for almost 30 years. While making good protein powders was a moral imperative, it was also a selfish endeavor because I wanted to personally use protein powder that works as advertised. I’m a lifter and I want to be healthier, so there’s no way in hell I’d want to contribute my efforts or expertise to something that didn’t meet my needs. But I’ve seen some things, ugly things, along the way. Below are a few of them and I’ve broken these various tactics down into two categories: “misdemeanors” and downright “crimes.” The misdemeanors are things that weren’t exactly dishonest, but end up costing you extra money for no reason, while the crimes I describe are exactly that – crimes – done with nothing but profit in mind and no regard for the consumer. Hopefully, this info will help protect you from making poor protein powder purchases in the future. Fair warning, though: At the end of the article, I’m going to act in a self-serving manner and tell you that the protein powder you should use is the one made by Biotest, the company I work for, but I’ll do it in good conscience because I know it’s a terrific, honest product. Misdemeanor – Ready-to-Drink (RTD) Protein Products The idea of grabbing a cold can of a pre-prepared protein drink out of the gym cooler as you head out the door is hugely appealing, but these drinks pose a couple of problems. First of all is the high price, but you’re not really paying for any exotic, muscle-building proteins contained in the formulation. Instead, you’re paying for water. Let me explain. The main ingredient in these products, by necessity, is water. Water weighs a lot. Water costs a lot to ship. What you’re paying for is directly related to what UPS or the USPS or Fed-Ex charges for shipping heavy items. Gasoline costs money. Jet fuel costs money. The meth long-distance truckers use to stay awake costs money. The herniated discs the workers suffer from having to hoist the heavy boxes and pallets on and off trucks costs money. To make up for those added expenses, manufacturers are forced to use lower-quality proteins. Additionally, the FDA requires that RTDs be pasteurized, so it’d be of little use to include expensive proteins in the first place because the heat from pasteurization would destroy a lot of the delicate peptides, glycomacro- and otherwise, that make certain proteins highly desirable. Don’t get me wrong, you’re still getting protein from these drinks, but as far as nitrogen-retention and all that other good, muscle-building stuff, it’s not much better than the protein in your nana’s SlimFast. Crime – Using Chinese Proteins China has long been a place where you can buy really cheap protein powder. They pay their workers really poorly and they don’t have to conform to any of those pesky regulations that plague American companies, so manufacturers can charge low prices and still make big profits. The trouble is, the lack of regulations allows them to cut a lot of corners. A few years ago, Consumer Reports did a study on 15 popular whey protein powders – several of which originated in China – and found that regular use of these products could expose their consumers to toxic levels of heavy metals including arsenic, cadmium, and lead. Not all of that contamination was intentional, though, as at least one-fifth of all farmland in China is contaminated with these aforementioned heavy metals and the cows can’t help but turn into walking chemical waste dumps. What appears to be intentional, though, is the other contaminants routinely found in Chinese protein powders, among them melamine, a chemical compound used in the production of glues, laminates, adhesives, and flame-retardants. It does not grow muscle. While this problem was supposedly taken care of after a huge, stateside ruckus, no one’s recently bothered to see if the use of melamine has resumed. It’s a mess. Then there’s the specter of other contaminants. Various non-protein “health” products from China have also been found to contain heavy metals, pharmaceutical drugs, and even DNA from endangered species like snow leopards. I can’t even venture a guess as the reason for that last one. Of course, with the advent of the trade war and the imposition of a 25% tariff on Chinese whey proteins, American manufacturers might soon be seeking alternative sources to
Origin: Protein Powder Crimes and Misdemeanors
Tip: Nail the Back Lever. Here’s How
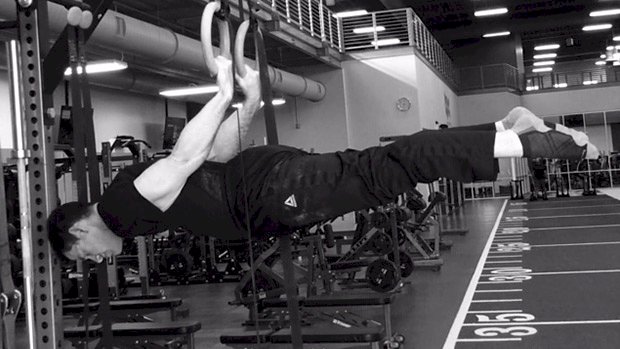 If you’re into calisthenics, at some point you’ll want to introduce yourself to levers. The back lever is one of the easier variations to start with. It’s not only a cool trick, but also a tremendous exercise to develop your isometric core strength. Learning how to isometrically brace your core and have all your muscles work together to achieve full-body tension will transfer to all of your main lifts. Whether you’re wanting to use this as a supplement to your big lifts, or you just want a fun trick to add to your arsenal of exercises, use these steps to nail the back lever. Step 1: Skin the Cat The back lever takes a considerable amount of shoulder strength and mobility. Before you start thinking about doing it, you’ll want to be able to skin the cat. This movement gets you used to going upside down, teaches you how to use your core, and preps your shoulders for the more advanced static holds. When you first try it, make sure to set up the rings so that your legs can touch the ground when you go through them. This will allow you to take pressure off your shoulders or stop the movement if needed. Step 2: Get Comfortable Hanging Upside Down Getting used to all the blood rushing to your head is another prerequisite before going for your holds. Holding yourself upside down with your legs straight and core braced will help you understand the initial positioning of the back lever and will build up your confidence. Step 3: Tucked Back Lever When it comes to levers, the longer you make your body, the harder the movement will become. Tucking your legs in will shorten your lever and give you more of a mechanical advantage. Make sure you can hold your tucked lever position at a dead stop for 3 to 5 seconds before moving to the next stage. Step 4: Bent-Knee Back Lever This movement is very similar to the tucked back lever, except it involves a little more extension at the hips, which increases the level of difficulty. Again, be able to hold your this position at a dead stop for 3 to 5 seconds before attempting to extend the knees. Step 5: Straddle Back Lever The next step is to move to a straddle stance. This gets you used to extending the hips and knees, and will get you stronger to progressively hold more of your bodyweight in a lengthened position. The beauty of the straddle-stance back lever is that you can make it more or less difficult by moving your legs further apart or closer together. Make sure you can hold your straddle position for 3 to 5 seconds before moving to the full version. Phone a Friend When you’re first learning this movement it will be difficult to tell when you’re parallel to the ground. Have a friend nearby to let you know or just video yourself. A friend can also help spot you, making the exercise considerably safer. Hand Positioning: Palms Up or Palms Down? Now, if you’re a gymnastics purist, you might say that a true back lever involves the palms facing the ground (supinated) when in the full lever. Although this is technically correct, it puts considerably more stress on the elbow and you can risk a biceps rupture. If you don’t have any formal gymnastics training, you’re going to want your palms facing the ceiling (pronated) to save yourself from an unnecessary
Origin: Tip: Nail the Back Lever. Here’s How
Tip: Curcumin Makes Fat Cells Kill Themselves
 The list of stuff curcumin does keeps growing. It started off as an effective pain reliever and anti-inflammatory, but then we found out it also fights cancer, blocks estrogen, boosts testosterone, improves heart health, makes you stronger, dissolves arterial plaques, stops your knees from aching, reduces the risk of diabetes, and even helps prevent mosquito-born malaria. And now there’s new research showing that curcumin causes fat cells to undergo apoptosis, which is the term for cellular suicide. When apoptosis begins, the surface of the cell starts to bubble and churn, almost like it’s boiling. Then, its nucleus starts to fragment. Eventually, the cell tears asunder, spilling its disassociated guts into the interstitial sea of fluid. A cellular clean-up crew of phagocytes, one accustomed to wet work, arrives to dispose of the corpses and there’s no investigation because they know curcumin was to blame. This new curcumin research also shows that curcumin prevents pre-adipocytes – baby fat cells – from developing into full-blown adipocytes. These baby fat cells are urged to go into a different profession… or else. The Study, Short and Sweet The Taiwanese researchers who conducted this study already knew from a few recent studies that curcumin supplementation reduces a high-fat diet-induced increase in body fat, but they didn’t know the mechanism behind curcumin’s hate for plumpness. To figure it out, they exposed mouse pre-adipocytes to varying concentrations of curcumin for varying time frames. They also exposed pre-adipocytes to a low dosage of curcumin for an hour, followed by a 24-hour incubation period. They found that curcumin inhibited adipocyte differentiation. In other words, the supplement prevents fat cells from maturing and fulfilling their ultimate function, which is to store fat. The high doses of curcumin actually caused fat cells to commit suicide, while the lower doses prevented the maturation of the baby fat cells. They suspect it had to do with curcumin’s modulating effects on something known as the Wnt/beta-catenin signaling pathway, which helps determine the fate of cells. The authors, despite seemingly being tight-lipped PhD guys, seemed pretty jazzed, writing: “These findings suggest that curcumin supplementation could be an effective strategy for treating or preventing development of obesity by a curcumin-induced reduction in the number or pre-adopocytes and the fat mass of adipocytes.” What to Do With This Info When you think about it, curcumin’s effects on fat cells may have something to do with many of the other benefits listed in the opening paragraph of this article. Collectively, our fat cells are considered to be a major endocrine organ with a powerful impact on things like the regulation of appetite, insulin sensitivity, immunological responses, and vascular disease, so if curcumin causes fewer fat cells to form while causing others to expire, it makes sense that it would have so many beneficial side effects. As far as how much curcumin to take to experience any reduction in fat mass, it’s difficult to say. The scientists exposed the fat cells to a concentration of up to 50 micrograms of curcumin to make them commit hari-kari, and 30 micrograms to keep pre-adipocytes from forming into full-fledged adipocytes, but given that the body weights of us human is so diverse, it’s hard to extrapolate a suitable dosage. But, given that 30 micrograms is awfully small (a thousand micrograms equals 1 milligram), I feel confident in suggesting that the standard Biotest dosage of curcumin (two 500-milligram capsules a day) would bring the average person into therapeutic range. Even so, this and other studies make me suspect that curcumin might be more useful in preventing further fat gain than reducing it, but that’s just a guess. Regardless, I don’t think you can go wrong taking curcumin, especially when you consider all its other healthful
Origin: Tip: Curcumin Makes Fat Cells Kill Themselves
Tip: Big Triceps, No Elbow Pain
 Smashing your triceps with repeated reps of poorly aligned exercises can result in inflammation and elbow pain. Instead, choose exercises that put you in good alignment to build bigger triceps without the unnecessary wear and tear. Think of your elbows like the hinges on your car door. If you repeatedly try forcing movement in a direction the hinges aren’t operational in, well, you’ll end up needing new hinges. That’s what happens with some triceps movements. Golfer’s elbow should be renamed “meathead’s elbow” since it’s more common in lifters than you might think. Let’s fix that. The Triceps Solution “X” cables (or cross cables) are simply where you cross over two cables creating an “X” in the middle. Usually, you just hold the end of the cable. X cables are a good way to align the force through your elbows. Torque and valgus stress on the elbows are more easily managed. X cables can put you in a good alignment to target the long head of your triceps, creating a more elbow-friendly alternative to exercises like skull crushers. Going overhead, you can efficiently target the long head in its lengthened position, loading in the direction of its fibers. (Credit to Coach Kassem Hanson for this one.) For a slight variation, if you have the range to go further overhead, stepping back into the cables will change the feel of the exercise. There’s a bigger stretch, and the point of maximal load is close to full elbow flexion. That means lots of mechanical tension. Guillotine extensions are a good option for overall triceps development and arguably one of the best-aligned triceps exercises to limit elbow stress. You’ll notice how close the cables are to your elbows with these. They somewhat resemble a Tate press, but performed with cables. Just keep your chin up and watch your neck! Using an X cable setup for kickbacks will also target the long head. Here you can place yourself in good alignment to work the long head in a more shortened position, focusing on a good squeeze. Using two ropes can have a similar effect since the direction of force and alignment are close to the X cables setup. It’s also an alternative if you only have use of a single cable (although it does require two ropes). Overhead extensions and kickbacks with a dual-rope setup are all brilliant elbow-friendly options. For a real triceps smoker using either the X cable setup or dual-ropes, here’s a triple-threat exercise to try. Aim for 6-8 reps in each position: Position 1:Step back, stand upright. Here the emphasis is on training the triceps long head in mid to shortened position. Position 2:Kneeling, upright. Emphasis on mid-range. Position 3:Kneeling, leaning forward. Emphasis on mid to lengthened position. If you care about building bigger triceps while keeping your elbows intact, these X cable and dual-rope exercises should give you plenty of ideas to work
Origin: Tip: Big Triceps, No Elbow Pain
