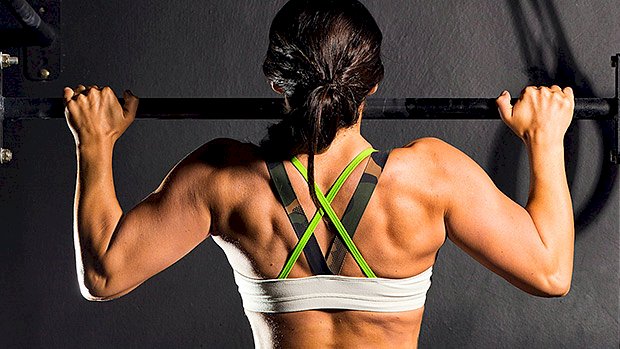
 I remember how frustrating getting my first pull-up was. There were times just spent looking up at the bar and wondering why I simply wasn’t moving. The best way I found to finally get my chin over the bar was a combination of similar but easier movements, combined with variations which took away a lot of my bodyweight. Let’s break each of those exercises down: Australian Pull-Ups This is a horizontal row which gets you used to pulling your bodyweight. With your feet on the floor you can easily adjust the assistance you give yourself. The more horizontal you are and the further away your feet are from your hands, the harder it is. The horizontal position should make it a bit easier for you to engage your lats. Try to keep your body straight and not bend at the hip as you pull. Negative Pull-Up This uses the full range of motion of the pull-up, but in reverse! It’s no secret that the eccentric (negative) part of any movement builds a lot of strength, and pull-ups are no different. Learning to control that entire range on the way down will carry over to when you’re going back up. If you jump up and immediately start to fall, build yourself up to a comfortable 10-second hold with your chin over the bar (the “top” of the rep) before you start doing the negative. Low-Bar Pull-Up Like the Australian pull-up, you can adjust how much of your bodyweight you remove by assisting yourself with the feet. Ideally you want to be on the tiptoes or the backs of your toes rather than the ball of your foot, encouraging you to use as little assistance as possible. This is where your technique starts to come into play and you need to focus on engaging your lats for the pull, not using the biceps which is a common beginner mistake. (See A Quick Fix For Better Lats for more info.) Think about pressing into the bar from your lats or “bending the bar.” Play around until you can feel your lats working. Banded Pull-Up These often get a bad rap because when the band is at full extension it will give you the most assistance. This means you get the most help at the bottom of the rep which reduces the need for you to learn how to initiate the pull with your lats. However, they’re great for volume. You just need to be disciplined. Be hard on yourself and only use a band which will allow your 5 reps to be doable, but not easy. Even if you start to only get 3 or 4 reps on your last set, it’s better to push yourself here than simply be bouncing up and down on a band – that will get you nowhere. Eventually you want to be doing these with a very thin band. Once you’re getting close, attempt a rep or two without a band. You might just surprise yourself. The program is simple and organizes the movements into two quick sessions that you can easily fit into your gym schedule: Session 1 Australian Pull-Up:3×10 Negative Pull-Up:5×3 Session 2 Low-Bar Pull-Up:5×5 Banded Pull-Up:5×5 Adjust the assistance of each exercise to reduce your bodyweight so that you can complete all the reps. Your aim over time isn’t necessarily to increase the reps or sets that you do, but instead to improve the movement itself and slowly adding in more of your own weight. For example, you’d aim to get more horizontal on the Australian pull-up, go slower on your negative, use less assistance from your feet on the low-bar pull-up, and use a thinner band on your banded pull-up. Consistency is key. Bodyweight training can be tedious, but the rewards are very satisfying. Pull-ups teach you how to properly engage your lats and give you a ton of shoulder stability for any overhead
Origin: Tip: How to Get Your Very First Pull-Up
Author: ondriving
Tip: A Weird Way to Row
 The problem with the one-legged Romanian deadlift (RDL) is that it hasn’t traditionally been trained as seriously as it deserves. It’s a tremendous movement that can offer great benefits. But we also need to perform accessory work for the one-legged RDL. Ask any powerlifter worth their salt and they’ll detail the exhaustive work they do to support their main lifts, and the one-legged RDL is no different. So how do we support the one-legged RDL? What can we do outside of the exercise itself to promote better performance, specifically single-leg stability? Enter the split-stance row. Once you try it, you’ll wonder why it isn’t already a staple of your training. The Split-Stance Row Set up in some variation of a split-stance. My preference is the corner stance shown in the videos below. Aim to have your knee over your mid-foot. Split-Stance Dumbbell/Kettlebell Row The goal is for 95% or more of your weight to be on the front leg so it doesn’t turn into a balancing act. Use just enough rear-foot contact to maintain a stable position. If you’re using a dumbbell or kettlebell, you’ll row it on the lateral side of your front leg. If you’re using a barbell, you’ll center it on your front shin. From there, you just row. Do the opposite leg (and arm if you’re using dumbbells or kettlebells) on the next set. Once you’ve got the hang of things, you can make it spicy simply by increasing the angle of your front knee. Split-Stand Barbell Row How to Program It Split-stance rows are an effective way to prepare yourself for split-squats, lunges, or, of course, the one-legged RDL, especially if you’re a bigger guy and your own body weight is challenging. Four to eight weeks of these will substantially increase your readiness for more unilateral lower-body work. Keep the reps in the moderate range, 6-10 per set. Once you’re performing single-leg exercises like a champ, you can keep doing split-stance rows as an accessory move to build truly formidable single-leg strength. Of course, if you’re already primed for one-leg work, start doing one-legged RDLs as your primary movement and do split-stance rows as an accessory
Origin: Tip: A Weird Way to Row
Tip: How to Lift with Angry Joints
 Lift hard for long enough and you’ll eventually have some joint pain. Whether it’s the knee, shoulder, lower back, or wrist, something will probably flare up. Now, you could pop some pain killers and grind through it until your flare-up becomes a real injury… or you could do the smart thing and manage your injury. If you’re ready to check your ego, use some of these strategies. Increase Your Volume and Decrease Weight Your muscles may be able to take heavy daily lifting, but that doesn’t mean your joints can. Dropping the heavy lifting and increasing your reps will not only give your joints a break, it’ll allow your nervous system to recover while you shift focus towards muscle growth. The amount of effort you put into your workouts doesn’t need to change just because you’re going lighter. Taking shorter rests and increasing your reps will create more metabolic stress which will lead to greater hypertrophy. Also, higher reps will get the heart pumping hard which provides extra blood flow and circulation to your cranky joints. Partial Reps Partial reps create more time under tension and emphasize the “pump” when lifting. Limiting your range of motion to the middle two-thirds of your lift and avoiding the lockout will relieve excess strain on your joints. As an example, here’s the neutral, close-grip incline press: Use Bands as Upper-Body Assistance This can prevent excessive stress at the end range of motion on your pull-ups and push-ups. They’re a great way to add both higher volume and partial reps while allowing your body to be in constant motion for your calisthenics exercises. Banded Partial Push-Up Banded Partial Pull-Up Even if you’re capable of repping out 50 push-ups or 20 pull-ups, bands push your volume even higher and keep a smooth muscular contraction throughout your sets. Deload Your Spine for Lower-Body Work If you feel like you’ve shrunk a couple inches after compressing your spine with heavy squats, it may be time to deload. You can still work the squat movement without all the spinal compression. One of the best ways is with the belt squat. The belt squat takes the spine out of the equation because a belt is placed around the hips and the weight is applied from the waist down. No belt squat machine? Rig together your own variation. One way to do it is to use a couple straps, a hook, some boxes, a weight belt, and a heavy kettlebell or two. Kettlebell Belt Squat Ideally, keep your butt pushed against a wall. This will provide extra stability and allow you to use your glutes and hamstrings to a greater
Origin: Tip: How to Lift with Angry Joints
30 Days of Shoulders: 21-30
 Editor’s Note: Brush up on the first twenty tips here: 30 Days of Shoulders: 1-10 30 Days of Shoulders: 11-20 Day 21 – Control Slow Before You Progress to Fast A common mistake lifters make when coming back from an injury is progressing too fast. Take the overhead press as an example. Just because your shoulder feels better doesn’t mean you should head to the gym and do barbell snatches paired with handstand walks over broken glass for AMRAP. Pump the brakes. Maybe try something like tempo presses first where you press a pair of dumbbells overhead with a neutral grip (which allows for more external rotation of the humerus and helps open up more space in acromion) and then lower under control for a 3-5 second count… or 10 seconds if you’re a masochistic a-hole. This may be home base for a period of time before you ramp things up to more ballistic/fast movements like the Landmine clean to split press, which I stole from Lee Boyce. Take a look. In short, take your time and control slow before you tackle fast. Day 22 – Remember, Simple Stuff Still Works We’re enamored by bright, shiny objects thinking that if something is new or novel then it must always be better. I disagree. Simple still works, and this is never more apparent than when the discussion of “best rotator cuff exercises” comes up. While current trends point to functional exercises that border on the absurd (which are fantastic for garnering likes on social media and for making me not have enough eye rolls to give) I prefer the more vanilla approach. The side-lying external rotation exercise is the KING with regards to EMG activation of the rotator cuff. Recent research suggests that when you “level up” the drill with a side plank you get even more trunk and infraspinatus activation. I use this often to sprinkle in more rotator cuff work in clients’ programs. More specifically, I’ll usually pair it with a squat or deadlift as a filler. Here’s an example: A1. Deadlift or Squat Variation:5 sets of 5 A2. Side Plank External Rotation:5 sets of 8 per side Day 23 – Do The Wall Press (and Shut Up About Winging) My biggest pet peeve in fitness – other than kipping pull-ups and detox teas – is when fit pros go out of their way to tell people how dysfunctional they are. Case in point: scapular winging. You’re more likely to get struck by lightning while being attacked by a pack of piranhas in a volcano than to have true scapular winging. True scapular winging is a neurological condition where the long thoracic nerve isn’t doing its job properly innervating the serratus anterior. As a result, there’s a lack of congruency between the shoulder blade, the ribcage, and the former peels or “wings” off the latter. Most of the time, what’s perceived as scapular winging can be attributed to lack of tension and poor positioning. The wall press will help you feel the requisite tension required to own the position. By pressing into the wall (and pushing away) you get more serratus activity. To go further down the myth of scapular winging rabbit hole, I’d suggest checking out some of Dr. Quinn Henoch’s stuff on the topic. Day 24 – Do REPs The REP (retraction, external rotation, press) exercise is one of my staples for overall shoulder health. It’s a versatile drill that can be used at any point in a program, but my preference is to use it as a filler of sorts. Key points to consider: Be sure abs and glutes are on (contracted) to prevent any excessive lumbar movement. Slow the eff down! Do it right. 8-10 reps per set should do it. Day 25 – Do The Hinge Band Press This exercise certainly won’t garner a bevy of “likes” and accolades, but it’s one I like a lot because of its practicality. It’s an ingenious way to “groove” overhead pressing mechanics – in terms of scapular movement – in a way that’s less aggressive and more palatable for many lifters. Use it as a filler or as an exercise on its own, but be sure to follow the cues given in the video. If you do it right, and do 10-15 reps, your shoulders will get nice and juicy. (Credit to Dean Somerset for the idea.) Day 26 – Unbalance Your Program to Balance It This likely won’t be a piece of info that wows anyone or wins me any coach of the year awards, but it’s a message that falls on deaf ears much of the time. A logical recommendation for most lifters is to use a 1:1 (push:pull) ratio when designing their own programs. This is fine advice and will likely serve most well in the grand scheme of things. But I’d argue one of the things that causes shoulder pain is programming that includes more pushing exercises compared to pulling. I could use a bunch of fancy-schmancy words here, but the gist of it is that the mirror muscles tend to be overactive/tight, and the muscles we can’t see (upper back) are weak. In this case it’s not uncommon for me to use more of a 2:1 or even 3:1 pull-push ratio to help even things out. This is what I mean when I say it sometimes behooves a
Origin: 30 Days of Shoulders: 21-30
Tip: Strong Legs, Ready-For-Anything Knees
 Sure, some version of the squat and the deadlift should be staples of every program, but they only make you move in the sagittal (forward and backward) plane of movement. They don’t require you to go from side to side. This is a huge missed opportunity for athletes and weekend warriors. No one wants a blown ACL. You want to be able to trust your knees if you need to change direction sideways playing basketball or making a cut on the football field. And you never know when you’ll slip on ice or find yourself having to catch your balance when you’re in an awkward position. Adding simple exercises like the lateral lunge or the goblet variation will help your knees and keep your legs more balanced. Lateral Lunge Stand with your knees and hips slightly bent, feet shoulder-width apart. Keeping your head and chest up, take a slow side-step to the right. Keep your toes pointed forward. Keep the left foot in place and shift your weight to the right leg. Flex the right knee and hip into a lateral lunge. Keep your upper body upright or slightly bent forward. Pause at the bottom. A straight line should form between your right foot, knee, and shoulder. Push your body back to the starting position. Tip: You might not be able to get all the way down like you would with a normal squat. Cool. Go as far down as you can. Once you get a little better at it, add some weight with a kettlebell or a dumbbell. Goblet Lateral Lunge Use the same starting position and movement as the lateral lunge. Keep the weight tucked under your chin like you would for a goblet
Origin: Tip: Strong Legs, Ready-For-Anything Knees
How to Evaluate Your Protein Powder
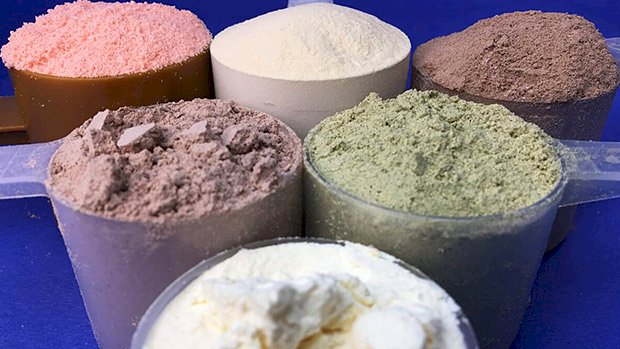 When it comes to evaluating the quality of a protein, it all comes down to bioavailability and amino acid profile. Bioavailability simply refers to how much of a particular protein people absorb. To figure this out, scientists give test subjects carefully measured amounts of protein to ingest. The scientists then play cards until the test subjects’ poop hits the Tupperware container, at which point they measure how much nitrogen is in it. They then use the amount of nitrogen detected to calculate how much protein was in the feces and compare it to how much was ingested. The final number is referred to as the BV, or biological value. Is the BV of a Protein Worth a Shit (Literally)? The trouble is, the calculation wasn’t very good from the get go because it neglects some basic human dietary mechanics. First of all, if the protein is “fast acting,” like whey, some of it can be converted to glucose, particularly if the person is a keto madman and is chronically low on carbs (and ipso facto, glycogen). Secondly, bacteria in the gut tend to filch some of the protein. While BV is kind of outdated, protein manufacturers still use it occasionally to play the “our protein is better than yours” game. The current accepted protein evaluation standard, used by the FDA, is the PDCAAS, or Protein Digestibility Corrected Amino Acid Score, which combines biological value with a protein’s amino acid profile. Some proteins have practically everything a human needs to sustain tissue growth. We call them “complete” proteins. They have a nearly perfect blend of essential amino acids (those we can’t make ourselves) and branched chain amino acids (BCAAs), which are particularly important to muscle growth. Other proteins are missing certain amino acids or have lousy amounts of BCAAs, so much so that their amino acid profile wouldn’t support the growth of a banana slug. Unfortunately, the PDCAAS isn’t the best way to gauge a protein’s quality, either. To calculate it, the scientists again measure and calculate excreted nitrogen, but the PDCAAS, like the BV, doesn’t take into account any protein that was eaten up by the bacteria in the gut. It also requires that test subjects have an empty stomach, which exposes the test to all kinds of inaccuracies. In real life, you might quaff a protein shake, but there’d probably still be a slab of lasagna down there to slow down the protein’s absorption. Equally likely is that there might be some Wheat Chex floating around your stomach like inflatable pool toys that might bind up some of that protein because of their high-fiber content. That leaves a relatively new scale, the Digestible Indispensable Amino Acid Score, or DIAAS. It measures the nitrogen content of the ileum, or small intestine, instead of the nitrogen in the feces. This allows researchers to get a more realistic evaluation of a protein’s bioavailability because the measurement occurs before all those bacteria were able to munch up a lot of the ingested protein. It also takes into account the digestibility of each amino acid instead of the overall protein. It’s currently the best scoring system in use. Got all that? If not, it doesn’t matter so much. What’s important is to just choose the best protein source based on your needs and our current best guesses as to which support muscle and tissue growth the best. So, How do the Various Proteins Rate? Plant-derived proteins are probably the fastest growing sector in the protein business. At first glance, it makes sense they’d be doing fairly well. Anything associated with plants is instinctively thought to be healthier, but the thinking is a bit two-dimensional in that these plant-protein fans aren’t actually eating plants, but the amino acids that are left over when the water, fiber, chlorophyll, polyphenols, vitamins, and minerals – just about everything else in the plant – is extracted. My Hanes cotton underwear are probably closer in composition to an actual plant in nature than a pile of plant-derived protein. But there remains another truth, this one particularly inconvenient: the amino acid profile of plants is not the same as what you’d find in human muscle. Sure, most of the amino acids are there, but usually not in the amounts you’d need to support optimal growth of muscle. That being said, there are a couple of plant proteins that come close to being complete: pea protein and soy protein. The PDCAAS shows pea protein at an impressive 0.893, while soy proteins rates from 0.95 to 1.00, depending on how they were processed. That means that pea protein is damn close to the highly desirable 1.0 score that most animal proteins come close to, while soy protein is neck-and-neck with them. That’s a little misleading, though. The PDCAAS must grade on a curve or something so animal-derived proteins don’t get swelled heads because they actually truncate the numbers. If they didn’t do that, whey protein isolate would score 1.2 on the scale and milk protein a tad higher,
Origin: How to Evaluate Your Protein Powder
Tip: Know Your Triggers
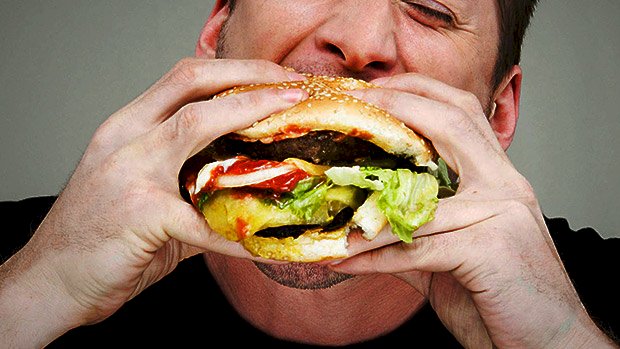 All of us have trigger foods. These are foods that send us spiraling right into the seventh circle of gluttony hell. Those triggers vary greatly from person to person. This is one area where I’d define foods as being “good” or “bad” based on your reaction to eating them. Contextually, a bad food is one that meets the seventh circle criteria when you’re trying to get lean. It’s up to you to be aware of what foods cause you to eat more even after you’ve had your fill. For me, it’s basically anything that doesn’t fall under the bro-diet umbrella. So basically anything that’s not eggs, oatmeal, rice, chicken, etc. I don’t just eat a slice of pizza; I eat four pizzas. I don’t just eat one doughnut; I clean out the bakery. Some people CAN just have two Oreos. They’re called sociopaths and they feel nothing, have no emotions, and lack empathy. It’s up to you to identify your trigger foods and eliminate them during the time that you’re trying to have a high degree of compliance. No, this isn’t something you have to do forever. But if you’re wanting to shed fat and you don’t want to screw it up, then just eliminate the foods that cause those problems. Beware the Scarcity Effect This is one obstacle to look out for. It’s when we end up wanting something because of the perceived lack of availability. The less access we have to something, the more we tend to crave it. This can be a lethal combination when it comes to trigger foods. The solution to replace those trigger foods with foods that are “close enough.” If you love pizza, try a thin crust or cauliflower option using toppings that are higher in protein and lower in calories: grilled chicken instead of sausage, extra veggies, half the cheese, etc. If you love cookies and brownies, try the low fat and/or low carb recipes for those foods. If it’s easier for you to just abstain all together, then do that. But figure out what you need to do to stop short-circuiting the fat loss process by giving in to your trigger
Origin: Tip: Know Your Triggers
Get Inside-Out Peeled
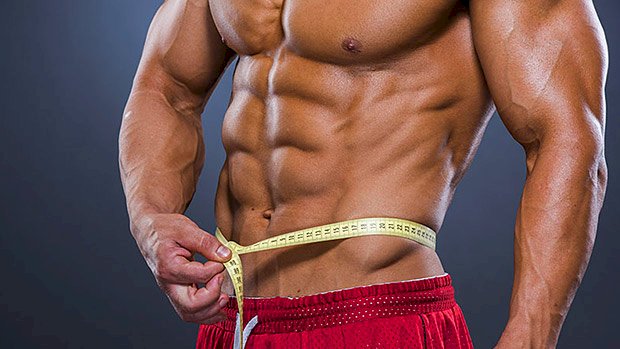 Every dude who stays in the lifting game long enough, regardless of whether he’s a powerlifter, strongman, or recreational body toner, should get inside-out peeled at least once… or at least give it his best shot. There are two reasons why: 1. Extreme leanness can set the stage for muscle growth. Ask any bodybuilder about the rebound effect of an intelligent “reverse diet” and the gains that follow those months of eating in a caloric deficit. When you get very lean, you’re going to be far more insulin sensitive, and very overworked. The reduction in cortisol and improvement in your nutrient partitioning should boost you to some new gains, as long as you don’t sabotage that process by eating way too much and getting lazy. 2. You find out if you have what it takes, and what you look like once you get there. If you’ve never spent months abstaining from foods you love, while putting in more work than usual, then you don’t really have an idea of what it takes to achieve remarkable leanness. As someone who’s done both powerlifting and bodybuilding, I can tell you the effort behind getting ready for a bodybuilding show is infinitely harder than a powerlifting meet. The Trade-Offs There are of course trade-offs that occur along the road traveled from pudgy to peeled. The internet is rife with diet ads, memes, and quotes about how you don’t have to give up the foods you love or your social life. That may be true for those who don’t take their leanness any further than what they can easily sustain. But if you want to get peeled – a state that’s not really meant to be easily sustained – you’ll indeed have to give up some of the things you love. Getting from “lean” to “ripped” becomes life-consuming, but the difference in lean and peeled is practically the difference in driving a Mustang GT and a Bugatti. It’s up to you to decide what it is you’re willing to sacrifice to achieve an exceptional level of leanness. It’s going to be different for everyone. Let’s look at what you’ll need to do – in increments – because you’re not going to be able to stick with a plan that’s designed to take you immediately from fat to ripped. Here are the general guidelines that can help get you there. Think of them as “you may have to…” suggestions. You might have to do more than what’s listed, or you may find that you can get the desired results with fewer restrictions. Step 1: Go From High Body Fat to Average Body Fat The Specifics: This is roughly 20% body fat (or more) down to 15% for men, and from 30% (or more) down to 25% for women. Let’s begin with the person who wants to get down into what would be an acceptable level of body fat. This tends to be something to the tune of 15% for men and 25% for women. This is an area where you’ll probably look pretty good, but it still won’t qualify as lean. And yes, some men can have a little ab definition at this point, but having abs doesn’t necessarily mean you’re lean. Guidelines Reduce intake of desserts, sugary drinks (soda, fruit juices), alcohol, and most overly processed foods. Include vegetables in at least one meal a day to increase satiation (1). Lift 3-5 times a week. Do cardio 3 times a week for 30 minutes per session to help expedite the process. Get protein intake up to about 1 gram per pound of bodyweight. If you make the above changes, then you probably don’t even need to count calories yet. Eating healthier foods and getting rid of most of the junk tends to be fairly self-regulating in terms of caloric control. Here’s an example of what to eat to simply get to this level without counting calories. Breakfast Whole Egg Omelet with Added Egg Whites Vegetable of Choice Oatmeal or Ezekiel Bread Lunch Chicken Jasmine Rice Salad with Olive Oil and Balsamic Vinegar Post-Workout Metabolic Drive® Protein Banana Rice Cakes Dinner Fatty Fish Like Salmon or Lean Cut of Red Meat White, Red, or Sweet Potato Before Bed Metabolic Drive® Protein with Fruit There are no macros or calories listed because the goal is to simply make better food choices. You’re not trying to contest diet on day one. If you were to fit in foods you enjoy here that are minimally processed and nutrient dense, you’d naturally find yourself coming down from the fuscular (fat-muscular) range, to the “hey you look like you stopped eating like an asshole” range. You’d be surprised how far you can get by simply making better choices. This phase could last from three to six months depending on where you’re starting from and how well you adhere to the guidelines. Step 2: Go From Average Body Fat to Lean The Specifics: This means getting down to around 10% for men and 18% for women. This is going to require you to take the next step in discipline and adhere to those habits for a decent period of time. Getting to this stage could take anywhere from two to three months depending on your degree of compliance. But it’s also an area that’s very sustainable once you’ve held it long enough to create a
Origin: Get Inside-Out Peeled
Tip: A New Way to Hammer the Triceps
 While the close-grip bench press is great, MRI research shows that it emphasizes your lateral and medial triceps heads, not your long head (1). However, things change when you follow Mark Rippetoe’s advice to combine a pullover with a traditional skull crusher. EZ-Bar Pullover Triceps Extension While it looks like you’re cheating with your lats, the long head of your triceps is a two-jointed muscle. It extends your elbow and extends your shoulder. Yes, your lats help, but they simply work with your triceps and allow you to use more weight for more reps. Benefits You hammer the long head of your triceps – the biggest head which makes the biggest difference in your overall triceps size. Less elbow stress than traditional triceps extensions. Tips Bring the weight back behind your head like you’re doing a pullover. Get a nice triceps stretch, but don’t overdo it. As you come up, simultaneously move your elbows up as you extend them. Don’t bring your upper arm all the way to vertical; this will take tension off your triceps at the top. Start slow to get the hang of this, then add some controlled speed. Remember, your triceps are fast-twitch dominant muscles and they love speed. As you get stronger, hook your feet under a sturdy object or have a training partner hold your knees
Origin: Tip: A New Way to Hammer the Triceps
3 Capsules for Perfect Sleep
 The Eggo Incident Want to gain weight and lose control of your appetite? Want to become forgetful, hypersensitive, unmotivated, cynical, and generally unpleasant to be around? Well, just lose sleep on a consistent basis. As a 24-year old, I remember feeling those feelings and watching myself expand. My circadian rhythm and appetite were so out of whack that I binged on a box of semi-frozen Eggo waffles between naps one afternoon. I didn’t own a toaster and didn’t want to take the time to put them in the microwave. With my first job straight out of college, I hadn’t figured out how to get adequate sleep. As a TV news producer, my alarm went off at 2AM. And ironically, in the evenings I was too stressed-out and anxious to fall asleep or stay asleep. If Z-12™ had been around back then, things would’ve been different. Yeah, this is a supplement article, but don’t freak out because it’s one you should consider using. And it’s not just for muscleheads. Your dad, mom, and next door neighbor could benefit from it. Bad Sleep = Fat Gain The fat you gain from losing sleep can be imperceptibly slow. It creeps up. And that’s the problem with it. Since you don’t see it immediately after one night of poor sleep, you likely won’t connect the dots after many poor nights of sleep. You might try dieting, skipping breakfast, and eating salads for lunch. And that’s fine. But when your sleep is subpar, you’re going to be swimming against the current. It’ll hurt your ability to comply with any diet. Don’t believe me? Then believe the European Journal of Clinical Nutrition, which published a meta analysis showing that after a poor night of sleep, people ate about 385 more calories the following day (1). This is likely caused by a disruption of leptin (the satiety hormone) and ghrelin (the hunger hormone), which ultimately leads to cravings. So if just one bad night can cause you to eat a few hundred extra calories the next day, you can imagine what weeks or months will do. And it’s worse for those with high-stress jobs. Researchers examined the eating and sleeping patterns of workers who had to deal with the public over the phone. They found that work stress was linked to unhealthy food choices at night. On the flip side, a good night of sleep had a “buffering effect” which led to better dietary choices (2) the next day. Sleep doesn’t just affect your appetite; it also affects the way your body stores fat. Researchers at the University of Chicago Research Center found that restricting the sleep of study participants caused their fat cells to become more insulin resistant (3). In short, sleep is an important regulator of energy metabolism. The Testosterone Thief Poor sleep is also tied to low testosterone, and those who don’t make enough are often depressed, tired, and overweight. So how badly does poor sleep affect testosterone? Well, in one study, after just a week of sleep restriction, healthy young men experienced a 10-15 percent decrease in testosterone (4). Researchers had them restrict their sleep to five hours per night. Sure, in the confines of an experiment, getting only five hours of sleep might seem severe. It is. But you have to wonder, what if their sleep was just restricted to six or even seven hours per night for several months? That would give them a little more sleep every night, but over a longer period of time. It’s not as severe as five hours, but it’s not an optimal amount either. Yet that’s the about how much sleep a lot of adults get. And they believe it’s normal. Would their testosterone be low as well? It’s possible. Perhaps “dad bod” is really just a low-T, sleep-deprived bod. The Sleep Strategy You Haven’t Tried You’ve already heard all the stuff about turning off the TV early, avoiding caffeine late in the day, and making your bedroom dark. If you haven’t read about these “innovative” sleep tips, just open a Reader’s Digest from 1999. The truth is, sometimes the obvious stuff doesn’t work. And to be completely honest, I want to punch anyone who tells me to stop watching Netflix at night. Especially since I can watch it and still get a full 8.5 hours of sleep. But maybe that’s because my main sleep strategy is taking Z-12™. It actually allows me to “turn off” the anxious part of my brain at night. It makes sleep so restful that I pop out of bed without an alarm. No grogginess in the morning. No racing thoughts in the middle of the night. Just rest. Feels Like Magic, But It’s Actually Just Science The body’s “chemical messengers” are neurotransmitters. When you’re working or working out, you want to produce neurotransmitters that stimulate or motivate. And when you’re winding down in the evening, you want to produce inhibitory ones. As their name implies, they inhibit excitatory neurotransmitters and help you relax. But if you’re still amped up after a stressful day of work (or arguing on the internet) your brain will continue to produce a flood of the stimulatory neurotransmitters. This
Origin: 3 Capsules for Perfect Sleep
